
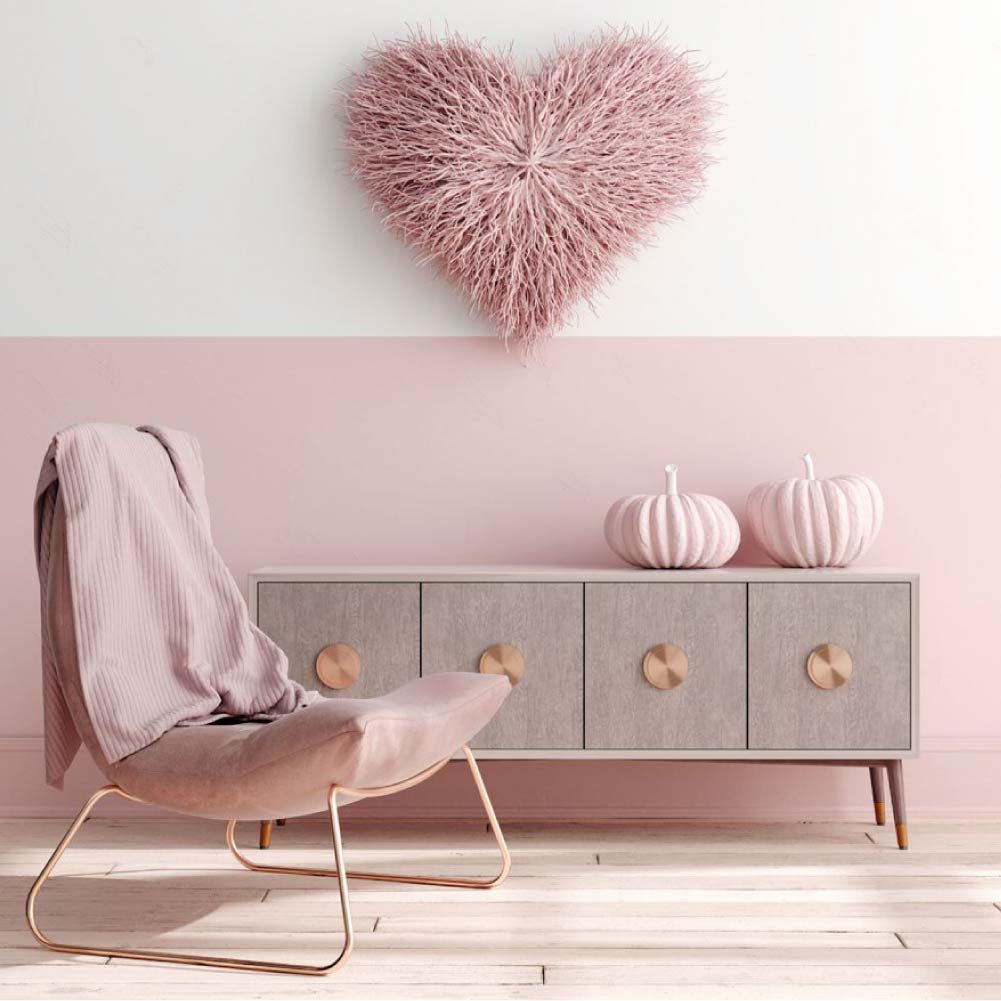
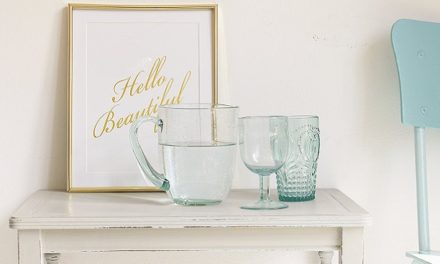
A Case for Colour Blocking
Reimagine your living room with a splash of paint and some creative colour blocking. It’s an easy way to add depth and interest with contrasting colours.
YOU’LL NEED:
- Pencil, spirit level & masking tape
- Sand paper: Fine grit
- Drop sheet and dust cloth
- Painter’s tray, roller and brush
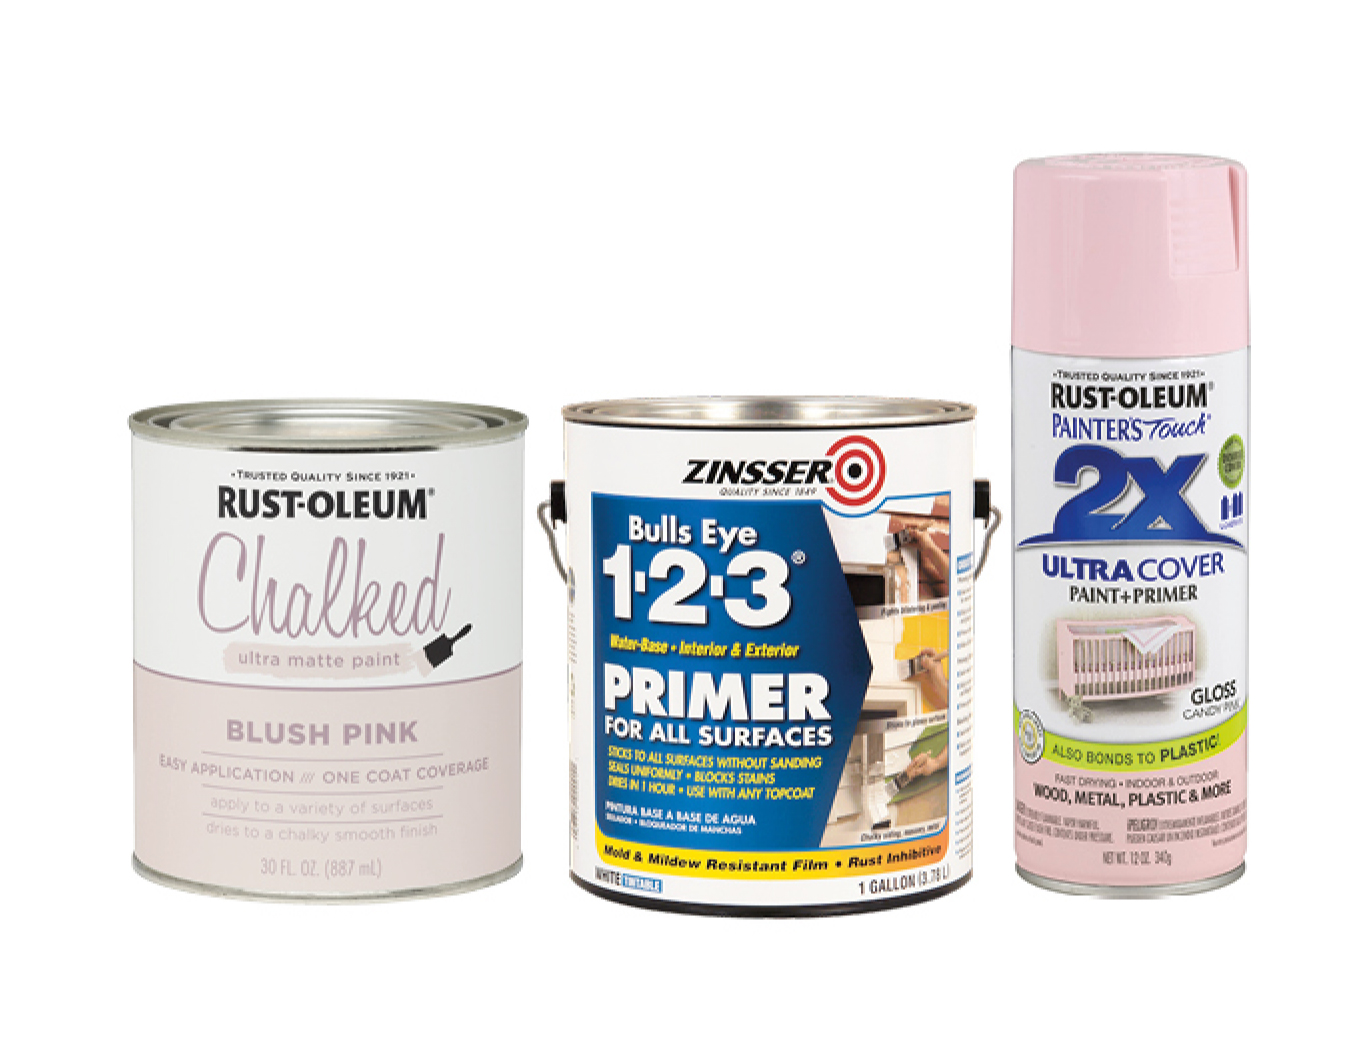
- Bulls Eye 123 brush on primer
- Chalked Ultra Matte Blush Pink
Top Tip
Always paint the darker shade of your colour block on the bottom half of the wall. Remember to also tape your skirtings to protect from any paint spillage.
Creativity is contagious.Pass it on.
First install a drop cloth to protect your floor. Lightly scuff the wall if it has a high gloss finish, using fine sand paper. Wipe clean. Measure, mark and apply tape in a straight line to create a crisp finish – use your spirit level. Prime with Bulls Eye 123 brush on. Leave to cure for 1 hour before top coating.
PAINT:
Stir paint and start painting around the edges using your brush. Then decant paint into your tray. Roll paint onto the wall in even strokes. Start and the top and work down the wall. Chalked brush on paint requires 2 to 4 hours cure time between coats. Apply Chalked Protective Clear Coat for extra protection. Only apply when the base coat is completely cured.
FINISH:
Remove the tape while the paint is still wet. Pull the tape back on itself – not towards you.
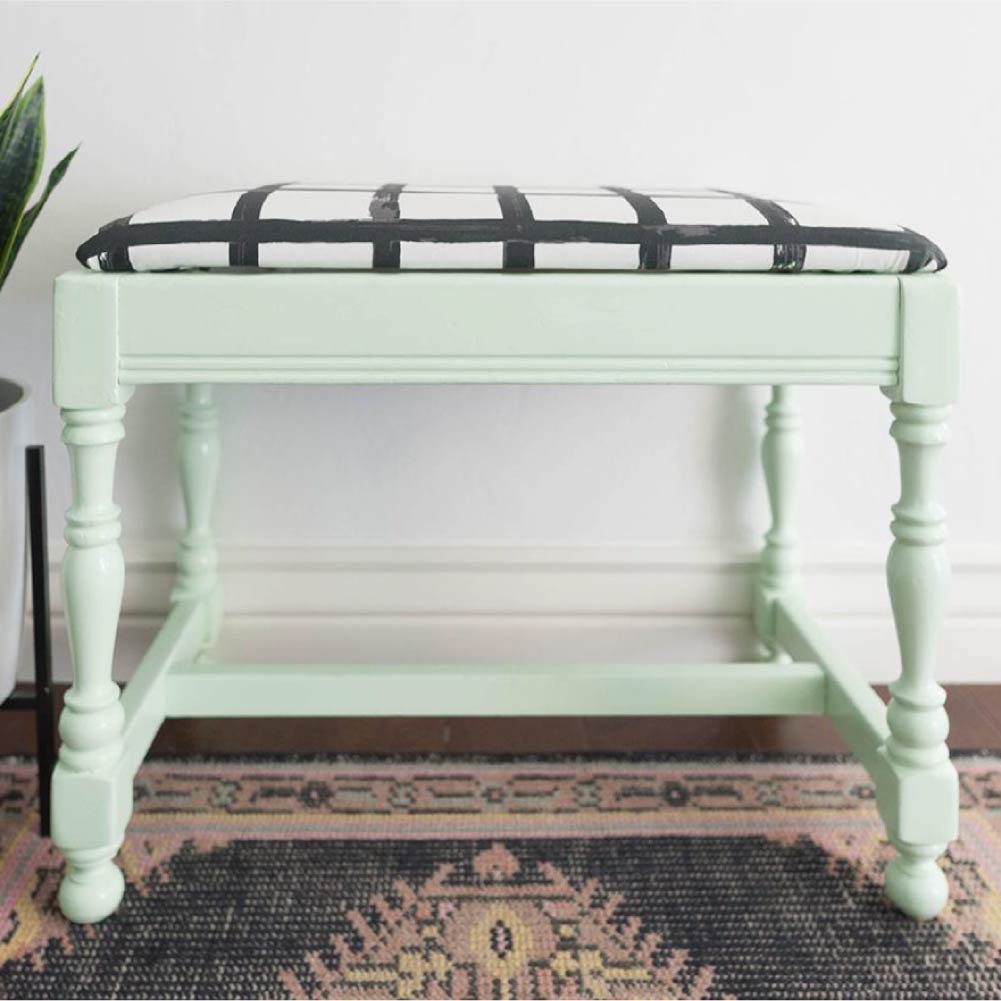
Entrance Hall Elegance
Update your entrance by adding touches of new trendy colours and fabric to your bench. First impressions count and a can of spray paint will transform the ordinary into awesome.
You’ll Need:
- Drop sheet
- Sandpaper: Fine Grit
- Soft cloth
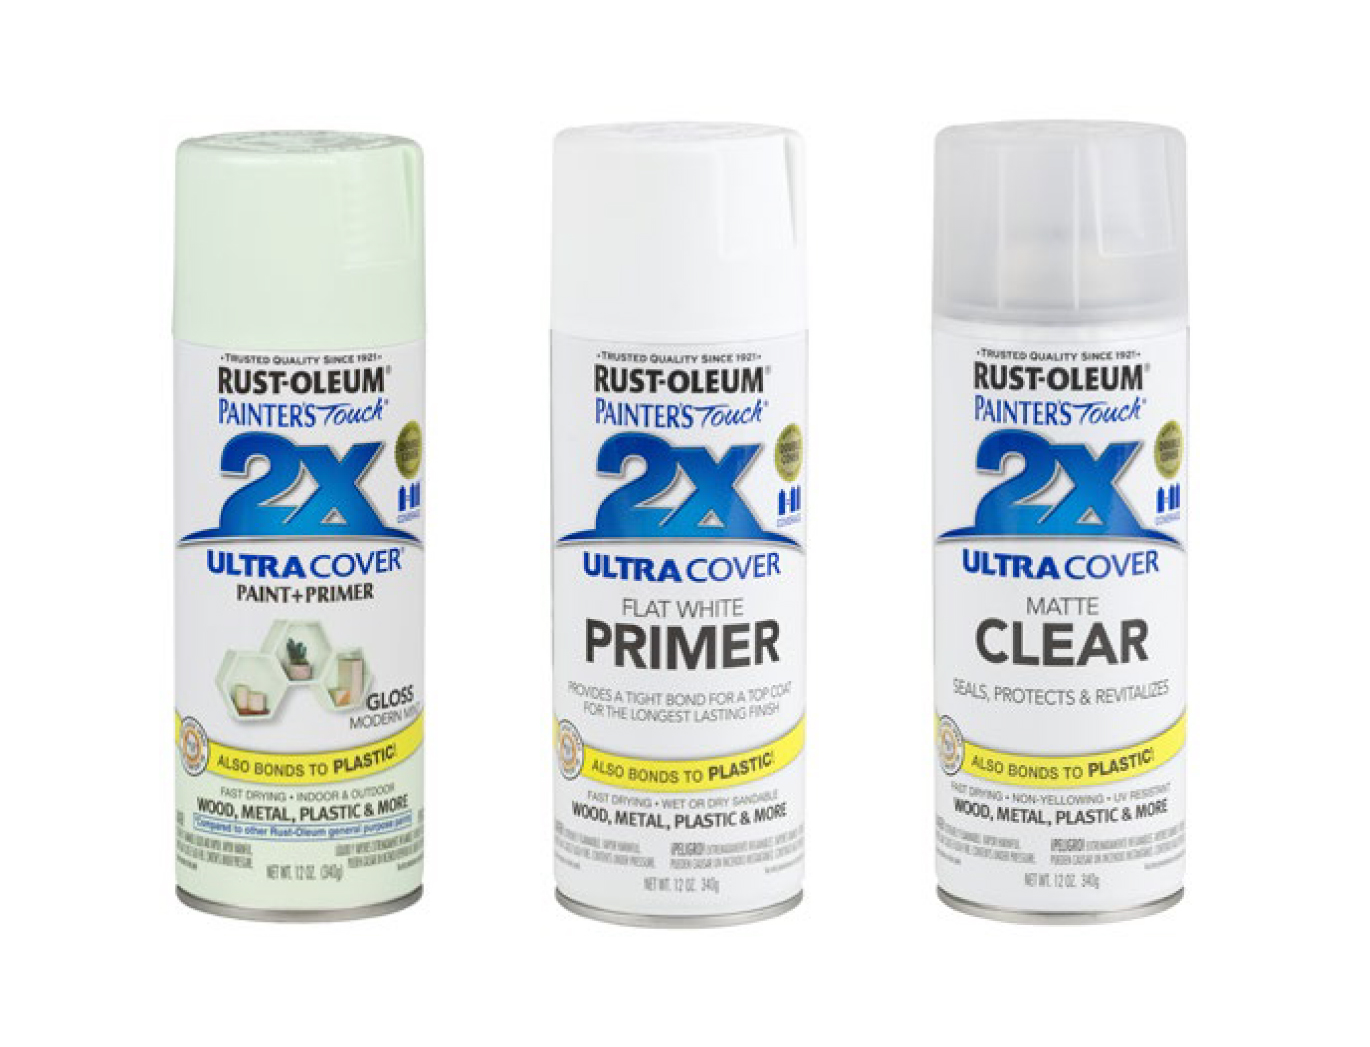
- Painter’s Touch 2X Modern Mint
- Painter’s Touch 2X Primer in White and Clear Topcoat
Top Tip
Using a primer and topcoat provides added protection and longer lasting colour. We recommend Painter’s Touch 2X Primer in White and the Clear Topcoat in the range.
Colours are the smiles of nature.
Always work in a well ventilated area and cover the floor with a drop cloth to protect it from overspray. Remove the old seat. Lightly sand bench and wipe down till totally dust free.
PAINT:
Shake you can of Painter’s Touch Plus 2X spray paint in Modern Mint for one minute after the mixing ball begins to rattle. Then, hold the can 30cm away from the bench and spray light and even coats. Keep your hand in motion to avoid drips and runs and slightly overlap each stroke. Apply two to three light coats to the entire bench a few minutes apart.
FINISH:
Let everything cure completely for 48hours. Add new fabric to the bench seat using a staple gun and reattach the seat.
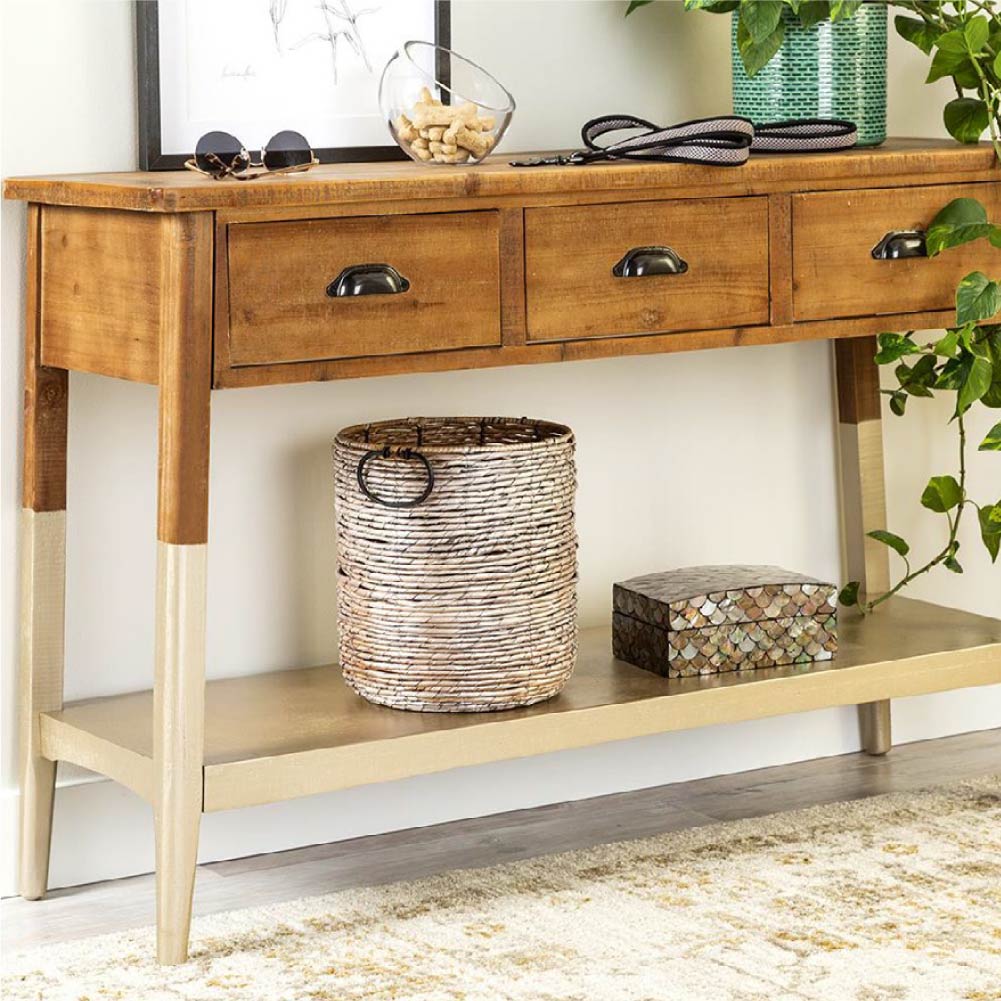
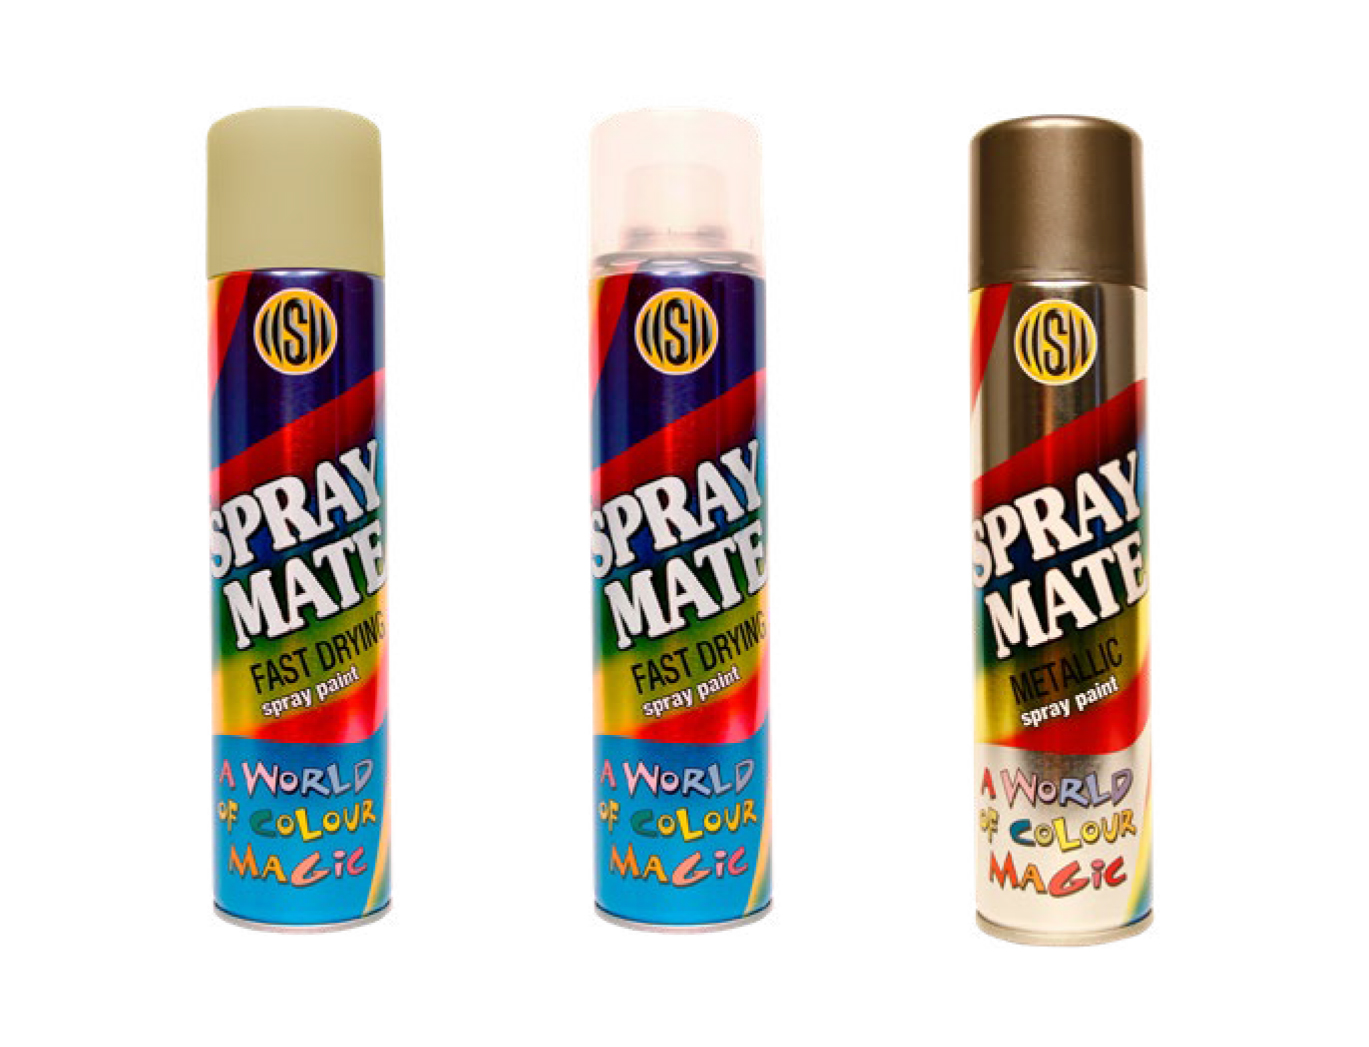
Love Your Legs
Add flair and timeless appeal to a server with a touch of Spraymate and colour dipped legs. Don’t stop at the legs – update the hardware to complete the look.
You’ll Need:
- Drop sheet
- Tape measure, pencil, masking tape & screw driver
- Spraymate Fast Drying Beige
- Spraymate Fast Drying Clear Lacquer
- Spraymate Metallic Cast-Iron
Top Tip
To clear the valve after painting, turn the can upside down and hold the nozzle down for five seconds.
Paint your life in your own colours. Never let others take possession of your brush.
Make sure your server is clean and dry. Remove the hardware with a screwdriver. Mark and apply tape to the legs at the height you want the dipped effect to go. Place the server on a drop cloth. Cover any areas of the server you don’t want to paint.
PAINT:
Shake the can for 1 minute after you hear the mixing ball begin to rattle. Using Spraymate Fast Drying spray, paint the bottom half of the server. Keep your hand in motion and slightly overlap each stroke for best coverage. Apply two or more light coats a few minutes apart. Once that is drying, place your drawer handles on a new drop sheet and spray them the same way using Metallic Cast-Iron. For best results, apply several light coats versus 1 heavy coat. We’ve used neutrals, but any contrasting colour combination will work.
DRY:
Allow the paint to dry thoroughly for approximately 1 hour before handling the frame and 24 hours before full use and reattaching the handles
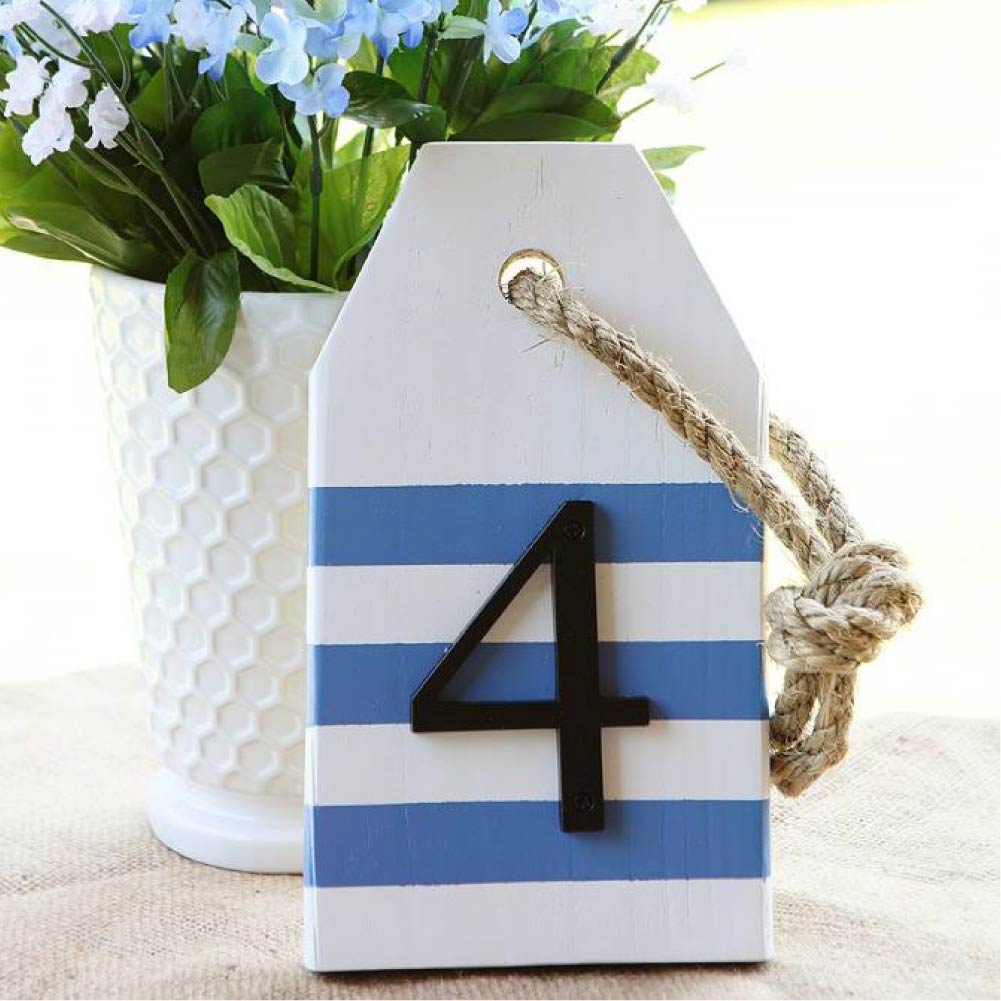
Chalk Up Nautical Table Numbers
These blue and white striped nautical table numbers are the perfect accent to anchor your beach wedding decor. Paint by numbers is as easy as 1 2 3.
You’ll Need:
- Pre-cut wood luggage tag shape with drilled hole
- Cord, wooden cut out numbers & wood glue
- Sand paper, pencil, ruler, masking tape and drop sheet
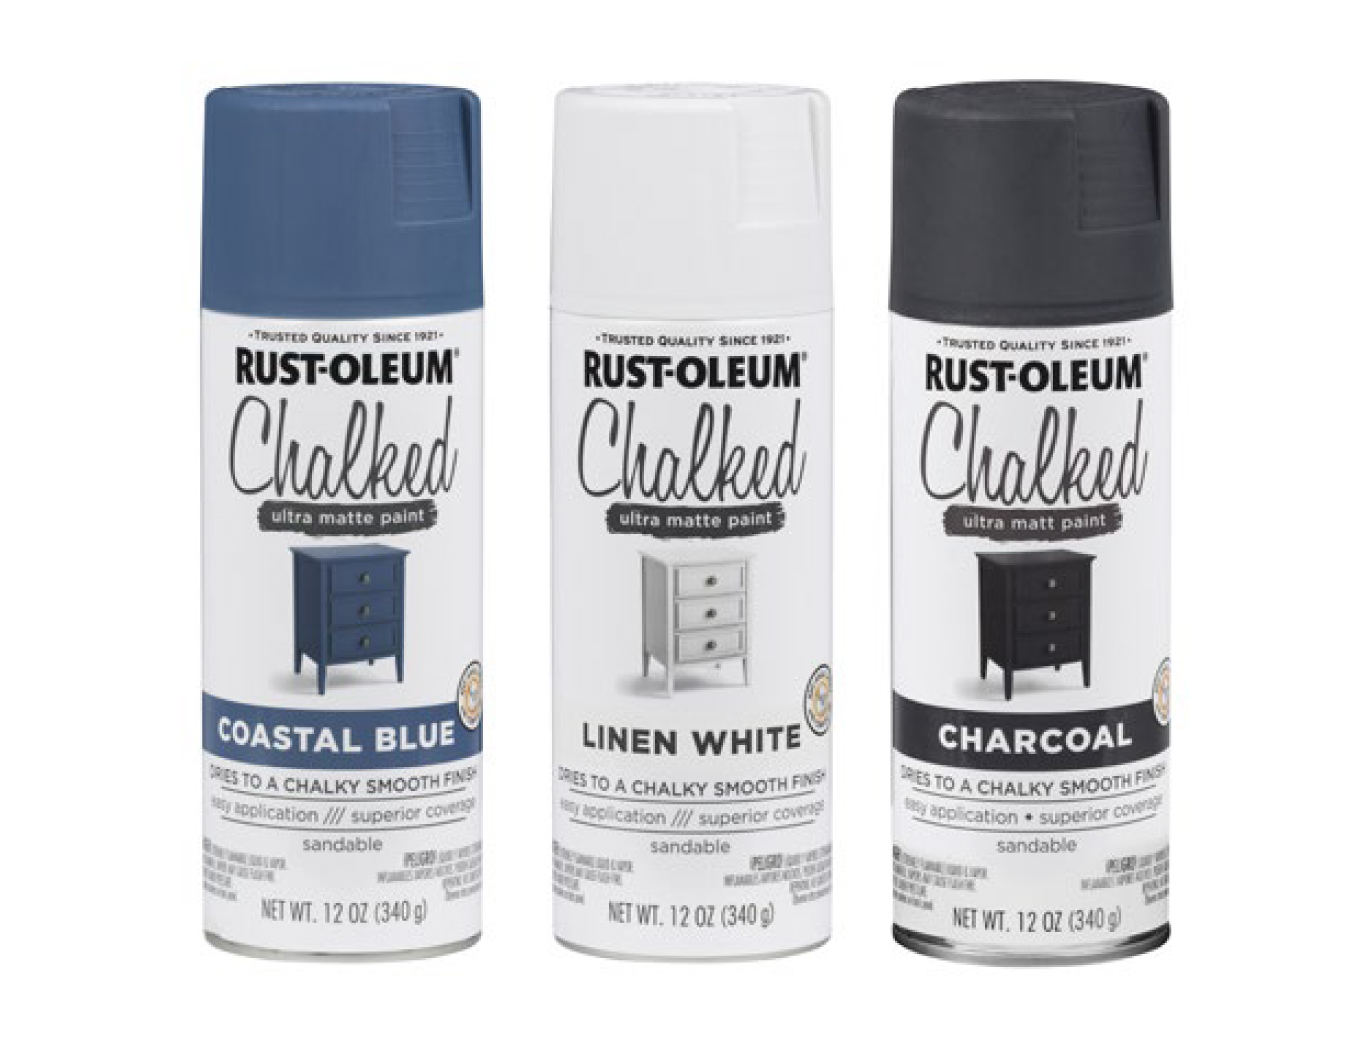
- Chalked Ultra Matte Coastal Blue and Linen White
- Chalked Ultra Matte Charcoal
Top Tip
Never mix paints from different ranges. Interactions between different compounds could cause a paint failure.
Create the things you wish existed.
Sand wooden surfaces – on both sides – and wipe clean removing all dust. Evenly space out wood on your drop sheet.
PAINT:
Shake your can for 1 minute after you hear the mixing ball begin to rattle. Using sweeping movements, spray multiple thin coats of Chalked Linen White paint a few minutes between each coat. Leave to cure for 48 hours, then measure and lightly mark off your stripes in pencil. Apply masking tape to cover areas to remain white. Apply Chalked Coastal Blue in the same way – minutes apart. Leave it to dry and gently remove tape while the paint is still wet. Once properly dry – repeat the process on the reverse side of the wood. Spray the table numbers on a separate drop sheet following the same steps above.
FINISH:
Thread rope through the hole and tie a knot. Use wood glue to stick the number to the centre of each block.

Colour It New
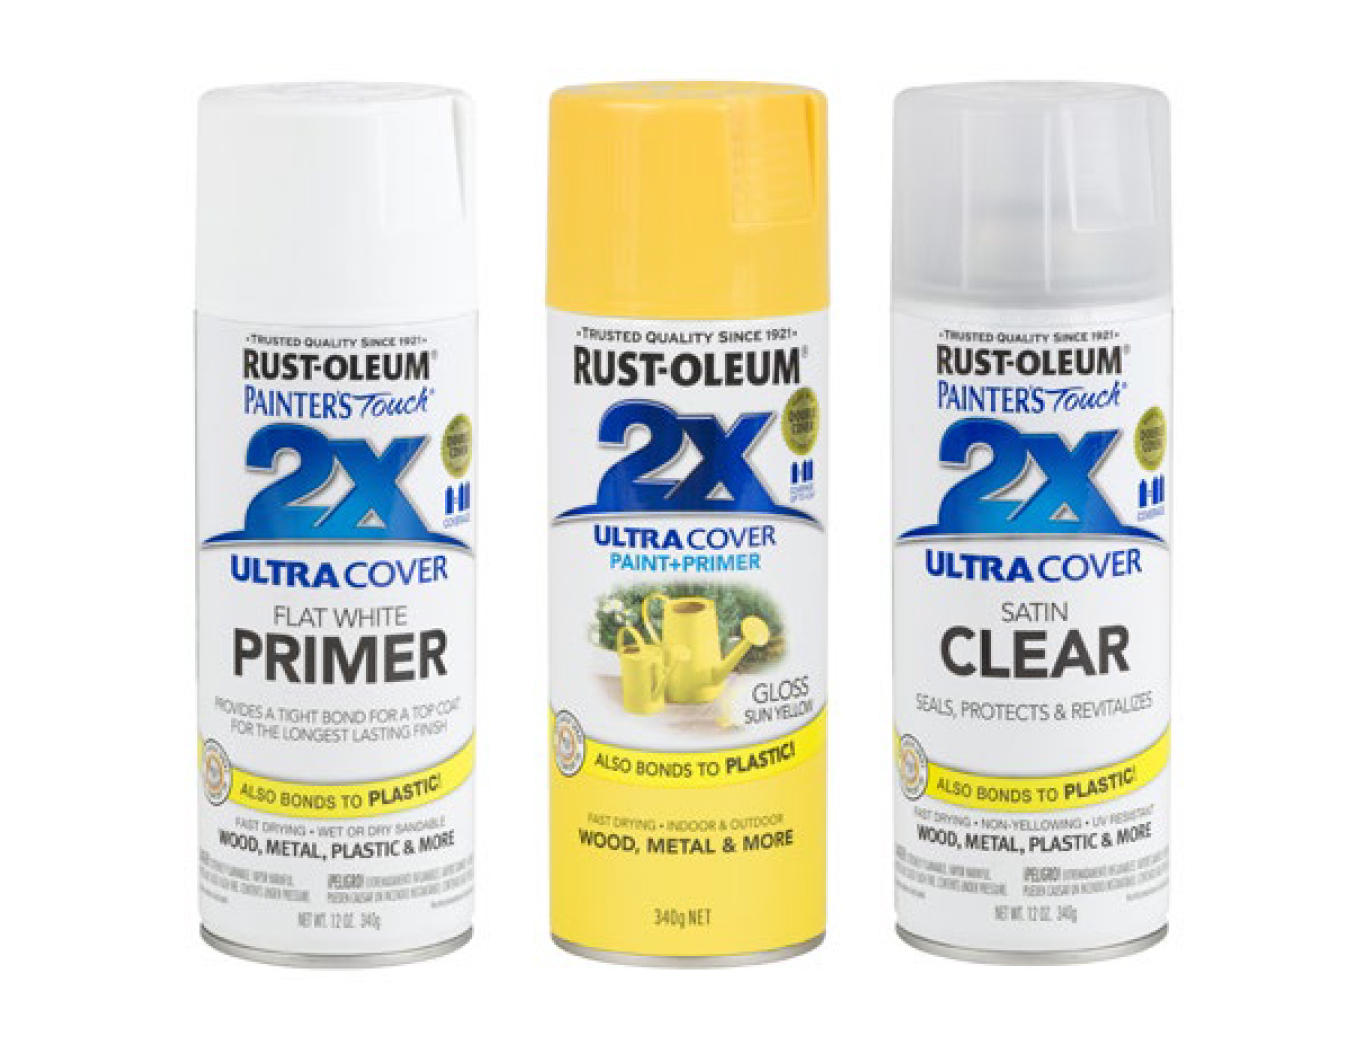
It’s been sitting in your garage for years, and it may be a little rusty, but with a few easy coats of spray paint, its purpose can be renewed.
You’ll Need:
- Wire brush
- Drop sheet
- Liquid soap, sponge & drying cloth
- Masking tape
- Painter’s Touch 2X Flat White Primer
- Painter’s Touch 2X Gloss Sun Yellow
- Painter’s Touch 2X Gloss Clear
Top Tip
When using Rust-Oleum paints – never leave them to cure in direct sunlight.
Limitations live only in our minds. But if we use our imaginations, our possibilities become limitless.
Before you start painting, make sure you protect your work area with a drop cloth. Using a wire brush, remove any loose paint or rust spots. Wash the bike with soapy water. Rinse off with clean water and dry well. If there are areas you don’t want to paint, tape them off. Shake the primer for 1 minute after you hear the mixing ball begin to rattle. This will mix the paint evenly. Using steady, back-and-forth motions, cover the bike in primer. Leave to cure for 20 minutes.
PAINT:
Shake the can of Painter’s Touch 2X Sun Yellow as you did the primer and spray 2 to 3 light coats of paint onto the bike 20 minutes apart. Hold the can about 30cm from the bike and keep your hand in motion to avoid drips and runs.
FINISH:
Seal with Painter’s Touch 2X Clear coat 20mins after applying your last coat of yellow. Let it dry for 48 hours before handling.
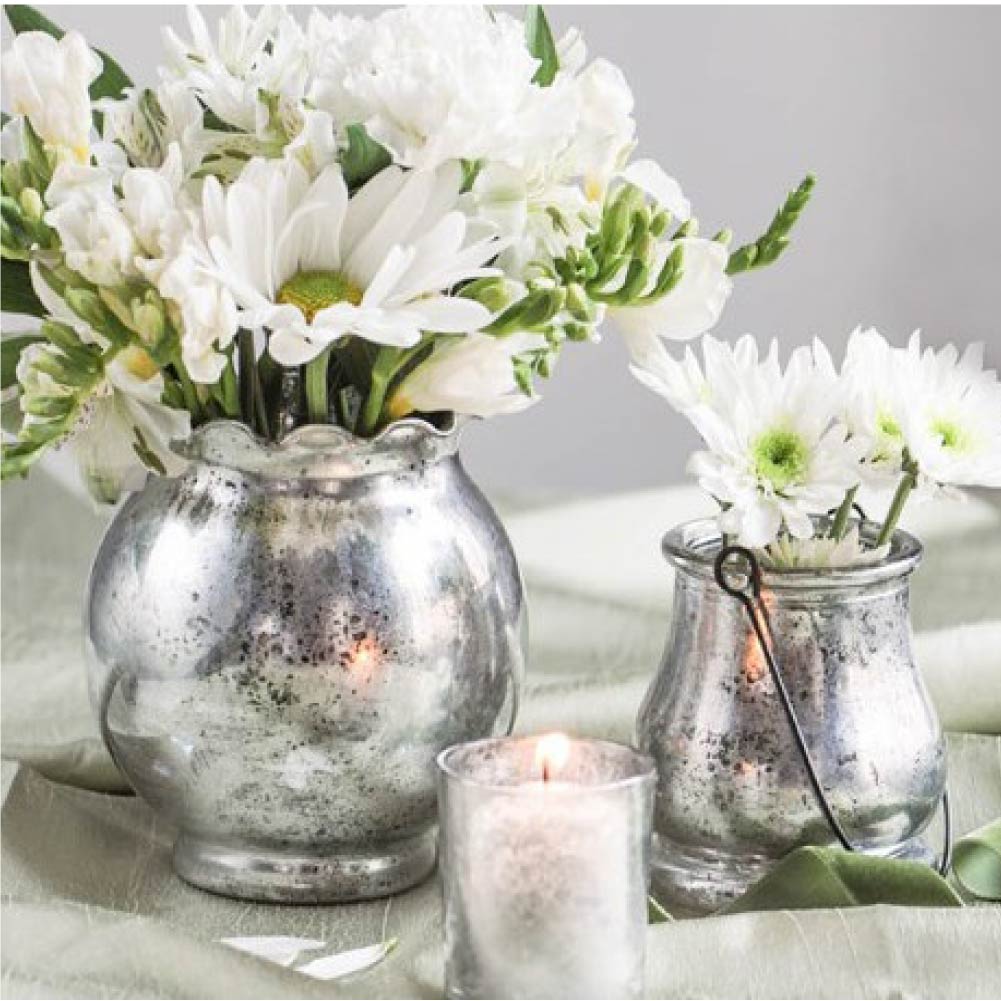
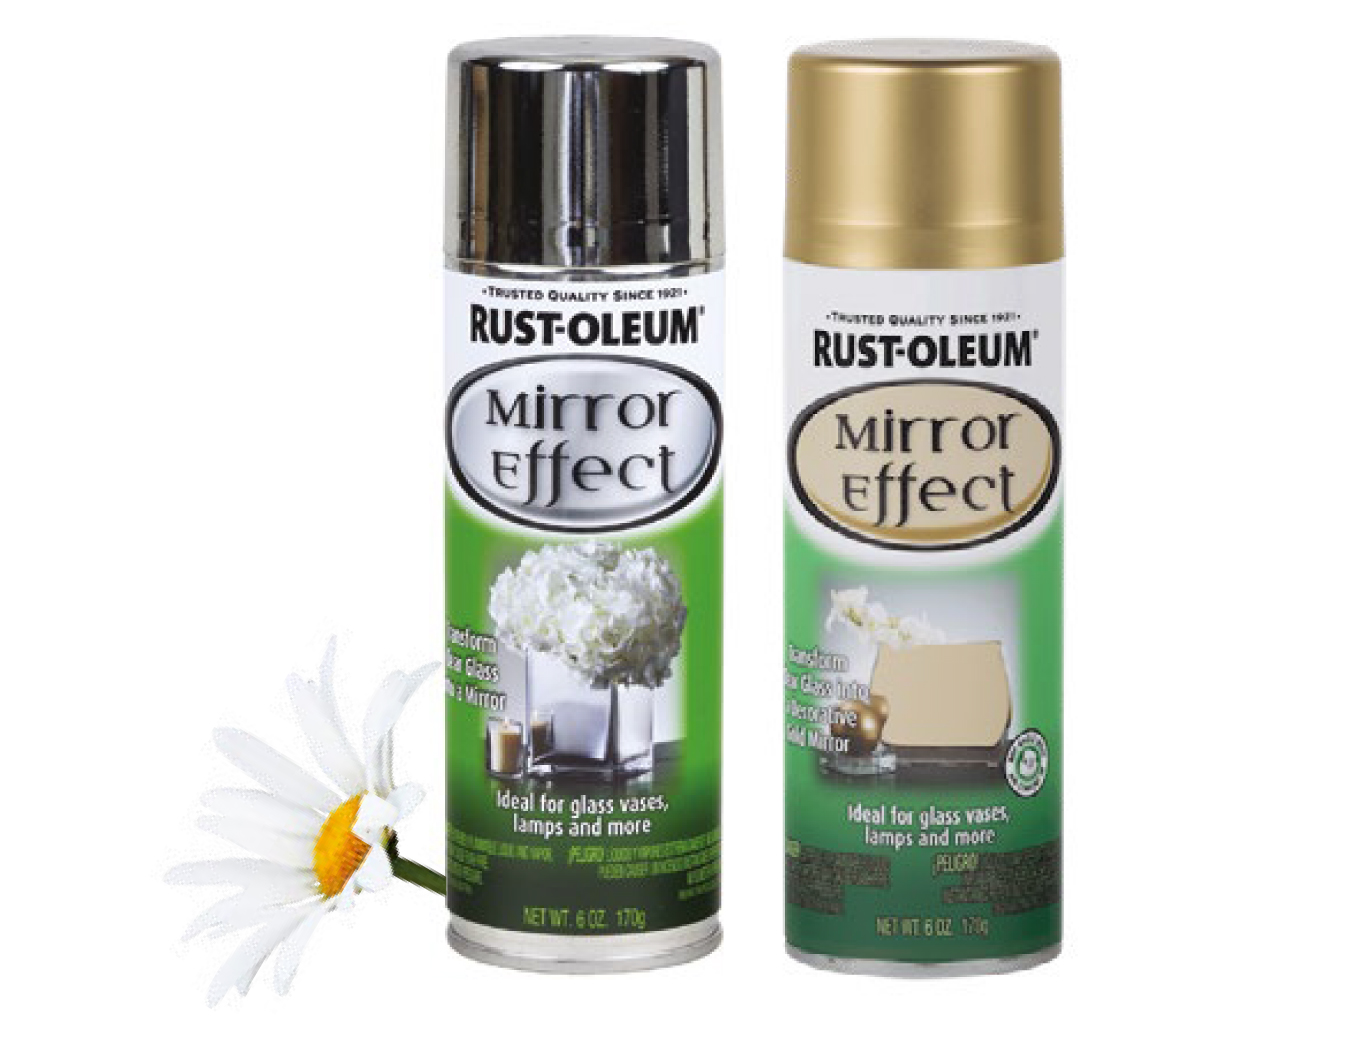
Luxe Your Look
Luxe your look and make the most of your space with mirror effect DIY d cor. Style starts here with just a few coats of spray paint.
You’ll Need:
- Glass vase/s
- Household glass cleaner and microfibre cloth
- Newspaper
- Masking tape
- Drop sheet
- Specialty Mirror Effect (gold or silver)
Top Tip
For an added antique faux mercury look, apply a thin coat of Painter’s Touch 2X Flat Black over the mirror paint and leave to dry.
Set up work station with drop sheet. Thoroughly clean and dry your vase inside and out. Completely cover the outside of the vase with newspaper and painter’s tape.
PAINT:
Shake your can for 1 minute after you hear the mixing ball begin to rattle. Lightly and evenly spray the inside of the vase with Mirror Effect spray paint, while carefully avoiding drips. Apply several coats two minutes apart – up to 6 coats are required for full and even coverage. Leave the coat to dry for up to 2 hours.
FINISH:
Remove the newspaper and tape once fully cured. Fill with flowers and enjoy your sophisticated new look.
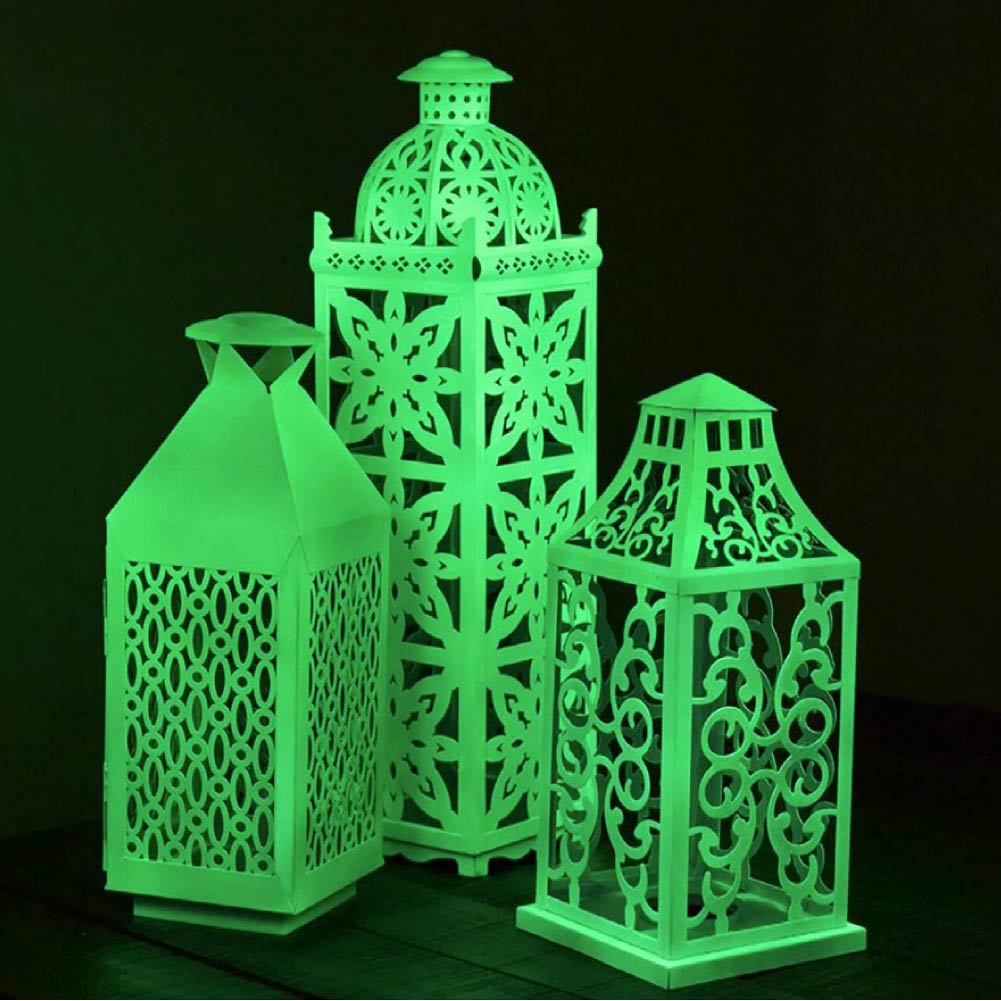
Illuminate Your Look
Don’t be left in the dark. For a glowing finish that radiates a luminous light at night – use our fun and functional Glow in the Dark spray paint.
You’ll Need:
- Lantern
- Drop sheet
- #150 Sand paper & Lacquer thinners
- Masking Tape
- Bulls Eye 123 Spray Primer
- Specialty Glow in the Dark
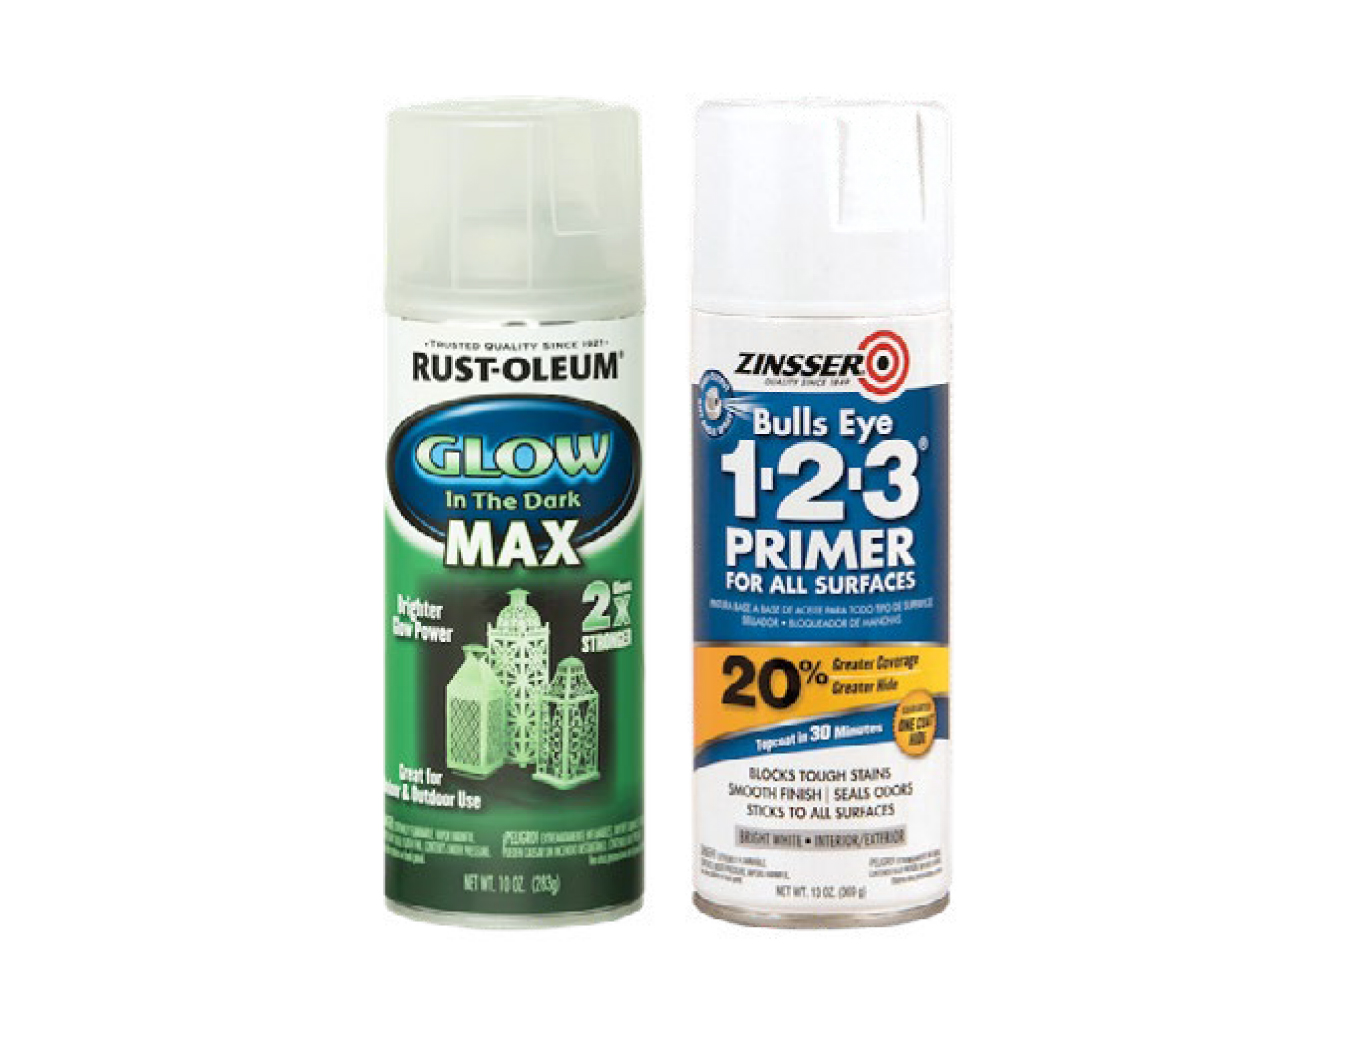
Top Tip
For a soft, lime green glow apply over a white base colour. This coating works best when charged with a light bulb instead of sunlight.
Lightly sand your lantern with #150 sand paper. Clean with a dry cloth. Non-porous substrates like plastic and mild steel must be cleaned with lacquer thinners. Tape off any areas you don’t want painted. Prime your object with Bulls Eye 123 Primer and cure for 1 hour.
PAINT:
After shaking the can for a minute, apply multiple coats of Glow in the Dark, allowing 30min drying time between coats. Keep your hand in motion while spraying and watch out for runs with a heavy application. The thicker the application the brighter the glow and the longer the charge will last.
FINISH:
Let the paint dry for at least 20 minutes before handling. Your lantern will need to charge for several hours before the glowing effect will occur. The glow will last for several hours – indoors or out. The darker the setting the more intense the glow will be.
Etched Effects
Want a frosted feel that has a flawless finish? Simply follow this guide to glass spray painting. Creating a semi-transparent coating for privacy or adornment is a decorating touch that anyone can DIY.
You’ll Need:
- Glass vase / jar and household cleaner
- Microfibre cloth
- Drop sheet
- Stencil or stickers and masking tape (or vinyl lettering)
- Specialty Frosted Glass
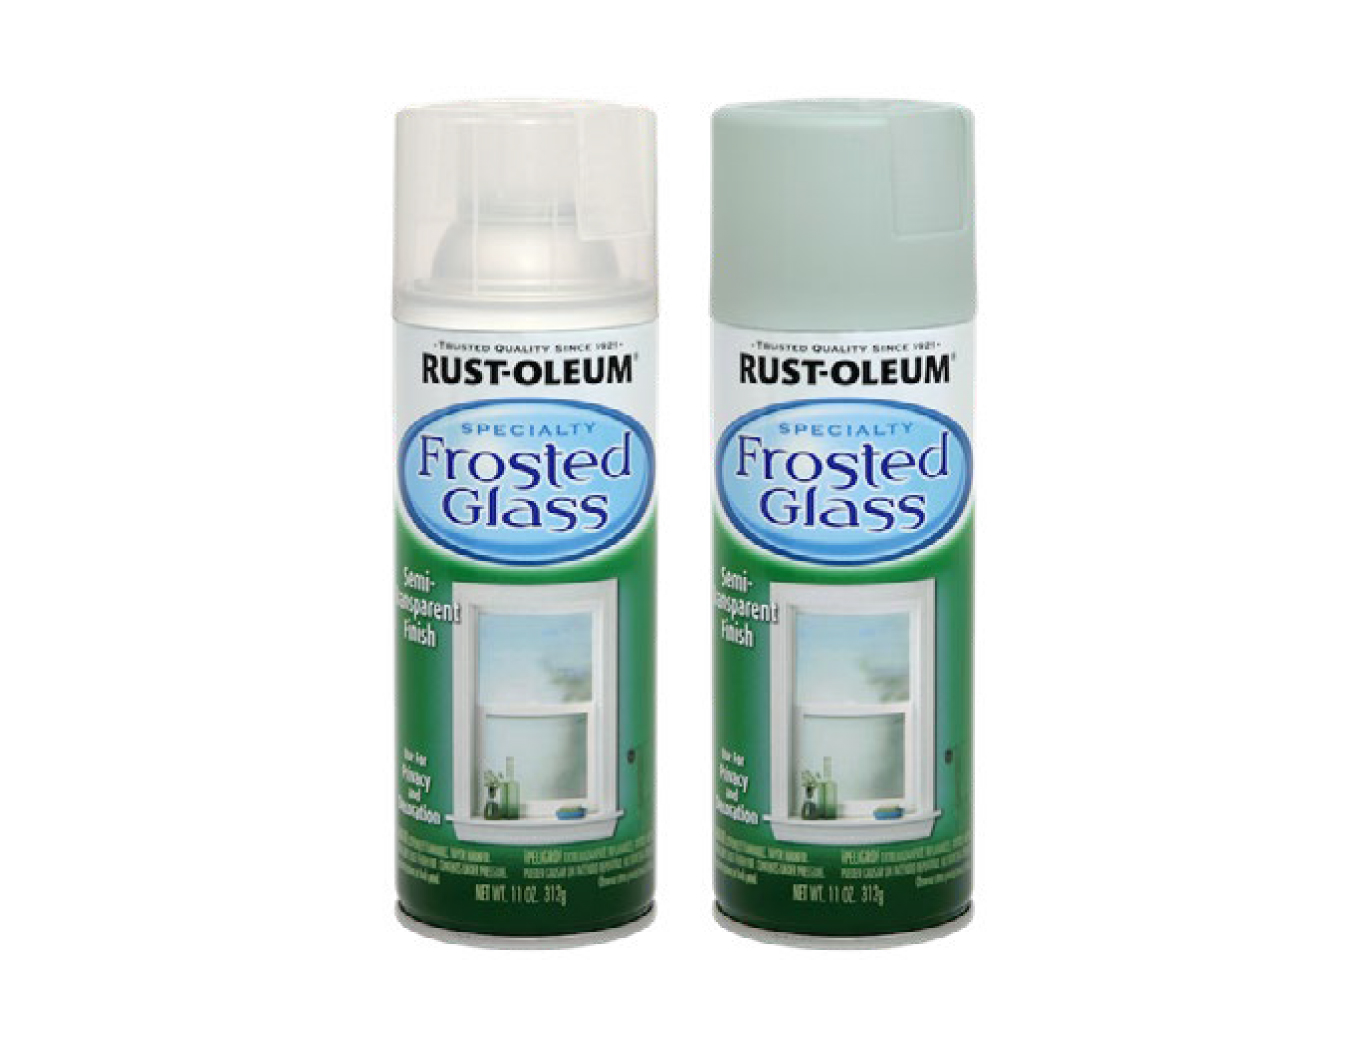
Top Tip
From glass doors to window dressing and DIY d cor – this product is only for indoor use. Practice spray on scrap material before you start your project.
Clean your glass and apply your stencil or stickers to the areas you don’t want frosted using masking tape. Before you begin spraying, protect your surrounding area with a drop cloth. Read the on-can instructions carefully.
PAINT:
Shake the can for a minute after you hear the mixing ball begin to rattle. Apply one light coat of Frosted Glass spray paint, holding the can 30cm from your vase. Wait for up to 10mins and apply a second coat. Be patient. Your partial or fully frosted coating may take 10mins for the effect to appear. Add more coats depending on how solid you want the final look to be.
FINISH:
Wait a full 10mins for the frosting to dry and only then remove the stencils or stickers to reveal your custom etched glass effect.
Turn Up The Heat
Sunny skies and outdoor braais. That’s what summers are made of. So fire up your braai, with High Heat Ultra, and we’ll guarantee your grill retains its good looks.
You’ll Need:
- Wire brush
- Lacquer thinners and soft cloth
- Sandpaper
- Drop sheet
- Specialty High Heat Ultra Black (protective enamel)
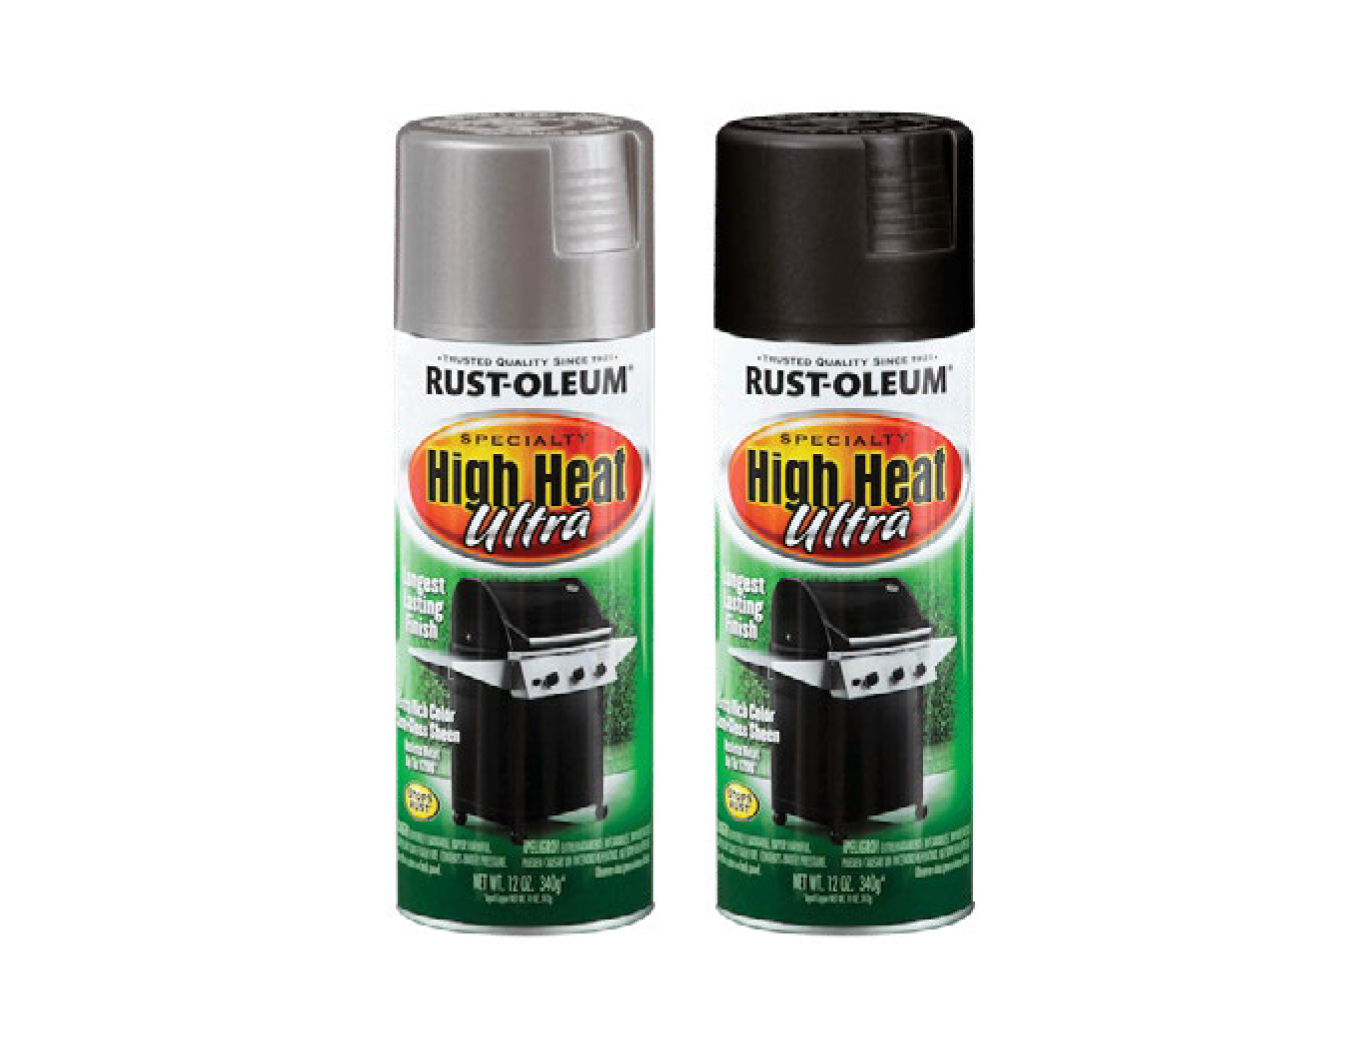
Top Tip
Although these products are resistant to extreme temperatures (up to 648 c), they are not flame resistant. Painted surfaces in direct contact with a naked flame will require touching up.
Before you start painting, make sure you protect your work area with a drop cloth. Using a wire brush, remove any loose paint or rust spots from your braai. Sand the rest of the braai surface with coarse sandpaper. Clean with lacquer thinners and a soft cloth.
PAINT:
Shake the can for 1 minute after you hear the mixing ball begin to rattle. This will mix the paint evenly. Hold the can upright, 30cm from the surface, and apply High Heat Ultra directly to the bare metal. Keep hand in motion while spraying, slightly overlapping each stroke. Let it sit for a few minutes before applying the second and final coat.
FINISH:
The paint will be touch dry in half and hour and ready to handle in 1 to 2 hours. Only fire up your braai after a good hour has past.
Browse 1000’s of products available to you. Select your country to Shop Online.


