
When repairing cracks in concrete, an angle grinder and an SDS drill should be the first tools you pick up.
Working with concrete can be tough, but two tools stand out as real heroes: an angle grinder and an SDS drill with a scaler function. When concrete slabs get nasty cracks, rainwater will get in and cause hidden problems. It’s crucial to fix this before it worsens.

Step 1:
Start by drawing a chalk line on either side of the cracks and cut along those lines for a neat finish. Don’t be tempted to simply fill the cracks. You need an area with enough width and depth for the repair mix to bind and set properly. If it’s too thin, the repair won’t hold.

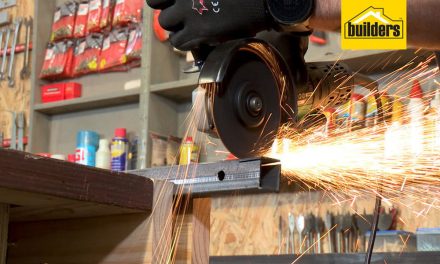
Step 2:
Before you do anything else, put on your PPE – safety glasses, gloves and a mask. To cut through the cement, use an angle grinder with a cement cutting disc, following the chalk lines. When cutting, don’t try to cut all the way through at once: score a line with the grinder and then slowly work over that cut line until you’ve cut through. Allow the cutting disc to pull its way through the surface to minimise friction and force. Remember, pressure and heat are the biggest enemies of cutting and abrasive discs.
Cutting concrete produces a lot of dust, so pay attention to open windows and wind direction. If you’ve got one, clear the dust with a blower. This will be a huge help for visibility and workspace cleanliness.

Step 3:
Now that the cuts are done, it’s time to use the DeWalt DCH133NT SDS drill. An SDS drill is built for heavy duty work and does jobs like breaking up concrete wells. An SDS drill with a scaler function allows you to use a chisel bit, turning it into a portable jackhammer to break up the concrete into smaller pieces.
Full speed and pressure aren’t always needed, but you do need a firm foothold and good control of the power tool. Don’t try to use the drill single-handedly. Once the concrete is broken up, remove all the rubble and clean the area with a blower or a broom.

Step 4:
With the area prepped, it’s time to mix and apply the concrete. Start by lightly wetting the area and stamping the soil down for a firm, uniform finish, which also prevents the concrete from running away underground. To fill the prepped areas, mix a slurry of black cement and water in a 50/50 ratio, with some keycoat making up part of the water quantity. Black cement has an MPA rating of 42.5 N, which make it stronger than 32.5 N cement. Adding keycoat enhances water resistance and adhesion strength. Mix in a bucket with a paint stirrer and a small amount of river sand, aiming for a lump-free, yoghurt-like consistency.

Step 5:
Pour the slurry into the channels and work it in with a trowel, taking care not to disturb the foundation you’ve just prepped. Apply the mix in one go throughout the area to ensure everything fuses together. Use a scrap piece of timber as a straight edge to keep the concrete neat and level with the existing slab. Remember to clean up around the newly cemented areas before it dries.
And that’s that – repair done and dusted! DIYs are easy when you’ve got the right tools and a little bit of knowledge. A simple repair like this will save you many headaches in the future, so don’t keep putting it off. Builders stocks a full range of these impressive DeWalt power tools, both in-store and online at builders.co.za.
Browse 1000’s of products available to you. Select your country to Shop Online.


