Chapter 18
PLASTERING
Introduction
Terminology
Tools
Cement Plaster
Two Coat Plasters
Screeds and Toppings
Accessories
References
Introduction
Plastering (plaster including screeds) is used extensively in building work as a decorative or protective coating or surface to vertical concrete and masonry walls and/or surfaces and to horizontal surfaces like concrete ceilings and floors. Plastering is often the least mentioned trade under regulations and specifications; with poor workmanship, incorrect mixes and the use of poor quality sands becoming more and more common.
The aim of this section is to provide the necessary technical information, to enable the reader to compile a specification to achieve a satisfactory standard of work and to act as a useful guide for successful plastering.
Terminology
Accelerator
A material that shortens the setting time of gypsum plasters and other cementitious materials.
Admixture
Any substance added to a plaster component or plaster mortar for the purpose of modifying its properties.
Alkalinity
Relating to or containing an alkali having a pH greater than 7.
Basecoat
Any plaster coat applied to a substrate prior to application of the finish coat of plaster.
Bleeding
See: Watering Out
Blistering
A condition characterized by bulging of the finish coat layer as it separates and draws away from the basecoat.
Body
A subjective and often misused term relating to the working properties of a plastic cementitious mass such as gypsum or
Cement plaster
Generally a term used to refer to the relative stiffness or resistance to movement under the trowel.
Bonding Agent
A material applied to a surface to improve the quality of bond between it and succeeding plaster application.
Bond
The connection between two surfaces – the way something ‘sticks’ to something else. A bond can be achieved through adhesion (a liquid that sticks things together as it hardens) or key (the roughness of a surface which allows something to stick to it).
Brown Out
The visual darkening of a plaster surface which indicates the completed setting (hydration) of the plaster.
Bull Nose
A special formed rounded external angle with a radius of 12.5 mm (½”) or more.
Cement Plaster
Variously defined as plaster containing Portland cement.
Coat
A thickness or layer of plaster applied in a single operation.
Cold Joining
The line at which, or the method by which, two separate plaster applications are jointed to provide a continuous plane surface. The first application (set, but not dry) is terminated at a sharp line using the trowel edge. The second application is brought up to the line of set material and finished to provide a smooth continuous surface. This method is used where termination of a plaster application at an edge, angle, control joint or bead is impractical.
Coloured Finish
A plaster finish coat containing integrally mixed color pigments or coloured aggregates.
Consistency
A term denoting the fluidity or viscosity of a plaster or cementitious paste; also refers to the amount of water required to bring a given quantity of dry cementitious material and aggregate to a given fluidity.
Corner Reinforcement
Reinforcement material used at re-entrant or interior angles to provide continuity between two intersecting plaster surfaces.
Corner Tool
A tool consisting of a right angle (90°) metal form with a handle used for application of plaster and finishing of interior angles.
Cove
A concave molding or curved surface used at the junction between a ceiling and a wall.
Craze Cracks
Fine, random fissures or cracks of the finish plaster surface caused by plaster shrinkage. These are generally associated with cement plasters being improperly gauged or troweled and/or rapid-drying conditions, or with second coat plasters subjected to rapid-drying job conditions.
Darby
A flat wooden or metal tool (aluminium straight edge) about 100mm wide and 1200mm long with handles; used to smooth or float the cement plaster; also used on finish coat plasters to give a preliminary true and even surface.
Delamination
The physical separation of plaster coats, or of a plaster coat from the substrate, that results from chemical or physical impairment of plaster bond to previous coats or other substrates.
Dope
A term often used by plasterers for additives of any type that adjust setting, workability or bond characteristics.
Dot
A small lump of plaster placed on a surface (usually scarified basecoat) between grounds to assist the plasterer in obtaining the proper plaster thickness and aid in aligning the surface.
Drag
A workability problem encountered during scratching off the plaster or finish troweling, where excessive pressure is required to draw the trowel across the surface to smooth it. This occurs when the material has not retained sufficient surface moisture to lubricate the trowel; in the extreme, the trowel or straight edge may skip or jump across the surface, creating ripples.
Dry-Out
A condition caused by excessive evaporation or substrate water absorption, when the plaster loses some or all of the water required for hydration (setting) – it appears as a lightcolored soft area.
Efflorescence
A white, powdery surface deposit sometimes found on plaster or masonry. Results from migration of soluble salts to the surface.
Fat
A mixture of fine lime and/or gypsum particles and water accumulated on the trowel during the finishing operation, which is used to fill in small surface imperfections.
Finish Coat
The last layer of plaster applied in a multilayer application.
Float
A tool or procedure used to straighten and level the finish coat, to correct surface irregularities produced by other tools, and to impart a distinctive surface texture.
Float Finish
Finish-coat texture which is rougher than a smooth (steel) trowel finish, and which is derived from aggregate in the mortar.
Glass Fiber Tape
Glass fiber mesh material of various widths used to reinforce joints in veneer plaster applications over gypsum base.
Green
A term to describe freshly applied plaster that has set, but has not dried.
Plasticity
The property of plaster that permits continuous and permanent deformation in any direction. As opposed to fluidity, a plastic material requires a measurable force (yield value) to initiate flow. A material of low plasticity is usually described as being “poor” or hard working; high plasticity is described as “rich” or easy working.
Plasticizer
An admixture to improve plasticity, workability, and spread under the trowel.
Pressure-Sensitive Tape
An open-weave, glass-fiber joint reinforcement tape used in veneer finishing, coated with a pressure-sensitive adhesive for easy application to base without need for staple attachment.
Rapid Drying Conditions
Job environmental or site conditions that cause premature removal of water from the plaster (prior to set), which results in incomplete hydration of the plaster; e.g., high temperature, low relative humidity and high air movement. These conditions promote dry-out and a variety of shrinkage cracking problems as a result of rapid and excessive evaporation.
Re-tempering
A procedure whereby plaster is remixed to a workable consistency using water and/or mechanical action – which is not a recommended practice.
Reveal
The visible part of the brickwork or wall in the opening for a door, window or other element, not covered by the frame.
Scrim
Woven natural or artificial fiber material coated with a binder or binder and adhesive; used to provide joint reinforcement.
Setting Time
The elapsed time required for a cementitious material to attain a specified hardness after mixing with water.
Skim Coat
A thin finish plaster coat troweled smooth.
Slip
A plaster workability characteristic relating to the relative ease with which the trowel is drawn over the plaster surface both during application and after the coat has stiffened or “taken up.”
Soffit
The horizontal under-surface any spanning or overhanging part of a building, a floor slab, lintel, door frame head, beam or arch or its lining.
Spread
A term referring to the extendibility or coverage obtained with a plaster; sometimes used incorrectly to refer to plaster workability.
Suction
The absorptive quality of a surface or substrate.
Sweatout
A defective gypsum plaster condition characterized by a soft, damp area remaining after the surrounding area has set. This is usually caused by insufficient ventilation, which inhibits normal drying.
Take-Up
The loss of water of a plaster into the absorptive substrate during application, as evidenced by a moderate stiffening of the plaster coat.
Template
A gauge or pattern used as a guide to produce arches, curves and other shapes or forms of a repetitive nature.
Texture
A patterned plaster finish as contrasted to a smooth finish.
Unsound
A term referring to the condition of a plaster installation whereby the hardened mass has lost internal strength, exhibiting cracking, spalling, delamination, etc. This general state may be contributed to by excessive aggregate addition, water damage, poor drying conditions, overwatering and other factors.
Water-Out
A plaster condition indicative of a poor water-retention characteristic. When at rest on a mortar ‘dagha’ board, the plaster loses or “weeps” free water in puddles or depressions in the mass.
Water Retention
The ability or characteristic of a plaster to retain sufficient water, when applied to an absorptive surface, to maintain a plastic workable state under the trowel for ease of application.
Workability
A general term encompassing the performance of a plaster mortar under the trowel in terms of spread,
plasticity and slip.
Tools
A description of the basic tools used in the process of building are the same as that covered under foundations in section 9; for more on plastering tools and their applications – See Tool section.
Cement Plaster
Overview
Cement plaster has important requirements in the fresh and hardened states. In the fresh state, plaster must be workable and cohesive, i.e. it must be plastic, and have good water retention. The properties of fresh plaster depend on the materials used, especially the sand, and on mix proportions.
In the hardened state, plaster must be strong enough to hold paint and withstand local impact and abrasion; be free of unsightly cracking; be well bonded to the substrate; have an acceptable surface texture; and have acceptable surface accuracy (with reference to a plane or curved surface). The properties of hardened plaster depend on the properties of the fresh plaster and the substrate, and on workmanship.
Types of Plaster
Wooden float
After applying the plaster to the wall, the plaster is left to set slightly and then screeded off smooth using a straight edge and then wooden floated with water to create a smooth consistent surface. This type of plaster can be left as a one coat or used as a first coat for a two-coat plaster, like Rhinolite or a decorative finish like Cemcrete Satincrete.
Steel float
Same procedure as above except the plaster is polished using a steel trowel after floating with a wooden float, giving a very smooth consistent finish which can be used for paint techniques and is a preferred finish in rooms that require a smooth plaster like bathrooms; without the expense of a second coat plaster. (Can only be achieved if a good quality fine aggregate is used and not recommended for two-coat applications).
Brush plaster
This plaster finish is completed as in wooden floated with the following additional step; a damp brush is then used to brush off in even, vertical strokes leaving a brushed finish.
Bagging
A watery plaster mix is rubbed over the face of brickwork using sacking. This fills in small holes and leaves a rough-textured surface.
Roughcast plaster
This is applied with a trowel and then brushed smooth without any screeding, leaving an undulating, uneven surface.
Cement wash
A mixture of cement, sand and water in a very thin, watery paste (Slurry), brushed on to brickwork to fill small holes, leaving a textured surface in which one can see the brickwork lines under the plaster finish and is used in typical fair-face brickwork applications or on brickwork skins requiring waterproofing e.g. cavity walls.
Scratch plaster
A coarser aggregate (usually river sand) is added to the plaster mix and when screeded off or dragged, the coarser aggregate makes deep and inconsistent marks in the plaster. Depending on the aggregate used, the quantity used in the mix and the way one screeds it (Rakes off) will determine the finish. It is always advisable to use a plaster sample on site as a reference and to make an exact note of the plaster mix used as well as the method used (and to use the same supplier of the coarse aggregate for the duration of the project).
Tyrolean
This is a textured plaster which is usually flicked onto wooden floated plaster with a hand operated “Tyrolean” machine. The plaster is a very watery mix (slurry), which is placed into the machine and when the handle is turned, the mortar splatters onto the wall. This can be left as it is or trowel off with a steel trowel.
Spatterdash
A rich mix of cement and sand (1:1½ to 1:2) which is mixed very wet using water, with or without a bonding agent and flicked onto the substrate by hand or using a “Tyrolean” machine. It is used on smooth surfaces with little suction, such as face bricks or dense precast concrete, to provide a key for the first coat of plaster. The spatterdash should cover the substrate surface completely and form a rough texture with nodules about 5 mm high.
Material selection
As discussed above the properties of plaster in both the fresh and hardened states depend to a large extent on the properties of the materials used. The following provides guidance in the selection of these materials.
Cement
Use “common” cement complying with SANS 50197-1, or masonry cement complying with SANS 50413-1 strength class 22,5X or higher. The choice of cement should be based on the properties of the sand (see sand and workability improvers below).
Sand
Sand is by far the major constituent of a plaster mix and has a significant influence on its performance and material cost. In South Africa, natural sands, i.e. pit, river and dune sands, are almost invariably used for plaster mixes. An essential requirement is that sand should be free of organic matter such as roots, twigs and humus.
Note: “Karoo” sands, which consist mainly of disc shaped dark-coloured particles, should not be used for plastering. This is because they exhibit excessive swelling and shrinkage with increasing and decreasing moisture content.
Crusher sands are also not generally suitable due to their angular particle shape. However, crusher sands are used successfully in rich mixes for special applications such as squash court plastering.
Important properties of sands are:
- Clay content
- Grading
- Maximum particle size
- Particle shape
SANS 1090:2009 the standard covering sand for plaster and mortar gives limits for certain properties of sands but these should be regarded as no more than a guide. It has been found that sands meeting this standard do not necessarily produce satisfactory plaster; conversely sands that do not meet this standard may produce acceptable mixes.
Clay content
Only a small proportion of clay can be tolerated in plaster sand. Sands with high clay content may generally be recognized as follows:
- The fraction that passes a 0,075 mm sieve1 can, after being moistened, be rolled into a thread about 3 mm or less in diameter.
- Plaster mixes made with such sands are:
- Very “fatty” and tend to cling to a trowel
- Have a high water requirement
For a field test, place a few handfuls of dry sand in the foot of a nylon stocking and tie closed. Shake the sand and collect the dust in a bowl.
Grading
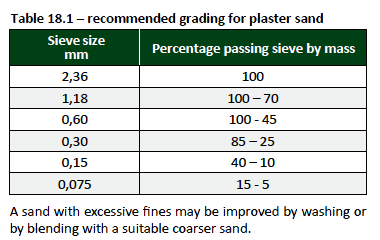
Ideally, the sand should have a continuous grading, from dust to the largest particles. The fractions passing the 0,15 mm and 0,075 mm sieves (“fines”) are important because they significantly influence the water requirement, workability and water retentivity of the mix. Increasing these fractions results in increased water requirement (with consequent lower strength and higher shrinkage), but improved workability and water retentivity. The optimum fines content is therefore a compromise between these properties. A sand lacking in fines may be used with hydrated builder’s lime, mortar plasticizer, or masonry cement – See improving workability.
Note: Some coarser material may be acceptable, or desirable, for textured decorative work.
Maximum particle size
For conventional smooth plaster, all the sand should pass through a sieve with 2,36 mm square openings. For coarsely textured decorative work the corresponding sieve size is 4,75 mm.
Oversize particles (and lumps) should be removed by sieving. Assessing the suitability of a sand for plastering
A sand may be assessed by doing both of the following:
- Comparing grading and maximum particle size, and – if necessary – apparent clay content, with the recommendations given.
- Making a mix to assess water requirement and workability.
A field test – Mix assessment is done as follows:
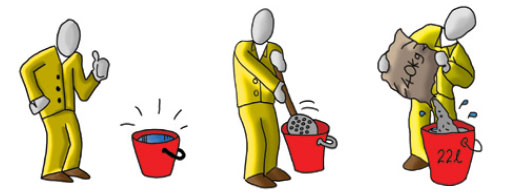
- (i) Weigh out the following amounts of material:
- 5 kg of cement
- 25 kg of dry sand
- 5 kg (ℓ) of water
- 1 kg (ℓ) of water
- 1, 5 kg (ℓ ) of water
- (ii) Mix the cement and sand to a uniform colour on a nonabsorbent surface.
- (iii) Mix, in succession, each of the amounts of water (5 ℓ, 1 ℓ and 1, 5 ℓ) until the mix reaches a consistence suitable for plaster:
- If 5 ℓ of water is enough the sand is of good quality,
- If 5 ℓ + 1 ℓ is enough the sand is of average quality,
- If 5 ℓ + 1 ℓ + 1, 5 ℓ is enough, the quality of the sand is poor and if more water than that is required, the quality is very poor.
Only “Good” sands are suitable for use in all plaster work; “Average” sands may be used for interior plaster; and “Poor” and “Very poor” sands are not recommended and should be avoided.
- (iv) Assess the workability of the mix (at plastering consistence) by forming a flattened heap about 100 mm high and 200 mm in diameter on a non-absorbent surface. Place a plasterer’s trowel face down on top of the heap and try to push the trowel down.
A workable plaster will squeeze out from under the trowel and it will be possible to push the trowel to within a few millimetres of the underlying surface. An unworkable mix will “lock up” once the trowel has moved a few millimetres and prevent further downward movement of the trowel. If the mix appears to be workable, pick up some of the plaster on a trowel then tilt the trowel. The plaster should slide off easily. If it clings to the trowel the mix is too “fatty”, an indication of excessive clay content of the sand.
Improving workability
These materials may only be used in cases where a mixture of sand and Portland cement does not have satisfactory workability, usually because of a deficiency in the sand. Workability is improved by increasing the amount of very fine material in the mix, entraining air in the mix, or a combination of these. The following materials are used to improve workability:
Hydrated builder’s lime
This is in the form of very fine plate-like particles. The amount added to the mix may be as much as the amount of cement (by volume, see mix proportion table). Only hydrated lime complying with SANS 523: 2007 Limes for use in building should be used. Use type A2P if possible for better plasticity. Note: that the limes used in South Africa do not have cementing properties. They cannot therefore be used to replace cement but are used in addition to Portland cement.
Air-entraining agents (AEAs)
These are chemical admixtures that cause millions of tiny air bubbles to be entrained in the mix. Accurate dosage is essential because over-dosage results in excessive air entrainment with consequent loss of strength. Because dosage is difficult to control on site, the dosing of AEAs on site is not recommended.
Note: Gypsum-based plaster should never be mixed with a plaster made with Portland cement. This is because gypsum is a sulphate compound which attacks Portland cement paste especially in damp conditions. This attack causes swelling, softening and disintegration of the plaster.
Masonry cement
These products comprise a blend of Portland cement, ground limestone or hydrated lime and an AEA. Masonry cements are normally used in plaster as a substitute for Portland cement. Plasters made with masonry cement will have lower strength than those made with Portland cement at the same ratio of sand to cement. For similar strength therefore, masonry cement mixes should be richer than Portland cement mixes – See Table 18.2 – Typical Mix proportions for plaster.
Note: Builder’s lime and AEAs should not be used with masonry cement.

Bonding agents
These are specially formulated water-based emulsions of polymers such as styrene butadiene rubber (SBR), acrylic, and polyvinyl acetate (PVA). They are used as a part replacement for mixing water in spatterdash coats. Emulsions become effective by coalescing which happens only when the mixture dries out. Un-coalesced emulsions can be leached out of the mix by water. Mixes containing an emulsion should therefore be cured by maintaining moist conditions and not by applying free water; they must then be allowed to dry out before being exposed to wet conditions. Polymer emulsions must not be used on their own because they may form a plastic skin that will act as a debonding agent.
Mix proportions
Mix proportions for conventional plaster are shown in Table 18.2.
Surface preparation
Strength
In the first instance the masonry units (vertical surface) needs to be strong enough to survive handling and transport prior to being built in and should be strong enough to hold the plaster. Similarly, in other surfaces other than masonry should have ample strength prior to being plastered. In some cases, it is necessary to plaster existing walls of soft clay brick. Methods of plastering such surfaces are discussed later.
Roughness
Background surfaces should ideally be at least as rough as coarse sandpaper or rough-sawn timber. Surface roughness can be achieved in one of the following ways:
- Using formwork with a rough surface, e.g. sawn timber for concrete
- Stripping formwork early and wire brushing concrete
- Hacking
- Abrasive blasting (e.g. sand blasting)
- Applying a spatterdash layer
Cleanliness
Surfaces must be free of loose material, such as dust, and films that can interfere with bonding, such as curing compounds, or release agents. Background surfaces may be cleaned by:
- Water jetting
- Blowing with (oil-free) compressed air
- Vacuum cleaning
Solvents should not be used to remove films formed by curing compounds. (Such films must be removed by mechanical means.)
Absorption
First assess absorptiveness by throwing about a cupful of water against the surface. The surface will fall into one of the three categories:
- I No water is absorbed.
- II Some water is absorbed but most runs off.
- III Most of the water is absorbed.
Category I surfaces, which would include hard-burnt clay face bricks, glazed bricks and very dense high-strength concrete, should be prepared by applying a spatterdash coat that includes a polymer emulsion (bonding agent). Such surfaces must not be pre-wetted.
Category II surfaces should not require any treatment to control suction.
Category III surfaces should be wetted thoroughly and then allowed to become surface dry before the plaster is applied.
Preparation of various types of substrate
Monolithic concrete
Concrete is normally placed in situ but may be precast. Provide a rough surface by using rough textured formwork, early stripping of formwork and wire brushing the concrete, hacking or abrasive blasting. (If none of these is practicable, apply a spatterdash coat after ensuring that the surface is clean.) Ensure that no form-release oil is left on the surface to be plastered. Clean down by water jetting or vacuuming. Remove curing compound, if any, by mechanical means. Conventional structural concrete should not require wetting to control suction. High-strength concrete may require the application of a spatterdash coat.
Concrete masonry
The texture of the masonry units should be sufficiently rough without further treatment. If not, apply a spatterdash coat. If the surface is dusty, clean by brushing, water jetting or vacuuming. It should not be necessary to control suction of the surface by pre-wetting, unless the masonry units are very absorbent
Burnt clay stock brickwork
The texture of the bricks should be sufficiently rough without further treatment. If not, apply a spatterdash coat. If the surface is dusty, clean by brushing, water jetting or vacuuming. Burnt clay stock bricks normally have a very high suction; this can be assessed by wetting the wall (see Absorption). If suction is high, pre-wet the wall and allow it to become surface dry before applying the plaster.
Burnt clay face-brickwork
Such walls are characterized by low suction. Brick texture may be smooth, almost glazed, or rough. Provide a key by cutting out mortar joints about 10 mm deep. (A key would not normally be made while the wall is being built because there is no point in using face bricks if the wall is to be plastered.) If the brickwork has been treated with a sealer or waterproofing agent, the surface layer containing this treatment must be removed. Apply a spatterdash coat if the brick surface is smooth. Rough bricks should not require this. It is normally not necessary, or advisable, to pre-wet the wall before plastering.
Sundried or poorly burnt soft clay brickwork
This type of walling may be found in very old buildings, usually when restoration or repairs are being done. Care should be taken when removing the old plaster so as not to damage the bricks. Protect the wall from rain or running water once the bricks are exposed. Rake out the joints about 10 mm deep (the mortar is normally very soft). Brush down the wall to remove any loosely adhering material. Lightly dampen the wall and apply a spatterdash coat that incorporates a polymer emulsion to improve adhesion.
How to apply plaster
Wet the wall where required (refer to Absorption). Use a hawk to hold the plaster and scoop plaster onto your trowel from the hawk.Apply plaster directly onto the wall, in a smooth upward sweep and ensure it is compacted onto the substrate.
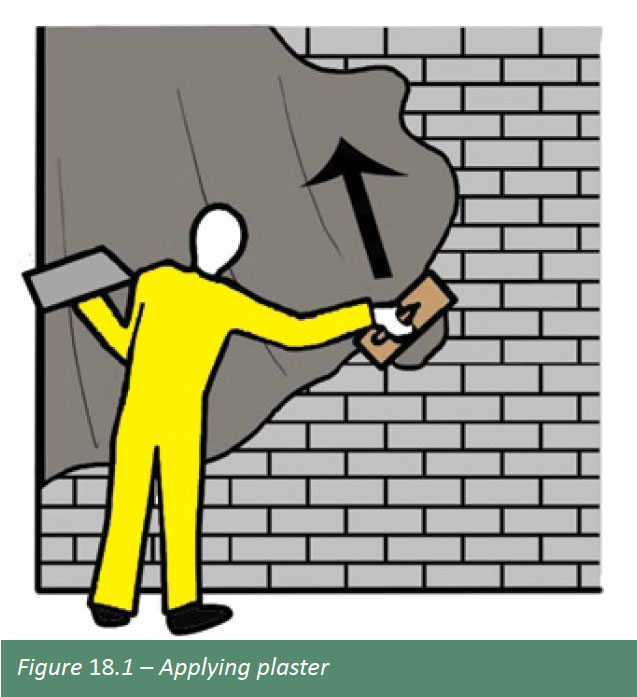
Plaster small areas at a time, but ensure that a whole wall is plastered in one operation; where this is not possible plastering should be joined where other vertical elements or components are also fitted or by cold joining the following day.
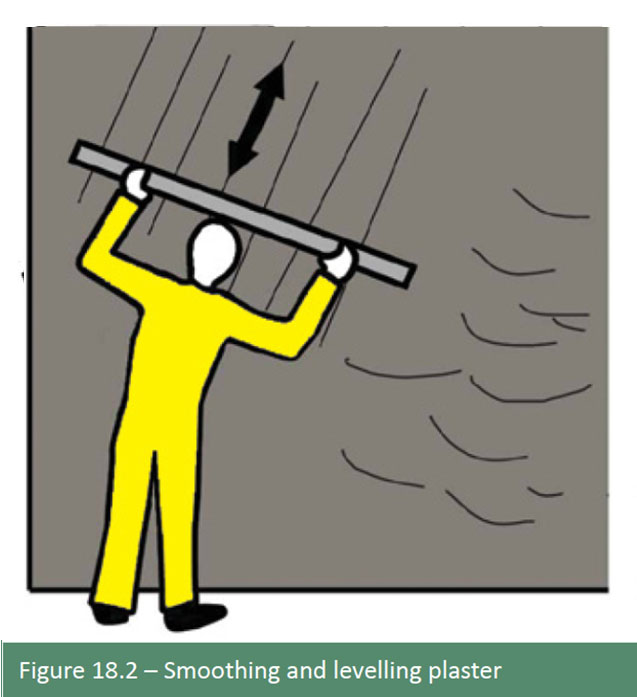
Level the plaster by pulling a wooden straight edge over the plastered area with a sawing motion. The plaster should be ±12mm thick. Wet the plaster slightly, and then use a wooden float to smooth the surface.
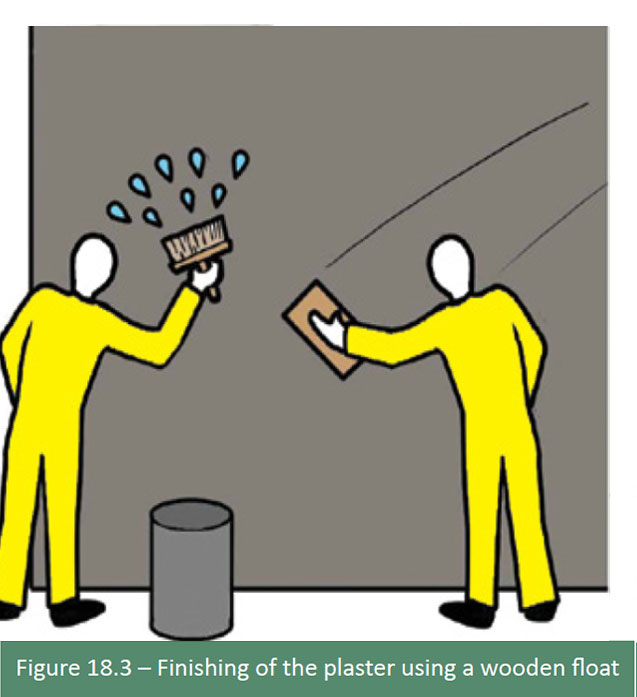
If a very smooth texture is required, a steel trowel may be used on the surface. Such surfaces are however not generally recommended because they tend to craze and show up Imperfections.
Plaster thickness
Recommended plaster thicknesses are as follows:
First coat (undercoat): 10 – 15mm
Second undercoat (if any): 5 – 10mm
Final (finish) coat: 5 – 10mm
Note: If plaster is applied in a single coat, the thickness shouldn’t be less than 10mm and not thicker than 15mm.
Plastering tips
- Never work in direct sun.
- Plaster should be cut through (a ruled joint) to the substrate where different substrate/materials meet; for example, where masonry and concrete join.
- Apply screed strips or dots on the wall before the wall is plastered. These narrow strips or dots of plaster act as guides for the straight edge to be checked against for accuracy and thickness when striking off the excess plaster.
- If plaster is to be applied in more than one coat, theundercoat(s) should be scored with rough parallel lines about 20mm apart and 5mm deep. The purpose of scoring is twofold: to provide a key for the next coat and to distribute shrinkage cracking so that it is less noticeable.
Note: Check out any West facing wall and you will notice they tend to have more crazing than walls say facing South – It is important to not plaster a West facing wall in mid to late afternoon sun and when you do it should be kept damp.
Common defects in plaster
Differential movements
This occurs when there is movement between the applied coat of plaster and successive coats. Application of the different coats must be done while the previous coat is still green – failures also appear where the cement is too rich – too much cement.
Lack of adhesion
This is common where no proper adhesion is provided for the plaster – see Absorption above. Sometimes it is also attributed to the excessive sucking of water by the substrate – Dry out.
Crazing of surface
The main cause of this problem is because of poor ungraded sand being used in the mix; it can also be caused by over troweling, especially with a steel trowel; or again due to Dry out especially when plastering walls expose to direct sunlight.
Loose or hollow patches
Whenever plaster is peeling from the wall then it is usually due to poor adhesion or because of moisture penetration from the substrate; for example, rising damp.
Popping or blowing
This type of defect is mainly where water enters through hair cracks in the plastered surface and forms a round circle which eventually pops out. Can also be caused by the presence of pyrites, clay lumps or other deleterious substances found in the sand.
Two Coat Plasters
Two coat plasters are usually applied to the first coat cement plaster for aesthetic reasons or for decorative purposes. They are available from very smooth gypsum finishes requiring painting to textured coloured plasters requiring no further painting except sealing if required.
Gypsum
Gypsum is a solid white mineral which is heated and used as a binder in gypsum plasters. Gypsum plasters have poor water resistance, and are not recommended for exterior applications.
Gypsum plaster types
Rhinolite
Is a lightweight retarded hemihydrate gypsum plaster; specially manufactured as a combined basecoat and finishing plaster for internal application onto brickwork, concrete block, concrete and Rhinoboard, and as a finishing plaster onto sand/cement first coat basecoats and suitable for providing:
- A highly polished smooth surface
- A Brush finish
- Or a textured finish
Rhinolite should not be used in areas where walls are washed with hosepipes, in showers or in industrial type kitchens. Rhinolite surfaces should under no circumstances be sandpapered and must be sealed with an oil or solvent based bonding liquid or a pigmented plaster primer suitably thinned down with mineral turpentine.
NB: Epoxy paints should not be applied onto Rhinolite Cretestone
Cretestone is a vermiculited, retarded hemihydrate gypsum plaster and a finishing plaster for application to concrete soffits, concrete blocks and Rhinoboard; for internal use only. Do not sandpaper Cretestone and seal with oil or a solvent based primer before painting.
Rhinoglide
Rhinoglide is a quick setting drywall joint filler for patching, bedding and finishing. This product has been developed specifically to assist the drywall contractor to complete the drywall jointing, within one day. It is designed as a filler for plasterboard systems but can also be used as an interior crack filler and for filling rough plaster surfaces prior to painting.
Rhinobed
An adhesive used for fixing decorative mouldings, rhino Cove cornice and as a jointing material for Rhinoboard.
Applying Gypsum plasters (Rhinolite)
Rhinolite two-in-one plaster should be used neat, with the addition of clean water only. The plaster has a setting time of approximately 60 minutes. As in good building practice, roof, windows and doors should be installed before plastering with Rhinolite (to help prevent dry-outs).
Mixing
- Do not add any foreign matter (e.g. cement) to Rhinolite. Mix with clean water in a clean container.
- Add Rhinolite slowly to clean water and allow to soak for 5 minutes. Mixture must have texture of thick cream.
- Mixing should preferably be done by mechanical means. This aerates the plaster,increasing coverage
and improving workability. - Mix only until the plaster is lump free. Do not re-stir or add more Rhinolite or water to the mix after mixing is complete.
Methods of Application
Basecoat and finishing plaster onto brickwork, concrete and concrete blocks. Brush off all loose particles of cement with a wire brush and ensure that dust, particularly in confined areas where mechanical chasing has been done, is removed. Slight damping down will help to settle the dust. Fix plaster corner beads, plum and square on all external corners and reveals, using dabs or dots of Rhinolite.
Note: It is recommended that all corner beads be applied before plastering commences. (Although corner beads are recommended, Rhinolite can be finished off around the corners in the normal manner with a corner tool).
Apply a thin tight coat of Rhinolite and then follow with a filler coat to the required thickness. Level out the Rhinolite using a feathered edge, straight edge or a darby. At this stage the plaster will not be completely smooth and a brush finish can be achieved by brushing evenly with up and down strokes using a damp block brush.
When a smooth finish is required, allow to stand until the plaster has stiffened and then treat in one of the following ways:
- On areas plastered with the same mix. Float the entire surface with a sponge rubber float to level the area and bring out the “fat” to the surface. Holding a steel trowel at an acute angle to the wall, remove the “fat” while polishing the surface.
- On areas plastered with different mixes. Apply a tight skim coat, made up from one mix only, over the entire surface and finish using a rubber float and a steel trowel in the usual manner.
Basecoat and Finishing Plaster onto Rhinoboard Ceiling
Tack 63mm wire scrim or apply 50mm Fibre-tape over all joints and plaster the entire surface with 3-6mm thick Rhinolite using the same plastering procedure as described above. A double layer of Fibre-tape should be applied directly over butt joints.
Finishing Plaster onto Sand Cement Basecoats
The sand cement basecoat must be completely dry before Rhinolite is applied. Brush down the entire surface to remove all loose particles. Wet the sand cement (plaster) basecoat to eliminate excessive suction.
Rhinolite finishing plaster is applied in two layers, the first of which should be a thin tight layer. The second filling-out layer, to between 1,5 and 3mm thick, follows immediately. As the plaster stiffens, float and/or steel trowel to a smooth surface free from blemishes, as described above under methods of application.
Application to Painted Surfaces
Ensure that the painted surface is sound and free of bubbles, loose particles and/or oiliness. Apply plaster bonding liquid in accordance with the manufacturer’s instructions and while it is still wet and tacky, follow with the required application of Rhinolite plaster.
Projection plasters
Projection One Coat Plasters are finishing plasters applied by means of a projection machine onto masonry. It is recommended that only certified and trained applicators apply this plaster.
Gyproc RhinoLite Projection One Coat
Plaster is applied by means of an air driven projection system. After the projection application has been completed, the product is finished off in the normal manner of using a steel trowel (no hawk required). Gyproc RhinoLite Projection Plaster provides a levelling and smoothing finish in one, while increasing productivity and shortening labour input time. Projection plasters reduces total installed cost of plasters as a result of their productivity.
Gyproc RhinoLite Projection Plaster is available in two products. One for board surfaces and another for masonry surfaces.
Key Facts
- One application
- Levelling and finishing plaster for board, brick and block surfaces
- Surface can be painted directly after dry out
- Uses 58% less water than with sand and cement
Decorative plasters
A number of specialized decorative plaster products are available offering a number of different finishes. Briefly described below are some products available from Cemcrete.
Satincrete
A blend of Cemwash and base Coat adhesive that is applied by trowel onto wood-floated plastered walls that creates a smooth, coloured, and waterproof finish; available in colours from earthy to funky. Depending on the look required the plaster can be sealed using linseed oil and turpentine or wax. The sealing will enrich the colours providing a wall finish full of depth, warmth and character. For Interior use only.
Decocrete
A coloured, cement based material specifically formulated to be plastered to excessive thicknesses; does not slide, shrink or crack and dries rock-hard. The slow setting properties of the plaster allow sufficient time to work and manipulate the material in-situ. Making it the ideal shaping plaster for wall carvings and other artistic creations. For interior and exterior use.
Cemplaster
CemPlaster is a 3-5mm coloured, waterproof, fibrereinforced plaster. It creates an attractive mottled finish that adds some texture to the surface. Due to its thickness, it can be imprinted with a texture as well as angle grinded to create an off-shutter concrete look.
Coloured scratch plaster
Coloured Scratch Plaster is ideal to achieve that rustic look. It is a blend of ColourCem, OPC and aggregate for the creation of an 18 to 20mm coloured plaster, perfect for outdoors, or bringing the organic look indoors.
Screed and Toppings
Overview
Screeds and toppings are commonly used as a means of providing smooth flat floors in residential, commercial and industrial buildings. Toppings may also be used to increase the structural depth and strength of the base slab. The aim of this section is to provide the necessary technical information, to enable the reader to compile a specification to achieve a satisfactory standard of work for laying floor screeds and toppings. Information is provided on monolithic, bonded and un-bonded screeds and toppings.
Let’s first try and differentiate what the difference is between a screed and a topping:
A Screed is a layer of well compacted material, commonly a mixture of cement and fine aggregate, that is applied to a base (usually a concrete floor) at the appropriate thickness and that has a surface suitable for receiving a floor finish.
While a topping is a layer of high-strength concrete designed:
- to provide a dense, abrasion resistant surface on a concrete base, or
- to increase the structural depth and strength of a base slab (structural topping).
Screed types
Three types of screeds and toppings are commonly found in practice:
- Monolithic screeds and toppings which are applied to the floor while the concrete in the base is still in a plastic state.
- Bonded screeds and toppings which are applied to hardened concrete floors.
- Unbonded screeds and toppings which are used when it is impossible to ensure a good bond between floor and screed or topping. In this case the screed or topping is separated from the floor by insulation boards or an impervious membrane.
While all three types have many characteristics in common, they also differ in some important ways; which are dealt with and discussed with what follows.
Material selection
Materials for screeds
Sand
The quality of the sand, i.e. its concrete-making properties, has a large influence on the quality of the resulting screed. It should be a “concrete” sand – not a “plaster” sand – but the largest particles should be removed by sieving the sand through a sieve with openings about 5 mm wide to facilitate finishing. Where possible, the sand should be tested in a laboratory beforehand. It should then, in a mix of 3, 5 parts of dry sand and 1 part of cement by mass, produce a plastic, easy working, cohesive mortar of plastering consistence (i.e. a slump of about 40 mm) with a water content per cubic metre of not more than 320L but preferably not more than 300L. (The higher the water requirement, the lower the strength of the hardened screed and the greater the drying shrinkage and tendency to crack.) To produce a mix that is easy to finish to a smooth surface, it may be necessary to blend two or more sands. Commonly a blend consisting of 4 parts of crusher sand, sieved as above, and 1 part of clean “plaster” sand, gives good results.
Note: Sieving must be done on horizontal sieves which are shaken, or on cylindrical sieves which are rotated. The practice of throwing the sand onto a sloping sieve with a shovel is unacceptable because it is inaccurate, unreliable and wasteful.
Cement
Use cement complying with SANS 50197-1 type CEM I or CEM II A. To use other cements, first obtain expert advice.
Admixtures
Commercially available admixtures, especially of the water reducing type, may be used, but preferably only on the recommendation of the laboratory which tests the sands, and only where adequate control of dosage on site can be guaranteed.
Materials for toppings
Aggregates
Aggregates for concrete should comply with the requirements of SANS 1083. The coarse aggregate used should be of nominal size 9, 5 mm for toppings of nominal thickness 30 mm. However, if the nominal thickness of the topping exceeds 40 mm, the nominal size of the coarse aggregate should be increased to one quarter of the thickness of the slab, subject to a maximum of 19 mm.
Cement
Cement should comply with the requirements of SANS 50197-
Cement extenders should comply with the requirements of SANS 1491. The choice of appropriate cement type depends on the type of floor and the environment in which it is to be used.
Of prime concern are adequate early strength for cutting of joints and adequate abrasion resistance. In floors with sawn joints, concrete has to achieve a certain strength to enable sawing of the joints. With mixes of low early strength, the time taken to reach this strength is increased. The longer the period between casting and saw-cutting, the greater the possible moisture loss from the concrete and the higher the risk of shrinkage cracks occurring before the concrete can be sawn. Cement types and/or cement contents promoting sufficient early strength for sawing should be chosen.
Because floors have a large surface-to-volume ratio they are prone to rapid surface drying with the attendant loss of abrasion resistance at the surface. Effective curing is therefore essential.
Concrete made with cements having a low early strength or site blended cements may require adjustments in the concrete mix design to ensure adequate early strength for cutting of joints, particularly in cold environments. Curing methods and regimes may also have to be improved to ensure adequate abrasion resistance, especially in adverse weather.
Technical know-how
Surface finish
Screeds
The surface of the screed should be finished according to the type of wearing surface or flooring that is to be laid. For mastic asphalt, wood block and strip, and some textile floor coverings, a non-slip finish is appropriate, while thin sheet and tile floor coverings usually require a smoother, steel trowelled surface. If a designer specifies the use of a thin sheet or tile floor, then the use of a smoothing compound needs to be specified in certain circumstances.
Screeds are essentially light-duty flooring elements and are suitable for:
- Wearing surfaces of floors of utility rooms in domestic premises (e.g. store rooms, garages)
- Floors covered with carpets, plastic tiles or linoleum, etc. and subjected to relatively light traffic such as in offices, shops and hospitals.
Screeds are generally not suitable as wearing surfaces in commercial buildings, schools etc. or in industrial premises. Preferred methods of floor construction for such premises are full-thickness trowelled concrete or a topping on a concrete base.
Toppings
The surface of the topping should be finished to meet the abrasion requirements of the facility.
Specifying tolerances in levels and surface regularity When specifying departure from datum and surface regularity, taking into account the types and thicknesses of the flooring and the screed or topping, the designer needs to consider:
- the finished floor surface
- the screed/topping/direct finished slab surface
- the base slab to receive a screed or topping
Deviations from datum level
Permissible deviation from datum level depends on the area of the floor and its intended use. For large areas for normal purposes ±15 mm from datum should be satisfactory. Greater accuracy may be required in small rooms, along the line of partition walls, in the vicinity of door openings and where specialized equipment is to be installed directly on the floor and in the case of high tolerance industrial floors.
Surface of floor/ screed/ topping Datum level.
Maximum permissible deviation from a 3 m long straight line joining two points on the surface:
- Class 1 – 3mm: suitable for floors requiring minimum irregularity, e.g. television studios.
- Class 2 – 5mm: suitable for the major proportion of construction work
- Class 3 -10mm: suitable for floors where regularity is not important
The designer should also specify the maximum permitted abrupt change in level across joints in direct finished slabs and screeds and toppings taking into account the type and thickness of the flooring to be applied. For some types of floorings, a maximum of 2 mm would be acceptable, taking into account the surface preparation necessary to receive the flooring. For other types of flooring, especially thin floorings, or where no flooring is to be applied, it would be appropriate not to have any changes in level across joints.
Note: Insistence on higher standards of surface regularity than are necessary will result in higher costs.
Thicknesses & Tolerances
Monolithic screeds & toppings
As defined above, these are screeds and toppings that are applied at the time when the underlying concrete floor is placed. Screed thickness should be approximately 25 mm but not less than 15 mm or more than 40 mm. The minimum thickness of a monolithic topping at any part should be 20 mm. The actual thickness required will depend on structural requirements. In some circumstances, the design thickness of a topping may have to be increased to more than 40 mm, but then there will be an increasing risk of loss of adhesion to the base, due to differential shrinkage stresses.
In attempting to achieve good adhesion between screed/ topping and base concrete, it is important to take cognizance of the phenomenon of bleeding of fresh concrete. Bleeding causes water to accumulate on the top surface of the fresh concrete and the presence of this water layer may impair adhesion unless suitably dealt with.
The screed/topping should therefore be laid at one of two stages:
- either immediately the concrete has been compacted and levelled off and before bleed water appears on the surface (“immediate placing”);
- or after bleeding of the concrete has ceased and bleed water has evaporated or has been removed completely by mopping up (“delayed placing”).
Immediate placing requires careful timing but has the advantage that no preparation of the concrete surface is required. Timing of delayed placing is not as critical but the surface of the concrete does require some preparation: laitance should be loosened by light brushing, with a wire brush or a brush with stiff bristles, and thoroughly removed by sweeping, or preferably, by vacuum cleaning. Delayed placing should however be done within an hour or two after the end of the bleeding period.
Bonded screeds & toppings
As defined previously, bonded screeds and toppings are applied to hardened concrete. The hardened concrete is also known as the base concrete. Screed thickness should be not less than 25 mm or more than 50 mm. The minimum thickness of a bonded topping at any part should be 35 mm. The actual thickness required will depend on structural requirements. In some circumstances, the design thickness of a topping may have to be increased to more than 60 mm,but then there will be an increasing risk of loss of adhesion to the base, due to differential shrinkage stresses. In these circumstances, the use of a reinforcing mesh (ref. 193 or 245) as close to the upper surface as is permissible will assist in restraining differential shrinkage and in controlling cracking.
Unbonded screeds & toppings
Screeds
Where screeds are, or have to be laid on a damp-proofing membrane or separating layer, the minimum thickness of the screed should be at least 50 mm. Where they are laid on a compressible layer, such as insulation boards, the minimum thickness should be at least 70 mm.
Topping
Where a concrete topping is required over a damp-proof membrane, an unbonded overlay of minimum thickness 100 mm should be used in order to minimize the risk of curling. A similar unbonded overlay should be used where a base has become contaminated (e.g. with oil), and bonding is not possible. The concrete used for an overlay intended to support a high-strength concrete topping should have a 28- day compressive strength of at least 35 MPa.
How to lay a screed
Screeds
Batching
- Mix proportions should be:
- Sand, measured in the moist, loose state: 130 ℓ
- Cement: 50 kg
- Water: sufficient to achieve a plastic, workable consistence.
Material quantities
The net approximate quantities of materials required to manufacture 1 m² of compacted screed mix 25 mm thick are:
- Sand in moist, loose state: 28 ℓ
- Cement: 11 kg
An allowance of 10% over and above these quantities should be made for wastage. The capacity of a builder’s wheelbarrow is 65 ℓ so batches consisting of two barrow loads of sand and one bag of cement are convenient for mixing by hand or in a sufficiently large concrete mixer. The volume of compacted screed mix produced by such a batch is approximately 115 ℓ. The size of the batch should never exceed the amount that can be used up within 45 minutes of mixing. Apart from wheelbarrows, containers such as buckets, boxes or drums of known volumes may be used for batching. Batching containers should always be filled flush to the rim. Sufficient containers for a complete batch should be provided to avoid the possibility of errors in counting.
Mixing
Machine mixing is preferable and each batch should be mixed for not less than three minutes if this method is used. With hand mixing, the sand and cement should be mixed without adding water until the colour is uniform. Then only may the water be added; the quantity used being just sufficient to produce a mix of the desired consistence. Hand mixing should be carried out with shovels on a smooth concrete floor or a steel plate. Mixing directly on the ground should not be permitted as this results in contamination of the mix with earth and/or organic matter.
Placing and compacting
Control of levels
Narrow strips of screed mix, laid 3 to 4 m apart and compacted to finished level, should be used as guides to establish the level of the screed. The screed should be placed and compacted immediately after laying the guide strips. Where the edge of a guide strip forms a day work joint it should be formed or cut to produce a vertical joint.
Alternatively, and especially for bonded screeds, timber or metal screed battens, carefully levelled and trued, should be fixed at the correct height for the required thickness of screed. At day work joints all bedding screed beneath the battens should be cut away to form a vertical joint. Figure 18.4b- Deviation from datum level (Exaggerated vertical scale)
Panel sizes and joints
Screeds should be laid in areas as large as possible in one operation, consistent with achieving acceptable surface regularity and the levels required, to minimize the number of joints. Although screeds laid in large areas may crack at random intervals as they dry and shrink, these cracks are more acceptable than the curling which may occur at vertical butt joints if screeds are laid in small panels.
Where joints are present in the base concrete, they should be continued through the screed so that joints in screed and base line up exactly. Where screeds are placed on precast concrete elements this may not be practicable. In such cases, the use of a reinforcing mesh in the screed may be used to control cracking of the screed and applied floor finishes, along joints between precast units, provided panel sizes do not become excessive. This is particularly important if the applied finishes are brittle, or the slab is subject to external influences, such as thermal stresses, which could cause movement.
Joints may be formed with screed battens if screeds on each side are cast at different times or by cutting through the partially stiffened screed mix with the edge of a trowel before the screed sets if both sides are laid at the same time. If the screed is not to be covered subsequently, edges at joints should be rounded to a 3 mm radius.
Time limits
The time which elapses between the start of mixing a batch and when that batch is placed and compacted should not exceed 45 minutes, and during that time the mix should be protected from drying out. Batches not placed and compacted within this time, or which have stiffened to a degree that their workability (consistence) cannot be restored fully by turning them over a couple of times with spades, should be discarded.
Finishing
See finishing under topping
Topping(s)
Mixes
Mixes
A topping should have a characteristic 28-day strength appropriate to the desired abrasion resistance or designed compressive or flexural strength, but of at least 20 Mpa where abrasion resistance is not a consideration.
Laying
After screed battens surrounding the panels on which the topping is to be applied have been attached to the prepared base and the bonding agent has been applied as described above, the topping should be spread, compacted, screeded and bull floated as for a concrete floor.
Monolithic toppings
Monolithic toppings should be laid in panels of the same size as those of the base. Full-depth isolation joints should be formed in monolithic toppings against walls, columns and other fixed objects. Such joints should have the same width as those in the base, but not less than 20 mm. Other joints in monolithic toppings should coincide with those in the base, be of the same type and width as those in the base and extend through the full depth of the topping.
Bonded toppings
For separate bonded toppings the area of a panel should not exceed 9 m2. This may not be practicable for structural toppings on precast units where joints across the span within the central two-thirds of the span cannot be permitted. This may be overcome by the use of reinforcement as discussed later in this section. The general pattern of panels will depend upon such aspects as the shape of the floor area and the position of columns. Wherever possible, panels should be square, and the length of a panel should be limited to 1,25 times its width to reduce the tendency to crack.
Full-depth isolation joints should be formed in separate bonded toppings against walls, columns, and other fixed objects. Such joints should have the same width as those in the base, but not less than 20 mm.
Except where intermediate joints are required in the topping to divide it into smaller panels than the base, joints in separate bonded toppings should coincide with those in the base, be of the same type and width as those in the base and extend through the full depth of the topping. Intermediate joints dividing the topping into panels of recommended maximum dimensions should be either sawn contraction joints that extend halfway through the thickness of the topping, or butt construction joints.
Where bonded toppings are placed on precast concrete elements and the above recommendations are not practicable, the use of a reinforcing mesh close to the top surface of the topping may be used to control differential shrinkage and cracking of the topping and applied floor finishes along joints between precast units, provided panel sizes do not become excessive. The larger the panel size and the thicker the topping, the greater is the amount of steel required.
Unbonded toppings
The maximum panel size of a separate unbonded overslab should be based on the following rules:
- Maximum joint spacing not to exceed 30 times overslab
thickness, or 4, 5 m, whichever is the lesser. - Length-to-width ratio of panels not to exceed 1, 25
Full-depth isolation joints should be formed in a separate unbonded overslab against walls, columns and other fixed objects. Such joints should have the same width as those in the base, but not less than 20 mm.
Other joints should be either sawn contraction joints that exceed a depth of one quarter of the slab thickness, or keyed construction joints. Both types of joint should be offset at least 300 mm from those in the base.
Time limits
The time which elapses between the start of mixing a batch and when that batch is placed and compacted should not exceed 45 minutes, and during that time the mix should be protected from drying out. Batches not placed and compacted within this time, or which have stiffened to a degree that their workability (consistence) cannot be restored fully by turning them over a couple of times with spades, should be discarded.
Finishing
The resistance to wear of a concrete finish is significantly influenced by the method of finishing and the care with which finishing is carried out. Under no circumstances should cement or a dry cement-sand mixture be sprinkled directly onto the surface of a finish in order to absorb bleed water or laitance, since defects such as surface scaling may occur later. Surface water should not be trowelled back into the finish and, similarly, water should not be applied between trowelling operations, since this may cause surface weakness.
Three types of surface finish are described below, the choice being made according to circumstances.
- Ordinary non-slip – The surface is left as finished with wooden floats, except that if it is too open or too coarse it may be given a few passes with either a Perspex or aluminium float to close the surface without smoothing it. Over-working should be avoided.
- Steel-trowelled – If a hard, smooth finish is required, the surface will have to be steel-trowelled, using the delayed trowelling method. After the screed or topping has been spread, compacted and screeded to level, it should be bull floated. Bull floating should immediately follow screeding and should be completed before any excess moisture or bleed water is present on the surface. The purpose of bull floating is to eliminate ridges and fill voids resulting from straight edging.
- Finishes that are not to be exposed to severe service conditions – The finish (after it has been spread, compacted, screeded to level, and floated) should be left undisturbed until bleeding has ceased and the finish has stiffened to the extent that a footprint will barely show. Surface water should then be removed from the surface, floated and steel-trowelled at intervals until the desired texture is achieved. The texture of concrete finishes can be varied from a fine matt to a glossy surface, depending on the number of trowelling’s applied. A coarse non-slip texture may be produced by brushing a freshly floated surface with a broom, but the resulting ridges may become subject to abrasion.
A number of screed and topping admixtures and finishes are available in the market place which are typically used in industrial type applications like factories, workshops, hospitals etc. and include products like Abrasive resistant screeds, anti-static screeds, epoxy screeds, polyurethane screeds and self-levelling screeds. We have not covered these items in this publication as these applications are seldom used in domestic and light commercial building projects.
Decorative Screeds & Toppings
Colour Hardener
A granolithic concrete material that strengthens and colours concrete floors. It is a special blend of cement, very hard-wearing aggregates, lime fast pigments and certain additives which set rock hard, have exceptional abrasion resistance and reduces drying shrinkage. Providing a hardwearing attractive colouring system, whether steel floated to a smooth finish or textured, stamped or rolled to obtain different tiled or paved effects.
FloorCrete
A coloured cement-based, self-levelling floor covering for application onto rolled or wood floated concrete floor slabs or screeds. It produces a 2mm smooth, decorative layer that does not crack and provides a very durable, economical, smooth floor covering. For interior use only.
Accessories
Floor levelling compound
A cement-based mixture having carefully controlled setting, hardening, adhesive and self-levelling qualities used for repairing damaged, uneven or rough screeds prior to installation of floor coverings. Its rapid drying properties enable the contractor to install flooring soon after application, saving both time and money.
Bonding Liquid
Bonding liquid is a water based synthetic latex emulsion used as a primer on walls or an additive to some plaster mixes and for porous screeds or as an additive to pave-lite or other self-leveling products to promote improved bonding of plaster or screed mixes to the substrate.
Flat bar dividing strips
Are used at door thresholds and other transitions between two different floor finishes, typically used when both floor finishes are of the same level -Available in aluminium (Natural anodized) in the following sizes 3 x 25mm; 38mm; 50mm.
Plaster beads
The products are available in galvanised steel, stainless steel as well as synthetically coated galvanised steel ensuring that the product may be used in a wide range of climatic conditions.
- Internal and external plastering
- Thin-coat plastering (Rhinolite)
- Dry-lining (Dry walling and shop fitting)
- External render work
- A wide range of innovative arch forming products
References
Alexander G D & Alexander G C. 2010. Buildaid Building and Pricing Guide 2010/11. Johannesburg: Buildaid Publishing.
Alexander G D & Van As F. 2008: Civil Technology. Johannesburg: EWA Publishing.
South African Bureau of Standards. 2011/12 – SANS 50197-1 & various other standards. Pretoria. SABS Standards Division.
Julyan E L. 1998. Building & Civil Technology. 2nd Edition. Johannesburg.
Cement & Concrete Institute – www.cnci.org.za
Saint-Gobain Construction Products – Gyproc – www.saint-gobain.co.za