Chapter 20
CARPENTRY AND JOINERY
Introduction
Terminology
Boards and Shelving
Timberply Boards
Commonly used Ironmongery
Fitting a Mortice Lock
Commonly Used Fasteners
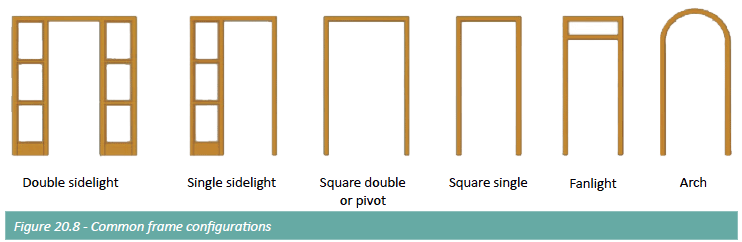
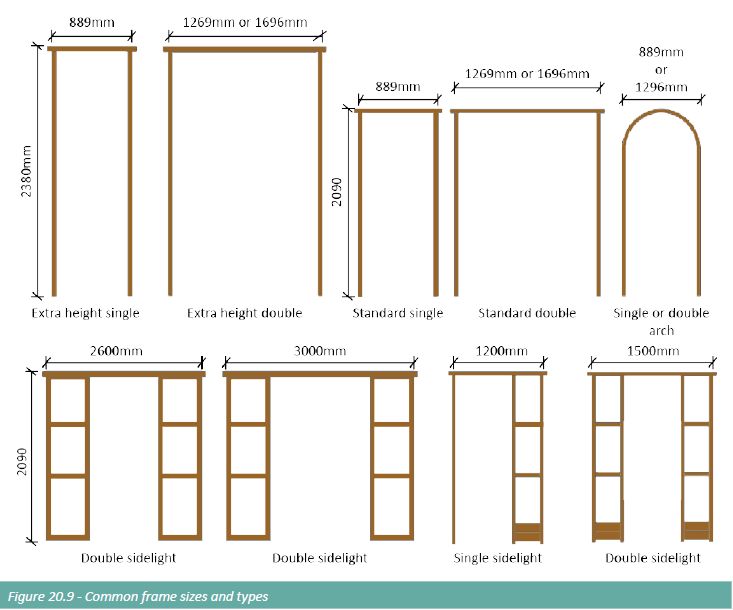
Door Frames
Doors
Building a Wooden Deck
Building a Jungle gym in your Garden
References
Introduction
Carpentry is a skilled trade primarily involving the use of wood to construct items as large as a home or simply fitting a skirting. The reference would sometimes include general carpentry, joinery and cabinet making although joinery and cabinet making are separate specialised trades. In South Africa over the past few decades the tasks undertaken by a carpenter have changed. Training
and qualifications have generally changed and the trade is simply not what it used to be.
Small to medium contractors have not been able to keep a qualified carpenter employed full time. They have therefore relied on their full time staff being multi skilled i.e. know enough about a few trades to get by. As an example, one may find the painter also hanging doors. Kitchen and cupboard manufacturers and installers have virtually taken the place of the cabinet maker. One must remember however that qualified cabinet makers still exist and undertake specialised projects. Reference to two sectors within carpentry have become a norm namely structural carpenter and finishing carpenter. The structural carpenter would undertake items such as constructing roofs, floors and timber framed buildings. The finishing carpenter would undertake for example skirting and architraves to doors. The terms joiner and a cabinet maker are virtually obsolete with the term finishing carpenter now an accepted norm.
Specialist carpentry trades
As the building industry has grown and evolved, smaller specialist businesses have become viable and now undertake the functions that had in the past been traditionally done on site.
Below is a list of some specialists that operate as independent business units.
- Wooden flooring
- Timber decks
- Prefabricated roof trusses
- Roof erection
- Shuttering and formwork
- Timber frame housing
- Ceilings and partitions
- Built in cupboards
- Kitchens
- Balustrades and staircases
On-site carpentry trades
Some carpentry tasks have remained on-site and are undertaken by tradesmen generally employed by the main contractor. Below are some examples of tasks undertaken. Remember that these tasks may also be undertaken by specialist contractors. Conversely, employed tradesmen may also undertake the tasks listed above which are normally undertaken by specialists. This is however unusual.
- Fitting skirtings, architraves and other mouldings.
- Hanging doors and fitting locksets.
- Fitting sundry fitting such as towel rails and door stops.
- Fitting curtain tracks or rods.
Some of the specialised trade listed above as indicated are all covered elsewhere is this publication.
Terminology
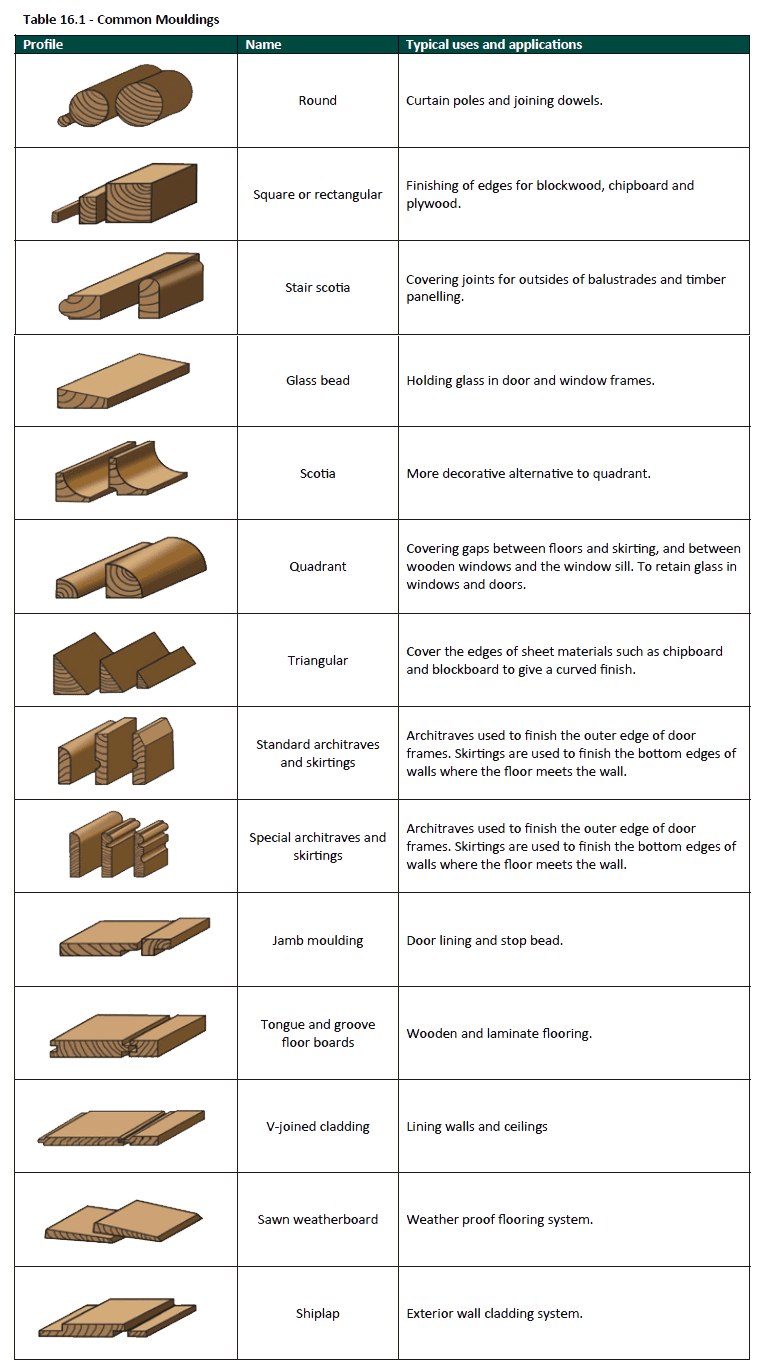
Architrave
An ornamental moulding to cover the joint between the plaster and wooden framings.
Arris
The corner where two plane surfaces meet. This is usually removed with sandpaper
Auger
A long twist bit turned with the hands, usually by means of a handle.
Awning Window
An out swinging window hinged at the top of the sash.
Awl
A hand tool for piercing small holes used as a starter hole for screws or nails. Also known as a Bradawl.
Bench Mark
A mark on a permanent object fixed to the ground from which vertical measurements are taken.
Baluster
Small vertical supports for the railing on a staircase.
Balustrade
A series of balusters supporting the railing of a staircase.
Balusters
The small vertical timbers supporting the handrail to stairs.
Bannister
A handrail with supporting posts on a staircase.
Block Plane
A small plane that can be used with one hand.
Bullnose
A piece of wood the end shaped to a quarter circle.
Carcass
The frame and structural parts of a cupboard, typically kitchen cupboards. The carcass is finished with working top surfaces, panelling and doors.
Casement window
A casement window (sash) is hinged at the side. Casement windows are held open with a casement stay.
Chair Rail (Dado rail)
A chair rail or dado rail is a moulding fixed horizontally to a wall to prevent chair backs from damaging the wall finish.
Countersink
Widening screw hole slightly at the top so that the head of the screw is flush with the surface when it is screwed in.
Cramp
A tool for compressing two or more pieces of material together.
Door Sealer
An aluminium profile with various rubber or plastic seals fitted to the bottom of the door and on the floor beneath the door to prevent wind or rain for entering.
Door Stop
A door stop is a small buffer (often a small round rubber knob) fixed to the floor or wall next to the door to prevent the door from opening too wide and causing the handle to bang against the wall.
Escutcheon
A metal plate fixed around a keyhole.
Face
The best side of a planed piece of timber.
Framed Ledged and Braced or FLB
A door constructed with frame (stiles, top and bottom rails) and ledge (midway between top and bottom rails) and then braced.
Head
The top member of a frame.
Jambs
The vertical posts of door frames fixed within an opening.
Joist
A parallel framing member used to support floors or ceilings.
Laminated
Several layers of timber glued to together
Ledged Door
A door consisting of boards and ledges but with no outer frame.
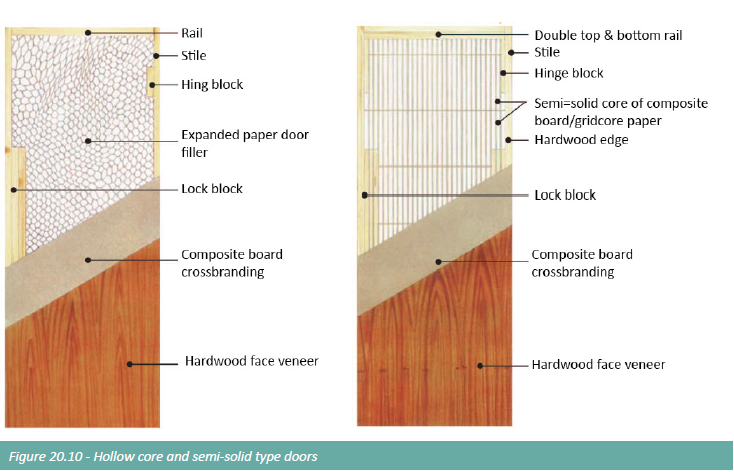
Lock Block
A block of wood in the framing of a hollow core to provide structural strength for the fixing of a lock.
Mitre Box
A rectangular box used for sawing mouldings to a required angle.
Mortice
A recess formed in one piece of wood to receive a projection (the Tenon) which is another piece of wood
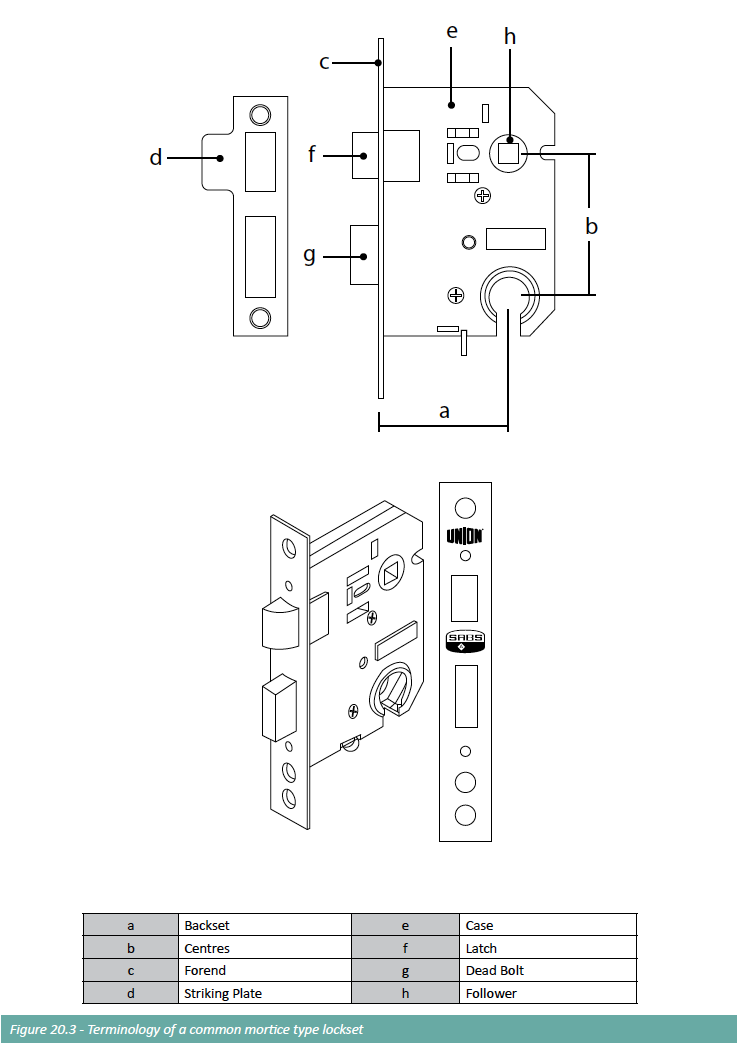
Mortice Lock
A lock sunk into the edge of a door stile. Once fitted the body of the lock is not visible on the face of the door.
Moulding
A piece of timber that has been shaped into various profiles ornamentation.
Mullions
The vertical divisions between two window frames or a window frame and a door.
Pediment
An ornamental head to a door opening
Pendant
The ornamental finishing to the bottom of a suspended post.
Plumb
Exactly perpendicular or vertical; at right angles to the horizontal floor.
Rebate
A rectangular recess formed in a frame to fit a door, sash
Rail
A horizontal member in a frame.
Rip Saw
A saw for cutting with the grain.
Riser
The vertical distance between two steps or treads.
Sash Door
A door with the top panels glazed.
Sash Frame
A frame carrying one or more sashes
Sash
A window sash is a glazed movable part of a window contained within the window frame. Its opening action is either side hung (hinges on the side) top hung (hinges on the top) or sliding both horizontal and vertical. A sash can also have a pivot action or hinged on the bottom of the frame.
Skirting
A moulding covering the join between wall and floor.
Span
The distance between the supports for a beam, arch or truss.
Stiles
The vertical frames of a door on the outer edges.
Strap Hinge
Hinges with long plates used on heavy doors or gates
Striking Plate
The plate screwed to the rebate in the frame against which the bolt of a mortice lock strikes as the door closes.
Strings
The sloping supports carrying the treads of a staircase
Tenon Saw
Small saw used for the cutting of the shoulders of a tenon. Also used for any small work where accuracy is required and in a mitre box.
Tenon
The Tenon is the shape in a piece of wood that has been sized to fit into a recess formed in another piece of wood (mortice).
Transom
A transverse horizontal structural beam or bar, or the crosspiece separating a door frame from a window above it or separation two or more windows.
Tread
The top, horizontal surface of a step.
Veneer
A facing of very thin timber used to finish off less attractive timber surfaces.
Weather board
A wood strip fixed to the bottom of a door to help prevent wind and rain entering under the door.
Winders
Radiating steps on a circular staircase, narrower at one side than the other.
Boards and Shelving
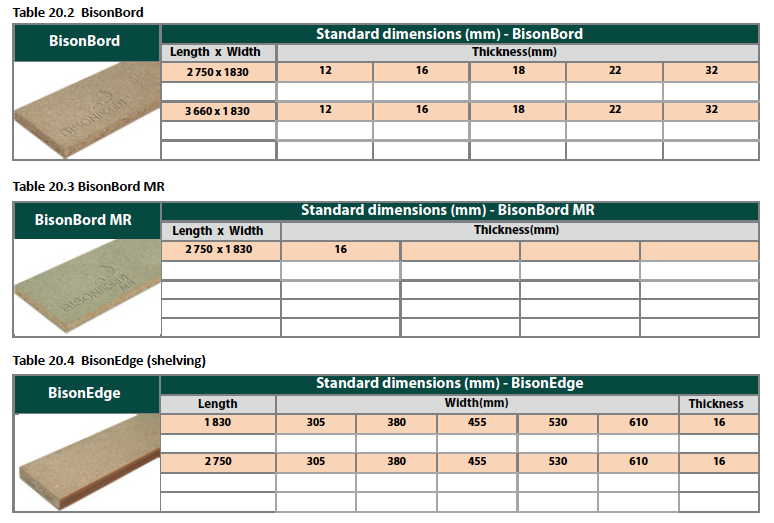
BisonBord (chipboard; particleboard)
BisonBord is the premium quality, interior grade particleboard. It offers excellent structural strength with superior screw-holding capability and machinability. Its smooth surface is ideal for priming, painting, printing, veneering and laminating with melamine impregnated paper (MelaWood), Formica (Board 13) or paper foils (DecoBord). Used extensively in shopfitting, kitchen manufacturing and the domestic and office furniture industries, amongst others, BisonBord is suitable for joinery applications like kitchens, built-in cupboards, carcassing, partitioning and displays.
Produced to meet SABS EN 312: 3, BisonBord offers:
- Consistent, smooth and high density surface
- Good screw holding and high strength
- Low dimensional movement and tolerances
- Low deviation to flatness, good creep resistance
- Good paintability, good machinability, low tool wear
- Controlled formaldehyde emission
- Availability and technical back-up
- Price stability
BisonBord V313
Similar in construction to BisonBord, BisonBord V313 has additional additives to help improve moisture resistance and therefore provide a lower swelling rate than that of BisonBord.
BisonBord V313 can be upgraded just like BisonBord and is designed for use in high moisture areas in interior applications only, such as bathroom vanities, laundry cupboards and kitchen kick plates. It is also ideally suited for use in coastal regions with high humidity.
BisonBord V313 is not waterproof but is water resistant.
BisonBord V313 is identified by green dye incorporated throughout the board.
Produced to meet SABS EN 312: 5
BisonEdge (shelving)
Using a substrate of BisonBord with either a Sapele or White edging strip on one of the long edges only, BisonEdge is the perfect choice for built-in cupboard applications. BisonEdge comes in a range of convenient lengths and widths, offering a cost effective, versatile shelving solution.
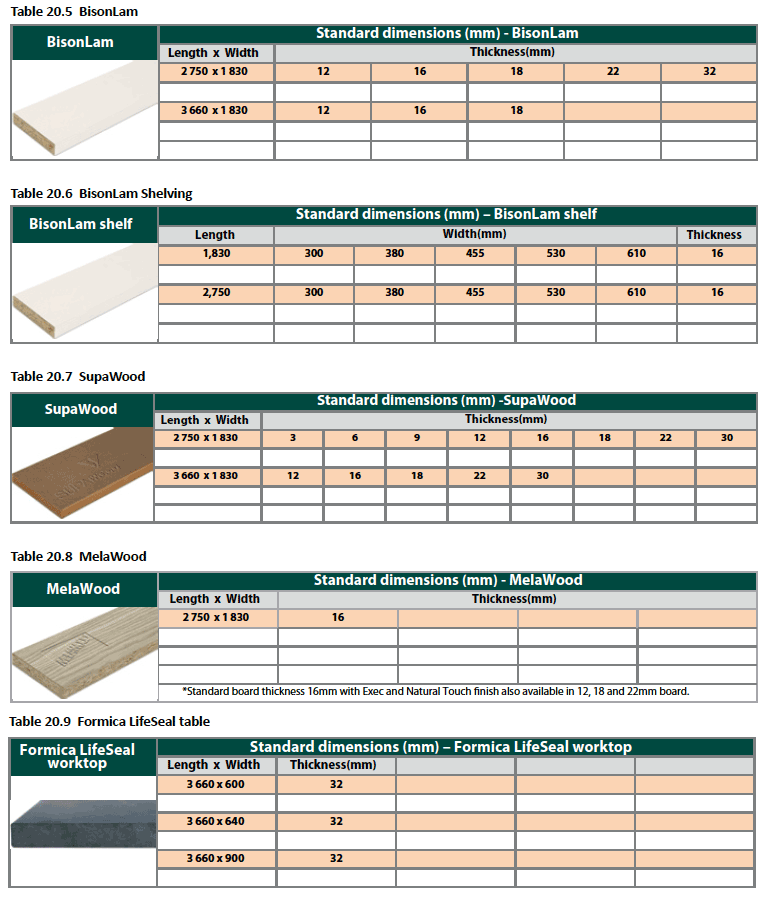
BisonLam
The leading brand name in white melamine faced particleboards (MFB), BisonLam, uses either BisonBord or BisonBord V313 as a substrate.
REFERENCE: www.pgbison.co.za
A single sheet of melamine-impregnated, white décorpaper is bonded to both the board’s surfaces under heat and pressure. This provides a durable, scratch and moisture resistant surface. (The board’s exposed edges still need treatment to protect them against moisture ingress.)
BisonLam is the ideal choice for kitchen, built-in cupboard and carcassing applications. BisonLam is suitable for medium duty vertical and light horizontal applications, such as door frontals, drawers, carcassing and shelving. BisonLam is available in three surface finishes, Peen (a textured, stippled finish), Executive (a smooth, matt finish) and Ashwood (an embossed, wood grain finish).
BisonLam Shelving
Combining BisonLam Super White on a substrate of BisonBord and then cut and edged into a variety of shelving sizes, BisonLam Shelving provides an excellent product for kitchen and built-in cupboard applications.
Edged either on one or both of the long edges, BisonLam Shelving’s melamine faced surface is suitable for medium duty vertical and light duty horizontal applications.
SupaWood
SupaWood is PG Bison’s exceptional medium density fibreboard (MDF). It offers excellent structural strength with superior screw-holding capability and machinability. This engineered MDF blends the advantages of manufactured board with the natural properties of solid timber, allowing for most traditional wood working techniques.
Technically superior and available in thicknesses from 3mm to 30mm, SupaWood is ideal for high gloss PVC wrap, recommended for spray painting and is deep routable. A versatile panel, its homogeneous construction allows for moulding, embossing, routing and edge profiling and is perfect for both domestic and commercial use.
Produced to meet SABS 540: 1, SupaWood offers:
- Use conventional woodworking techniques
- Free of knots
- No directional grain
- Consistent density
- Smooth surface
- Uniform sheet size and thickness
- Homogenous construction allows for routing
MelaWood
MelaWood is PG Bison’s leading brand of decorative MFB. With its durable, scratch and moisture resistant surface, MelaWood is the ideal choice for kitchen, built-in-cupboard, furniture and case-goods applications.
MelaWood is available in four surface finishes, Peen (a textured, stippled finish), Executive (a smooth, matt finish),= Ashwood (an embossed, oak wood grain finish) and Linear (a deep textured, straight wood grain).
MelaWood uses either BisonBord or SupaWood as a core or substrate and melamine-impregnated, decor paper bonded to both the board’s surfaces under heat and pressure.
Formica High Pressure Laminate (HPL)
Formica HPL offers the most versatile of surfacing materials for both horizontal and vertical applications. With its exceptional resistance to wear, scuff, impact, heat, moisture and stains it provides an unbeatable low maintenance, durable and dependable surface, easy to clean and hygienic too.
Formica HPL is fabricated by laying up sheets of resin-impregnated kraft paper together with a resin-impregnated décor paper for the surface. These sheets are then pressed together under high heat and pressure whereby the resins bond the construction together into a homogenous decorative laminate.
Timberply boards
Plywood is a flat wood-fibre panel made of sheets of veneer or p lies that are bonded together with heat and under pressure with a glue or resin to form a board (plywood). The panel is always constructed with an odd number of layers of veneer in the board with each layer orientated perpendicular to the adjacent layers. This makes a symmetrical panel which is more stable. The outside plies are called face and back plies and the inner layers are called core layers. Typically a higher-quality, visually-appealing face is used on the surface of the board while the balance of the lower quality veneer makes up the core of the board. Usually the grain direction of the outer panel is in the direction of the longer dimension of the panel.
Typical Properties of Plywood
The alternating layers provide panels with dimensional stability across the width of the panel and results in fairly similar axial strength and stiffness properties in perpendicular directions within the panel plane, unlike solid timber which has vastly different physical properties with and against the grain of the wood.
The laminated construction distributes defects in the wood (limiting the defect to one layer of veneer only in any position in the panel) and reduces splitting when fasteners are used through the panel. Checking is also reduced. The large flat panel allows cost effective coverage of large cross sectional areas using a minimal amount of wood fibre. These panels can be cut to customised sizes with little effort and standard equipment. In simple language plywood splits, twists, warps, expands and shrinks less, holds nails and screws tighter, is stiffer in both directions and remains flatter than a panel made from the same type of solid timber.
Hardwood and Softwood Plywood
Broadly speaking, two categories of plywood are made. These are softwood and hardwood plywood. Softwood species have needles on the branches of the trees, while hardwood trees have broader leaves (angiosperms). The hard/soft description does not refer to the durability or strength of the fibre but to the family of trees. Both have softer and more durable species of timber.
All plywood currently made in South Africa is softwood plywood and is made from pine. The vast majority of this material is used in construction and industrial applications, although some clear, high-quality panels are made to be used as decorative clear or stained panels. In addition to the locally made pine plywood, some pine plywood is imported from Brazil and, to a lesser extent, China.
Three species of pine are grown for plywood in South Africa. These are pinus patula, elliottii and taeda, with the majority of material used being pinus patula. No differentiation is made by the forests with regard to species.
Hardwood plywood is made from a range of more species of hardwood that grow in tropical conditions. Most hardwood plywood in South Africa is imported from Malaysia and Indonesia, although material from Central Africa, South America, other countries along the Asian peninsula and China are also imported from time to time.
No tropical hardwood (commercial/Okume face) or marine plywood is made locally in SA. South African pine plywood is manufactured following the guidelines set out in SANS 929. Although local manufacturers follow this standard, the adoption of the standard is not compulsory and imported plywood often does not follow these minimum standards.
Face Grades
Plywood is specified according to the quality of the face and back panels, as well as the grade of resin used to make the panel.
Face grades of veneer are:
- A-clear veneer, no cracks, no defects
- B-limited tight knots, limited splits, limited discolouration
- C – open knots, patched, larger splits patched, discoloration permitted
- D- no minimum standard, defects unlimited.
Standard face/back combinations are BC (appearance grade), CC (shutter grade) and DD (crating grade). Other combinations may be specified by special order. (AA, AB, AC, BB, CD, etc.)
A and B faces are used in applications where a smooth, consistent and visually appealing surface is required. Faces are typically sanded. Most exposed furniture faces, doors, wall panelling, higher quality floor decking and precision applications use this grade of plywood.
C faces are used where a consistent, high-strength face is required but where appearance is not important. Most concrete shuttering use this grade and the product is often referred to as shutterply. Faces may be sanded (C+C+; C+C) or unsanded (CC).
D grade plywood is used where a low cost minimum spec panel is required. No quality constraints with regard to the veneer appearance apply. However, the plywood internal bond strength is required to be intact.
Reject or Downgrade plywood is sold with defects that do not qualify for the grades specified. Usually the cause of the rejection is due to the bond between veneer layers not being intact. This is referred to as blistering or delamination.
REFERENCE: www.elbtimbers.co.za
Adhesive Systems Used
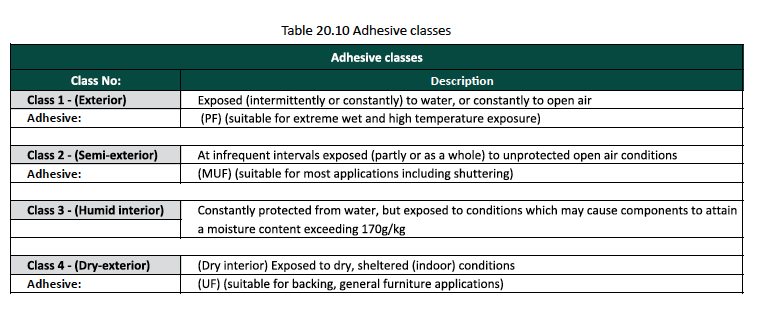
Three adhesive types are used to bond the veneers together. They are urea formaldehyde (UF), melamine-reinforced urea formaldehyde (MUF) and phenol formaldehyde (PF). Resins are graded according to their moisture resistance. At present all South African made plywood is made from Class 1, phenol-formaldehyde (PF) glue. This provides the maximum durability and can sustain continuous exposure to higher temperatures and wet/high humidity conditions. Refer to Table 17.10.
Crating grade plywood usually does not specify the grade of resin used and will also contain boards with limited face and edge damage.
Board Dimensions
Plywood is usually made in 2.440 x 1.220m (8 foot by 4 foot) panels with the following standard thicknesses: 4, 6, 9, 12, 16, 18, 21, 25, 29 and 32mm.
Other thicknesses can be custom made by special order.
Plywood density is approximately 550 to 600kg/m3. Boards with A or B faces are sanded. Those boards with a CC face may or may not be sanded, depending on specification.
Other Types of Plywood:
- Commercial Plywood
- Fancy/Exotic Plywood
- Bendy Plywood
- Marine Plywood
- Film-Faced Plywood
Blockboard
Blockboard is manufactured with a solid timber core of 12mm solid timber planks approximately 25mm in width and two layers of veneer on each face, one with its grain at 90 degrees to the other. Two standard thicknesses are available, 18mm and 21mm. Other thicknesses can be made to order.
Two standard types of board are produced. These are:
- Blockboard – BC face, with an interior (UF) resin
- Shutterboard – CC face, with an exterior (PF) resin
Blockboard is sanded, shutterboard is normally not sanded. Boards are packed in bundles of 50 boards per pallet. Set out below is an extract from SANS 929, the standard describing all board products we manufacture, showing visually what the structure of the board looks like.
Laminoboard or Strip-ply
Strip-ply or laminoboard is an engineered product made with a plywood core cut to 12mm and bonded vertically, with two veneers on each outer face. Set out below is an extract from SANS 929, showing visually what the structure of the board looks like. It is shown technically described as laminboard. It performs in a similar way to blockboard and tests indicate that it has superior stiffness and bending strength compared to blockboard.
Initial practical testing of the product in field has shown that the product remains flatter and has more accurate physical dimensions than plywood. Two thicknesses are available locally – 18 and 21mm. Standard face grades available are BC and CC.
Commonly used Ironmongery
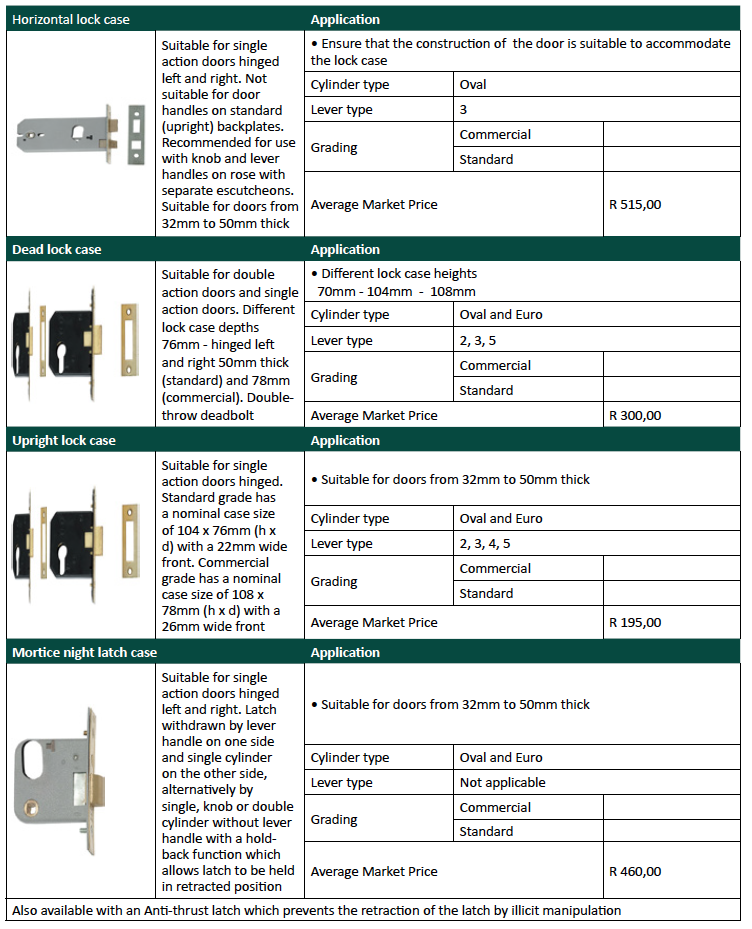

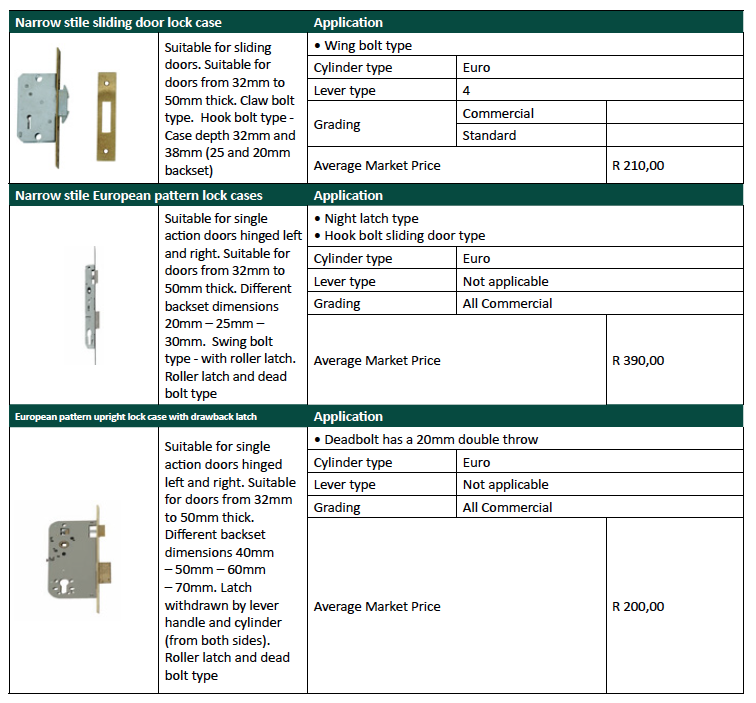
Lever locks
The key must move several levers to release the bolt when it is shot or withdrawn. They are available in the following types.
- 2 lever suitable for internal doors only
- 3 lever suitable for internal doors and inter-leading internal doors
- 4 lever suitable for internal doors where a higher level of security is required and external doors
- 5 lever are usually classed as security locks and therefore used only on external doors, some are supplied with a closed box type striking plate
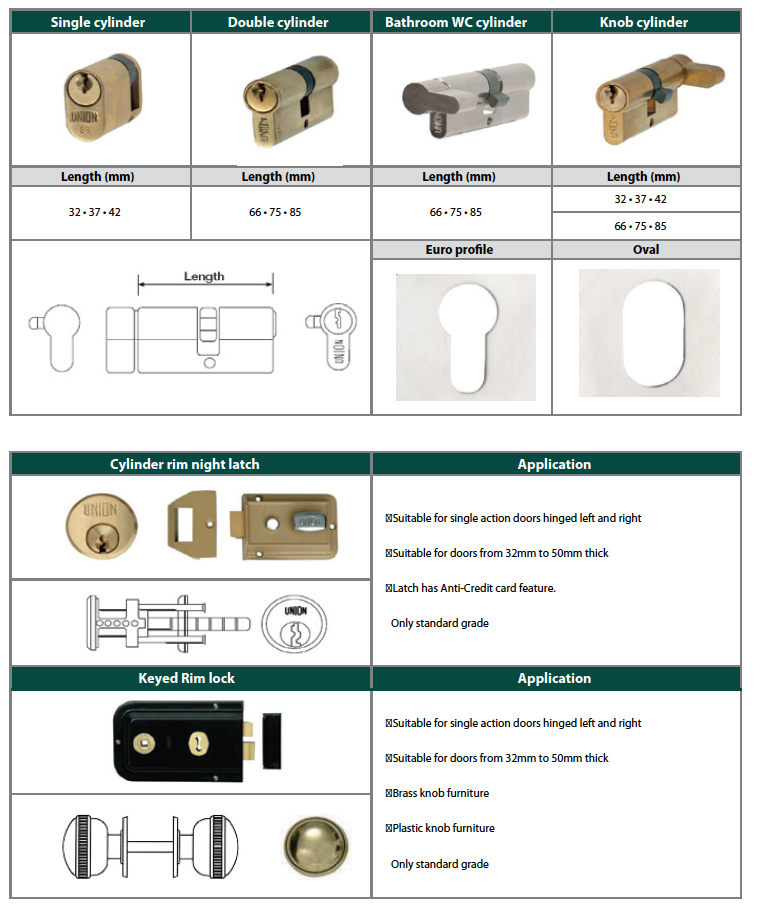
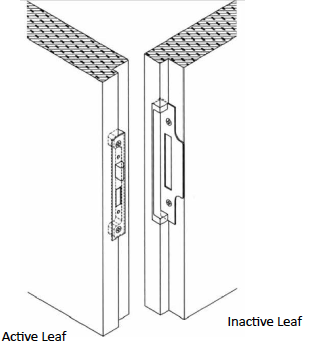
Rebate sets/kits
Locks fitted to double leaf doors with rebated meeting stiles require Rebate Conversion Sets/Kits. The Figure to the right illustrates the two component parts of a typical Rebate Conversion Set, namely the striking plate portion which is fitted to the inactive leaf and the forend strip which is fitted behind the forend plate of the lock in the active leaf. Rebate Conversion Sets/Kits typically suit doors with 13mm deep rebated meeting stiles.
Available in the following finishes;
- Satin Chrome (SC)
- Brass (PL)
Note: Rebate conversion Sets/Kits are not available for many European style lock cases; therefore doors without rebates should be specified if these types of lock cases are to be used.
Other Lock Types
Electric locks
Operate typically where the striking plate or latch has a release catch which can be operated remotely or via a wired button; also operated by key inside and out. Electric locks need to be hand specified i.e. left or right, open in or out. Most require a 12V or 24V connection via a transformer. These types of locks are seldom used in residential applications and seen more in office and commercial type applications.
Padlocks
Padlocks are used to lock other locking devices e.g. pad bolts, especially on security gates, tool shed doors, etc. Padlocks are available in a number of different sizes and manufactured to suit specific applications e.g. a pad lock used in a high security application has a more robust casing and manufactured from high tensile steels with a higher pinning of the actual locking cylinder.
Pinning of padlock cylinders are usually as follows;
- 4, 5, 6, 10 and 12 pin
Widths of locks also differ as follows;
- 30mm, 40mm, 50mm, 60mm, 70mm with some locks going up to 90mm
The shackle heights of padlocks differ substantially depending on the width; standard padlocks have the following typical shackle heights which increase with the width of the lock i.e. the bigger the lock the higher the shackle.
- 17mm, 23mm, 27mm, 37mm, and 40mm with extra long shackle varying from 80 to 200mm.
Panic locks
These are locks in which the handle or panic device (panic bar) withdraws the latch and deadbolt simultaneously in a panic situation. These are typically only found in public places or fire escapes and can also be classed as emergency locks.
Emergency locks
These are typically used only on exit routes in public places and to doors which usually have no access and are only there in the case of emergency. They are typically inoperable from the outside as many emergency exists are directed to the exterior of building or access corridors/passages. (See Panic locks above).
Security locks
Security locks can be described as locks that are used to prevent illegal entry particularly for external doors and have lock cases manufactured from thicker material with hardened steel or composite latches and double throw deadbolts.
Cupboard locks
Are a lot smaller than a typical mortice or rim lock and are fitted on the inner face of the cupboard door. They act more as a means of locking the cupboard to prevent unwanted access rather than for security reasons.
They are available as 1,2 and 3 lever type locks; with lock case sizes of 51mm, 64mm and 76mm and as cylinder type locks with different cylinder lengths. Also available are cam locks which can be used for cupboard doors but are typically used for drawers.
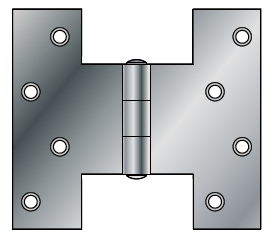
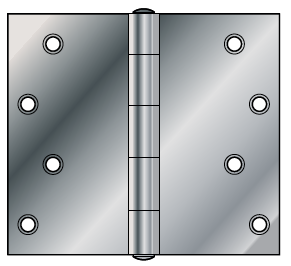
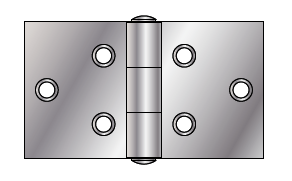
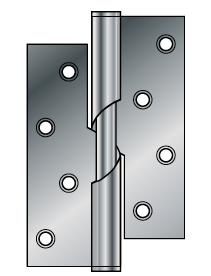
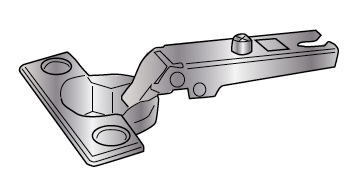
Hinges
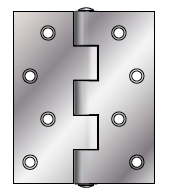
Butt Hinge
Butt hinges are the most commonly used hinge for doors; when the door is shut the two halves are folded tightly together. Each flap is usually morticed (counter sunk) one into the door frame and the other into the hanging stile of the door leaf.
The ordinary steel butt is very cheap and durable, in contrast to the more expensive ball-bearing butts which are smoother running, noiseless, and longer lasting.
Butt hinges that have removable pins (loose pin butt) are usually found fitted to steel door frames allowing the door leaf to be removed without having to unscrew the hinges from the door.
Sinkless hinge
Sinkless hinges can also be referred to as non-mortice or
surface fixed (flush) hinges. A sinkless hinge is a butt hinge
which when closed is only as thick as the metal in one of its
flaps; the flaps are cut to fit one inside the other. Sinkless
hinges are not recommended for hanging solid core type
doors.
Sinkless hinges are available in three standard (height) sizes; 65mm, 75mm and 100mm
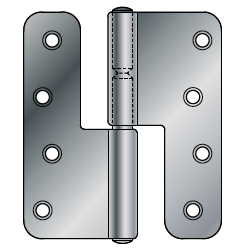
Parliament hinge
A hinge with two lengthened T-shaped flaps, joined to form an H. The knuckle (the middle of the cross-bar of the H) projects beyond the face of the closed door or shutter, allowing the door to clear the architrave or as in steel French doors the brick reveal, and to lie flat against the wall when opened. Typically used for steel French doors, window and door shutters. Parliament hinges are intended for light duty to medium duty applications and should a hinge of this type be required for a heavy duty application rather use a projection hinge (see projection hinges).Parliament hinges are available in the following standard sizes and finishes;
Height x width
- 75mm x 75mm
- 100mm x 100mm
- 125mm x 125mm
- 125mm x 150mm
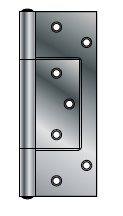
Projection hinge
A Projection hinge is basically a butt hinge with wide flaps and a knuckle that sticks out, allowing the door to swing open to more than 90°.
Similar in function to that of a parliament hinge except a projection hinge is used for heavy duty applications and recommended for hanging solid doors where the door is required to clear the architrave or the brick reveal. Available in the following standard sizes and finishes.
Height x width
- 100mm x 125mm
- 1 100mm x 150mm
- 1100mm x 178mm
- 1100mm x 200mm
Back-flap hinge
A hinge with wide flaps, screw fixed to the face of a door and frame, usually used on a door too thin to be carried on butt hinges e.g. chipboard or Supawood doors. Available in the following sizes; 38mm, 50mm, 61mm, and in the following finishes:
- Galvanised or bright steel
- Electro galvanised
- Brass and Brass plated
- Chrome on brass
- Satin chrome on brass
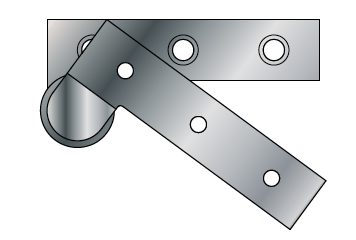
Lift off hinge
A hinge that can be taken apart by lifting one flap from the other, a door on lift-off hinges can be un-hung simply by lifting the door leaf but only when fully open. Lift off hinges are handed i.e. left hand or right hand.
Rising butt hinge
Hinges which cause a door to rise about 10mm as it opens. They have a helical bearing surface between the two flaps. The door therefore tends to close automatically as well as to clear a carpet when opening.
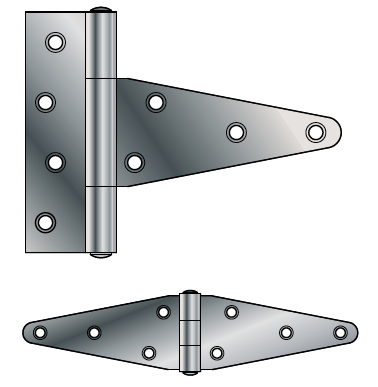
T-hinge/Strap hinge
A strap hinge or T-hinge is usually used to swing wooden batten doors which are too thin to be carried on butt hinges. The strap hinge has one short flap which would be fitted to the fixed frame or post and the other flap has a long tapered flap surface fixed to the face of the door, providing more strength to allow the door to swing without the hinges pulling out
Pivot hinge
A pivot hinge is typically used for extra wide swing doors (pivot doors) or heavy swing doors, with rotating parts fixed to the top and bottom rails of the door leaf which joins matching parts in the floor and transom of the door frame. Pivots are always recommended for use with single solid doors exceeding 1.000mm in width, as the stresses placed on butt hinges would eventually render the door inoperable and unable to close properly.
A pivot frame needs to be specified when a pivot hinge is to be used; the frame has no rebates and weather strips are retro fitted once the door is hung.
Fitment of pivot hinges and accessories does require a high degree of accuracy, although some adjustment is possible. Typically used for timber doors up to 120kg.
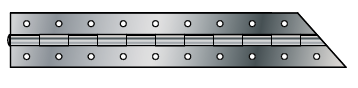
Piano hinge (continuous hinge)
This type of hinge runs the entire length of the door, panel, or box. Continuous hinges are manufactured in very long lengths and are sometimes supplied in rolls. These hinges also come in various thicknesses, pin diameters, and knuckle lengths.
Slide-on hinges
A hinge typically used for the hanging and swinging of kitchen and built in cupboard doors (BIC). A hole is bored into the actual door to accommodate the round hinge locator and the slide or click on flap. The other male flap is fixed to the inside panel to which the other flap fixed to the door slides over it or clicks onto it. These hinges are adjustable in numerous ways be it vertical, horizontal or plumb, making them the ideal choice for kitchen and BIC doors where adjustment is essential with constant opening and closing. (only used on light weight cupboard doors).
Flush Bolts
Recessed
A Flush bolt that is recessed (counter sunk) into the door or shutter, so that the two surfaces are flush, and in most cases the bolt is fixed to the edge of the door concealing the bolt when the doors are closed. (see right).
Sizes available 150mm, 200mm, 250mm, 300mm with different pin diameters from 19mm to 25mm with an approximate throw length of 25mm.
Finishes include; polished brass, chrome, satin chrome and aluminium – natural, black and bronze anodized.
Surface mounted
- Flush lever bolt fixed to the surface (see right).
- Sizes available 100mm, 150mm and 200mm.
- Finishes include polished brass, chrome and satin chrome.
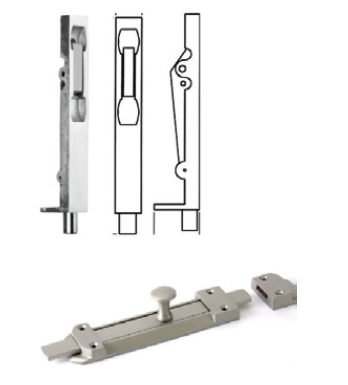
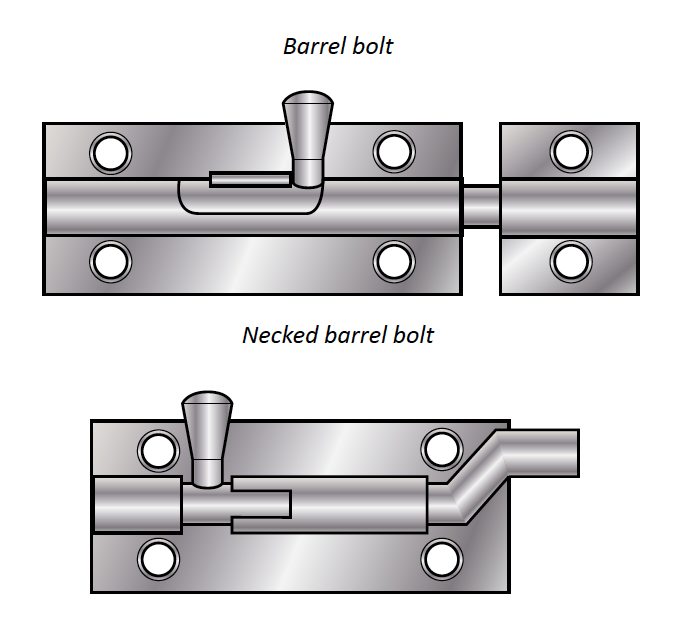
Barrel bolts
A barrel bolt can be described as a surface mounted door fastener with a metal rod or bar that runs in a case, entering a hole or keep in a straight line (straight barrel bolt) or off the straight line of the case, (refered to as a necked barrel bolt).
Typical sizes available for straight barrel bolts include 50mm, 63mm, 75mm, 100mm, 150mm, 200mm, 300mm with some manufacturers having different throw lengths. With necked barrel bolts usually available in 75mm, 100mm and 150mm. Finishes include; Brass, chrome, and galvanized steel.
Note: Bolts are available in longer lengths (400mm – 900mm) acting as ‘extension’ bolts, allowing the bolt to be opened on doors that are higher than normal and also to prevent bending down.
Door closers
A door control (door closer or floor spring) is used to control the closing movement of a swing door until deliberately opened, usually with a one-way hydraulic or air check device that acts during closing to prevent slamming, although back check action can also cushion movement in the opening direction.
There are three types of door closers;
- Overhead door closers
- Floor springs
- Concealed door closers
Where are door closers used;
- On any internal door which is required to be kept closed when unattended e.g. doors in kitchens, toilets etc.
- On any main entrance door which needs to be kept closed for reasons of wind and weather.
- On any fire door, internal or external which must be closed in the event of fire.
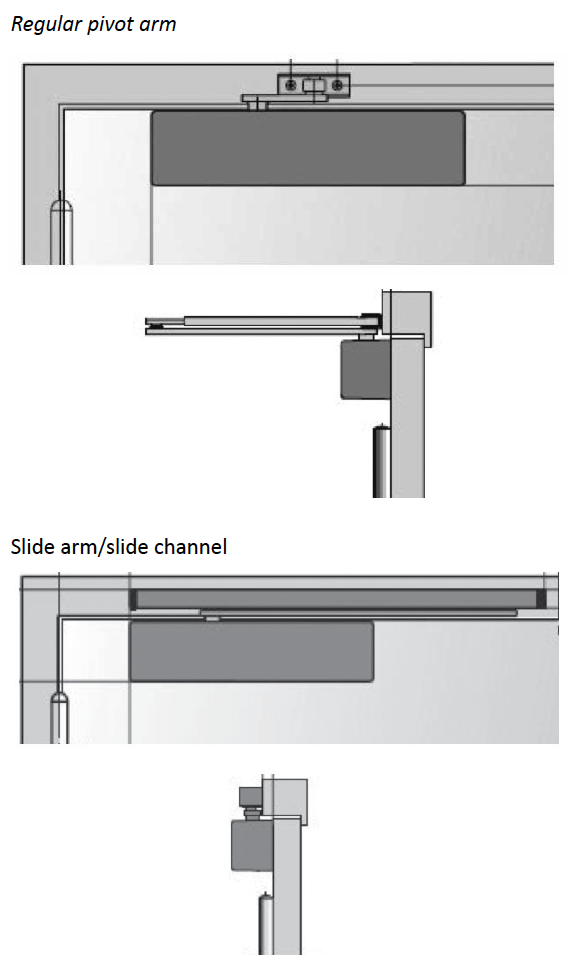
Overhead door closers
Overhead surface mounted door closers include the following components:
- Door closer unit
- Arm – pivot or slide
Factors to consider when selecting an overhead door closer Door closers mounted on the “Pull-side or hinge side” of the door – Regular arm (standard)
- Most common application for interior doors
- Closer mounted to the door with the arm fixed to the frame
Allow space behind the door so as to avoid the closer hitting the adjacent wall. Door closer mounted on the “Push-side or opposite-to-hinge side” of the door
- For doors opening to the exterior, with two methods of fixing
- Parallel arm mounting; closer mounted to the door and the arm to the frame via a soffit bracket.
- Frame mounted closer (regular arm) closer mounted directly to the frame or on a drop plate, with arm fixed to door. (Note: the limit of 0 -95mm frame reveals depth depending on the type of door closer used).
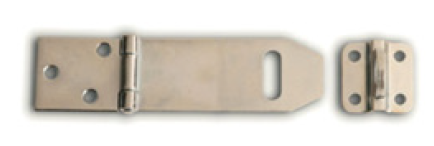
Hasps and staples
Fixing for doors, gates, or box lids, the slotted hasp hinges down over the upstanding staple and is secured by a peg or padlock.
Available in the following sizes; 50mm, 75mm, 100mm and 150mm
In the following finishes;
- Galvanized steel
- Chrome plated
- Brass
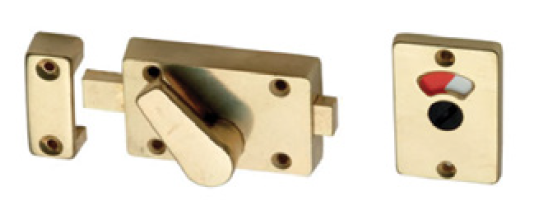
Indicator bolts
Privacy latch for a WC door that shows on the outside when it is locked or unlocked e.g. by colour (red or green) or wording (vacant or engaged)
Available in the following finishes;
- Aluminium
- Brass
- Brass plated
- Chrome
- Satin chrome
Fitting a Mortice Lock
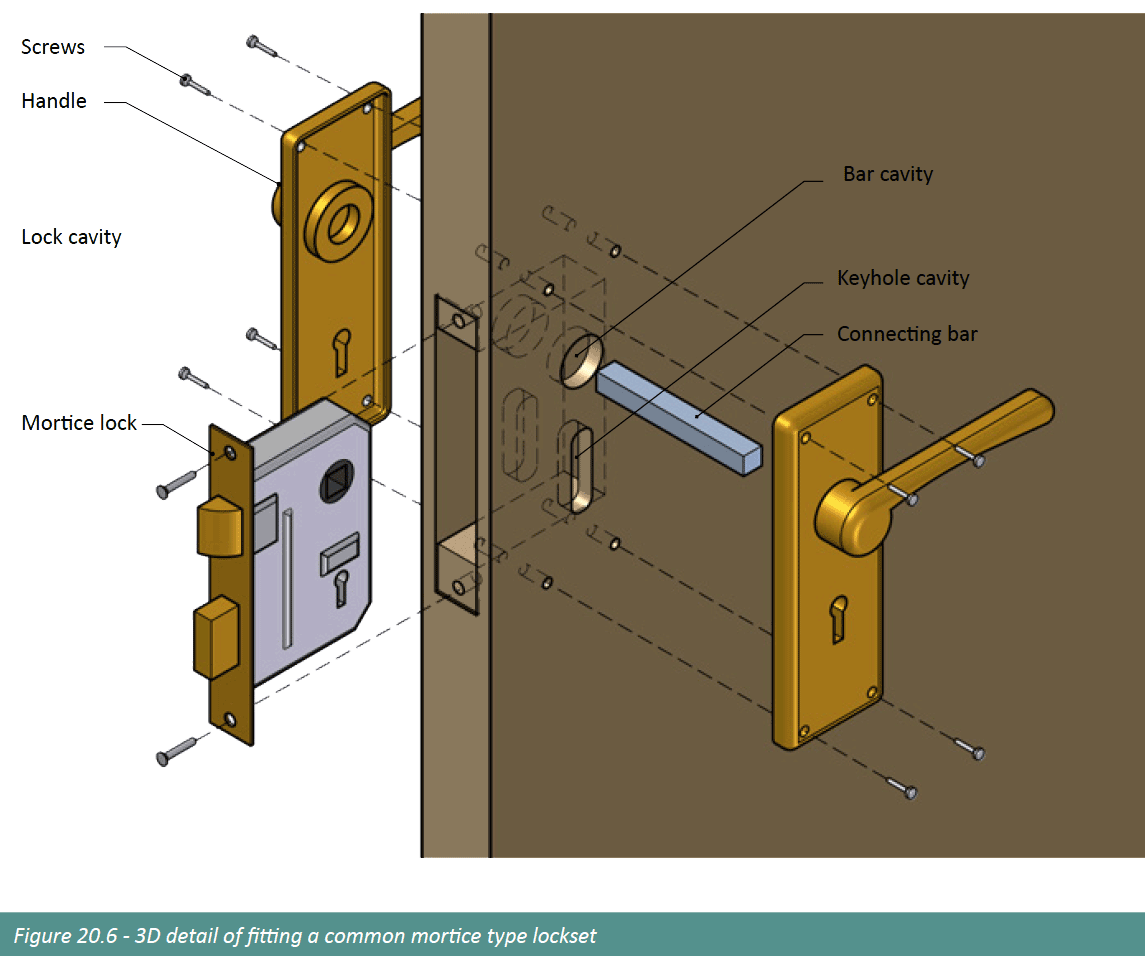
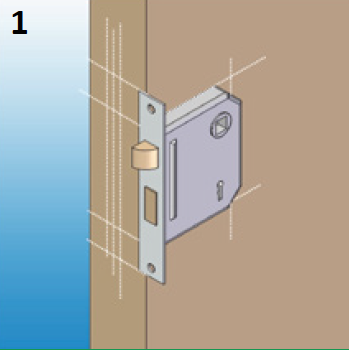
Start by deciding on the height of the mortice lock or locate the lock block for a hollow core door. Position the mortise lock body against the side of the door and mark the top and bottom against the side of the door. Transfer markings of plate and lock body to front of door. Mark out center line of door and width of lock body accordingly.
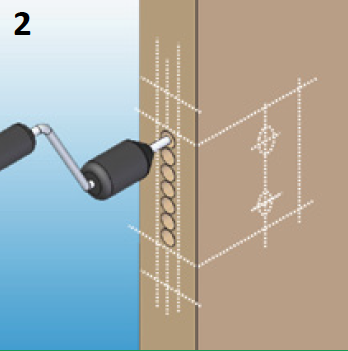
Using a brace or drill on low speed setting, drill a series of holes within the confines of the markings for the lock body. Drill the holes to the depth of the lock body (+- 80mm). Include a tolerance for the front plate (+- 3mm) if the front plate is to be recessed. Keep the drill perpidicular to the door front.
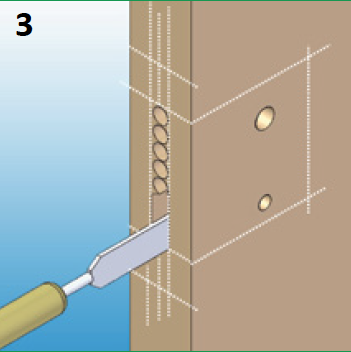
Once all the holes have been drilled, use a sharp chisel to remove the waste wood and roughly smooth the sides of the hole. Once the hole is large enough, check the fit of the lock – the fit should be snug without too much play.
Once the lock fits the hole, ensure it is straight and parrallel to the door edges. Put the lock in place and mark around the front plate onto the edge of the door. This will mark the area to be recessed to accommodate the front plate.
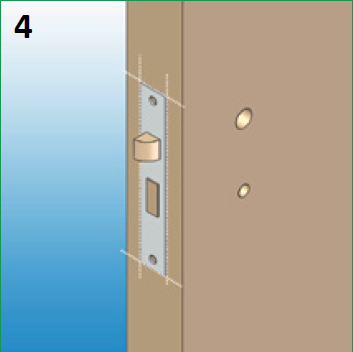
Remove the lock and use a sharp chisel to mark along the lines to establish the edges – this should stop any surface wood from lifting beyond the lines required. Using the chisel, cut out the rectangular recess to a depth of +- 3mm to accommodate the front plate.
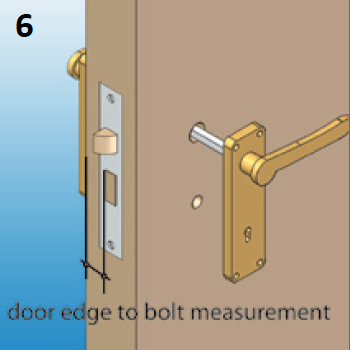
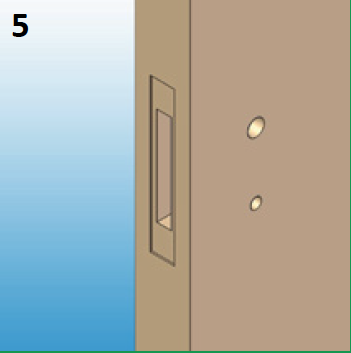
Fit the lock into the door and secure using screws. Fit the door handle spindle and fit the door handles. Note the the “door edge to bolt measurement”

Fitting the strike plate
Turn the lock into the locked position and close the door. Mark the top and bottom of the door catch and the lock bolt onto the door frame. Open the door and transfer these marks to the inside face of the door frame. Position the strike plate so that the marks made on the door frame line up vertically with the holes in the strike plate. Use a chisel to cut out the holes in the door frame to take the door latch and lock bolt. Use a chisel to cut out a recess in the door frame to accommodate the strike plate for the mortise lock. When finished, position and screw the strike plate to the door frame.
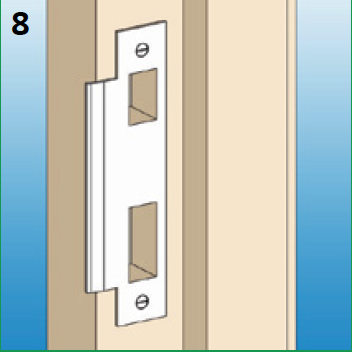
Depending on whether you have a right or left hand opening door, you may have to turn the springbolt over. This is very important as this bolt could get damaged if the door is slammed, hitting the straight edge of the springbolt against the striker plate.
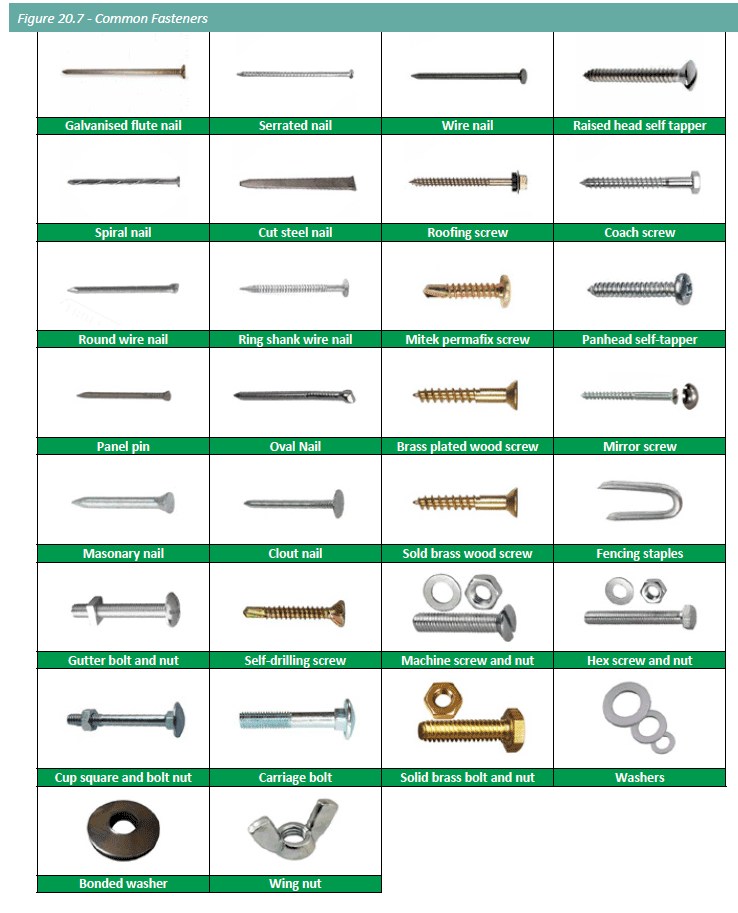
Commonly used Fasteners
Door Frames
Until the nineteen eighties, steel door frames were the most popular in residential building but since then timber door frames have become popular. Steel door frames are manufactured in standard sizes with different frames widths. Wooden door frames are made from a variety of different types of wood. The most commonly used timber in the manufacture of wooden door frames in South Africa is meranti, with most of the meranti coming from South East Asia. The wood needs to be dried and the method used these days is a kiln (a chamber through which warm air passes). Kiln drying is quicker than natural seasoning and the high temperature kills fungus and bores.
Doors
Hollow core and semi-solid doors
Hardwood doors
Wooden doors have been in existence for hundreds of years, made from a variety of different types of hardwoods. The most commonly used timber in the manufacture of hardwood doors in South Africa is Meranti. Hardwood doors are manufactured by a number of different companies and are available in a large number of different designs, forms and shapes.

Building a Wooden Deck
You will need
- Dynabolts: 5 x 160mm by M10
- Bolts and nuts: 35 x 1BOmm by M10
- Bolts and nuts (for double bearers): 5 x 210mm by M10
- Washers M10: 2 per bolt
- Cement: 2 bags
- Sand: O.5m’
- Stone (19mm): 1m’ (This assumes a cement, sand, stone mix of 1:3:6).
- Galvanised ringshank nails for boards (75mm by 3.8mm): as required
- 120 to 139mm top diameter poles (in compliance with SABS 457H4):40
- 36mm by 152mm bearers in 4.25 lengths (in compliance with SABS 563 Grade 6 treated to H3 requirements of SABS 1288): 10.36 by 73mm deck boards (treated to H3 requirements of SABS 1288) assuming gap between boards of 5mm: 110
- Water repellent (see manufacturer’s specifications for quantity required).
PHASE ONE
Functions and design of a deck
Decks are designed to add living space to the home and, as a result, may be subjected to a considerable amount of wear and tear.
In actually designing the deck, here are the important points to consider:
- How far off the ground will the deck be?
- What is going to happen to the crawl space underneath?
- Will it be concealed with latticing or bushes, or will lawn be grown underneath?
- What happens to objects falling through gaps in the deck’s flooring?
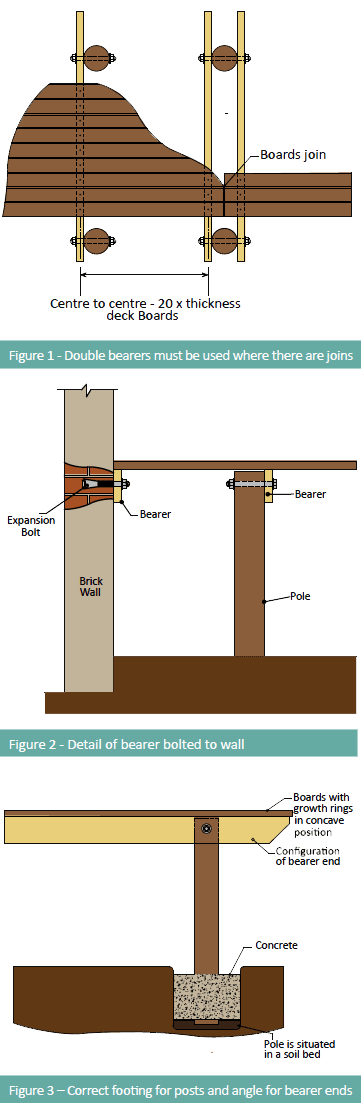
It is essential to ensure efficient water run off. In this area use narrow boards in preference to wide boards as they are less susceptible to cupping. Narrow boards are easier and cheaper to replace in the event of damage. It is also true that narrower boards of shorter lengths are easier to obtain. When it comes to the bedding of support posts, make sure that the bottom of the posts are not encased in concrete (See fig 3). This will ensure that water running down the posts is drained off easily and is not entrapped at the bottom, which may increase the risk of wood decay.
When designing bearers, make sure that boards are joined over double bearers (see fig 1). The centre to centre distance between adjoining bearers should be no more than 20 times the thickness of a deck plank. In other words, if a 20mm deck board is to be used, the spacing between bearers should be about 400mm. In the case of a 35mm plank, the spacing would be about 700mm.
When the terrain is rocky, it may be difficult to install the number of poles required by a conventional design. In this case it may be better to use thicker poles. This approach could allow for a spacing between support poles of 3m. In such an application thicker bearers, 50mm by 228mm, would be bolted to the support poles. Beams would then be placed on top of these bearers at a spacing dictated by floor board thickness. This design, because it requires stronger materials, would be more expensive.
Also while designing, take account of the spacing between boards. Depending on deck function and the material used, a space of between 301m and Smm should be allowed.
PHASE TWO – Suitable materials
Very few timbers are naturally durable and hardwoods that are durable can be very expensive. These timbers, although more durable, can crack and split and will require some form of protection. The cheaper locally grown timbers that can be used are Pine or Saligna. Fortunately, with proper impregnation of a suitable wood preservative, these timbers can offer long term durability. There are various timber preservatives available. Some are not suitable for timber in ground contact, while others protect timber in all possible applications. Creosote and preservatives are equally suitable for the support poles and bearers, and CCA treated timber is suitable for the boards. CCA treated timber has a greenish colour and creosote timber dark brown or black. timber treated with boron or TBTO does not change its natural appearance.
The latter two preservatives are, however, leachable and should therefore contain a water repellent in the preservative in order to meet the H3 requirement of SABS 1288. This water repellency property has to be maintained to prevent leaching of the preservative. A water repellent also protects the weathering. In order to inhibit the effects of ultra violet rays at the same time, an inhibitor may be added in the form of a brown or red colourant. Remember, the use of treated timber ensures that a deck is protected against attack by termites, borers and fungal decay.
Should it be necessary to paint the timber, boron, TBTO and CCA treated timber can be painted directly Creosote timber can also be painted, provided it is first coated with a bituminous based aluminium coating. As a general rule, preservative treated timber in its natural form is the easiest and cheapest solution. Remember that support poles should never be cut. Order them in the lengths required. Only beams, boards and bearers can be cut if necessary. However, their ends should be brushed with a preservative before assembly. It is essential that all ground contact poles are treated in accordance with the SABS H4 Hazard Class. Beams, bearers and boards can be treated to H3 requirements.
When choosing boards it may be possible in some areas to obtain boards with grooves on the underside. These grooves arrest curvature (cupping) to a degree, ensuring that the boards remain flat. Remember to round off the arrasses of boards and be sure to install them so that the timber’s growth rings will be situated in a concave position (see fig 3). This will avoid splintering and surface degradation.
PHASE THREE- Construction of the base
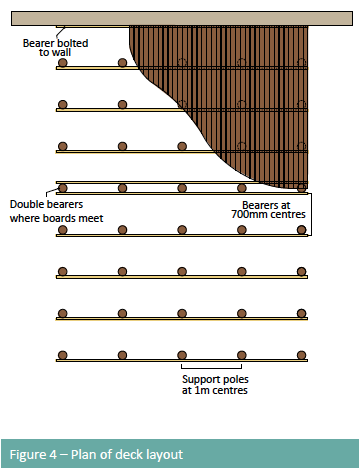
The simple deck we will be building will abut a wall on one side. This means a bearer will have to be bolted to the wall (see fig 2). The spacing between bolts on this bearer will depend on the nature of the wall and the deck to be built but, as a general rule of thumb, an interval of 1m should be suitable.
Assuming you are looking at a simple deck 4m wide and 6m long, you would start off by deciding on the board thickness. Here it would be advisable to choose 38mm by 76mm boards, if installed in the rough form, or 36mm by 73mm planed boards. This would dictate a space between the bearers of 700mm.
Support poles would then be planted accordingly. The bearers should be 36mm by 152mm Grade 5 timber. Poles should not be encased in concrete. When installing the poles, plant the two end poles of each row first and align the faces, where the bearers are to be bolted to the intermediate poles, with a piece of string. The top ends of the poles need not be absolutely level. The bearers will provide —I a level plane for the deck. If the deck is less than 1m above ground, a planting depth of 500mm is adequate, which increases with greater ground clearance.
Also, bearer ends should be cut as shown in fig 3 to reduce the amount of end grain exposed to the elements. Double rail bearers should be installed where boards are to be joined. It is important to keep in mind that the overhang of unsupported boards ends should not exceed 300mm. The layout of the proposed timber deck is seen in fig 4.
This design has taken particular account of the need to use commonly available timber lengths. Thus, with a 6m long deck, two 3m long boards can be employed. While the choice of 38mm x 76mm boards dictates that the distance between bearers should be 700mm, some latitude can be allowed The spacing could, in fact be as wide as about 750mm. In addition to the items already mentioned it will be necessary to obtain bolts, nuts and washers to tie the bearers to the poles, cement, sand and stone and ringshank nails for fixing the boards to the bearers.
An extremely important aspect of constructing any deck is to obtain a level deck of the desired height. As a starling point, remember if the deck is to line up with an existing patio or stoep the bearer bolted to the wall should be dropped below the level of the stoep by the depth of the board. To obtain a level running away from the stoep, many people make use of a string in conjunction with a spirit level. To obtain the horizontal level, line up the end poles and check levels of other poles in the same row against this level. In order to double check on levels merely nail bearers to poles. Only once levels have been achieved should the bearers be finally bolted into place.
There should also be ongoing checks for squareness by lining up poles using string. With double bearer poles it is important to select poles of an even diameter.
PHASE FOUR – Construction of the deck floor
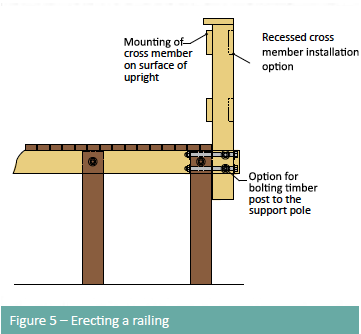
Install the boards from the patio side so they extend over the gap between double bearers. Chalk a line over the ends and cut off to obtain a straight line. Then install the remaining 3m boards. It is important to verify that the Line in which the first board is laid is straight and at right angles to the wall. Make a spacer to ensure even spacing. In screwing or nailing the boards down use only one nail in the centre of a board and, where possible, drive it through the centre of a bearer. Use a string to align all the screws or nails. Nail the boards into place proceeding from one side of the deck to the other, bearer by bearer. Remember to place deck boards with growth rings in a concave position. Making provision for railings There are many options available when it comes to railings. Perhaps the easiest is to buy poles longer than required to support the deck so that these poles can act as railing supports. With these supports, putting the cross members in place is a Figure 5 – Erecting a railing Figure 4 – Plan of deck layout Double bearers where boards meet Bearer bolted to wall Bearers at 700mm centres Support poles at 1m centres cross member on surface of upright support pole post to the Recessed cross simple process. Alternatively, sawn timber posts can be bolted onto the support poles to provide uprights for a railing system (fig 5). If desired they can be recessed to allow for overhang. There are obviously many cross-member configuration options. However, one that should not be implemented is the X-formation, because when timber is cut in the centre in order to accommodate this formation it will be exposed to moisture and other possible causes of future problems. This article was compiled by The South African Wood Preservers Association (SAWPA) with theassistance of Mr. Sakkie Burger.
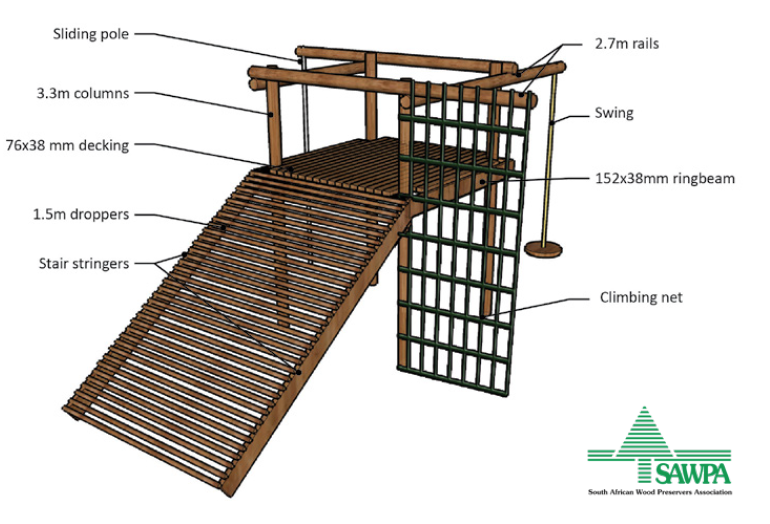
Building a Jungle Gym in your Garden
This jungle gym is simple to construct and because of its rustic look, it won’t make the garden look messy, but will enhance it. But this doesn’t compare with how much the kids will love it.
You will need:
Timber (Preservative Treated against fungal and insect attack e.g.CCA)
SA Pine / Gum Poles
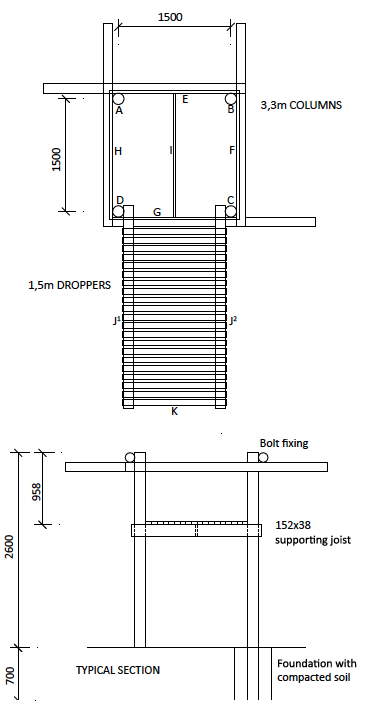
- Columns A, B, C & D: H4 treated 125 – 150 diameter x 3,3m / 4
- Rails E, F, G & H: H3 treated 100 – 125 diameter x 2,7m / 4
- Stair stringers J1 and J2: H4 treated 100 – 125 diameter x 2,7m / 2
- Droppers K: H3 treated 32-50 diameter x 1,5m / 25
SA Pine
- Decking: H3 treated 76 x 38 x 3,3m / 22
- Ring beam: H3 treated 152 x 38 x 3,3m / 4
- Floor joist: H3 treated 152 x 38 x 3,3m /1
- Hardware
- Galvanised wire nails, 150mm – 20kg
- Galvanised wire nails, 75mm – 5kg
- 12mm threaded rod – 300mm / 10
- 12mm nuts and washers – /20
Paint
- Suitable penetrating wood sealer to choice
Construction set out
- Find a suitable piece of ground approximately20m²
- Measure out four holes for columns A,B, C and D with centre lines 1,5m apart. Holes to be 500 x 500 mm wide and 700mm deep.
- Compact bases for all holes.
Columns
- Put Column A in first hole, in centre, secure plumb and put soil back, and compact in layers of 150mm. Make sure that the column is plumb at all times.
- Repeat step 1 for column B making sure that the centre lines are 1,5m apart.
- Repeat steps 1 and 2 for columns C and D.
- Trim ends to secure same level height.
Rails
- Secure rail H in position as shown on plan to columns A and D. Drill holes and fasten with 300mm threaded rod and nuts. Fasten tight.
- Repeat step 1 for rail F against columnsB and C.
- Secure rail E in position against columns A and B and under rails H and F. Secure with bolts and nuts.
- Repeat step 3 for rail G against column D and C.
Ringbeam
- Secure the ring beams L and N to columns A and D, and B and C respectivelyto height 950mm from the top of the columns, with 2 x 75mm nails per column. Make sure beams are level.
- Repeat step 1 for beams M and O to columns A and B, and D and C. Trim end.
- Secure joist beam I in the centre between ring beams M and O as shown, and headnail fix it with 2 x 75mm nails through beam M and O.
Decking
- Nail decking strips with 75mm nails to ring beams and joists as shown, using one nail per joint.
- Trim ends of decking strips to fit.
Stair / Stringers
- Secure stair strings I and J to columns D and C respectively directly under ring beam O, using one bolt and nut per joint.
Droppers
- Nail fix droppers, as shown on plan, on stringers I and J with 1 x 75mm nail per joint.
- Allow for +70mm openings between droppers.
Paint
- The structure should be protected with any good quality wood penetrating sealer containing a water repellent, recommended for external use. Sealers must be maintained as per the instructions on the product label to ensure maximum protection against weathering agents i.e. UV, temperature and moisture.
Sundries(optional)
- Swing – a nylon rope with seat from formed materials
- Sliding pole – 25mm diameter. Galvanised pole through 25 diameter. Hole in rail E and other end sunk in ground.
- Climbing net – nylon ropes tied together to form blocks as shown, and net tied to rail G.
References
Alexander G D & Alexander G C. 2010. Buildaid Building and Pricing Guide 2010/11. Johannesburg: Buildaid Publishing.
Alexander G D & Van As F. 2008: Civil Technology. Johannesburg: EWA Publishing.
South African Bureau of Standards. 2011/12 – SANS 10400 Part A. Pretoria. SABS Standards Division.
Alexander G D & Van As F. 2008: Civil Technology. Johannesburg: EWA Publishing.
South African Bureau of Standards. 2011/12 – SANS 10400 Part A. Pretoria. SABS Standards Division.