Chapter 24
PAINTING
Types of Paint
General Guide to Painting
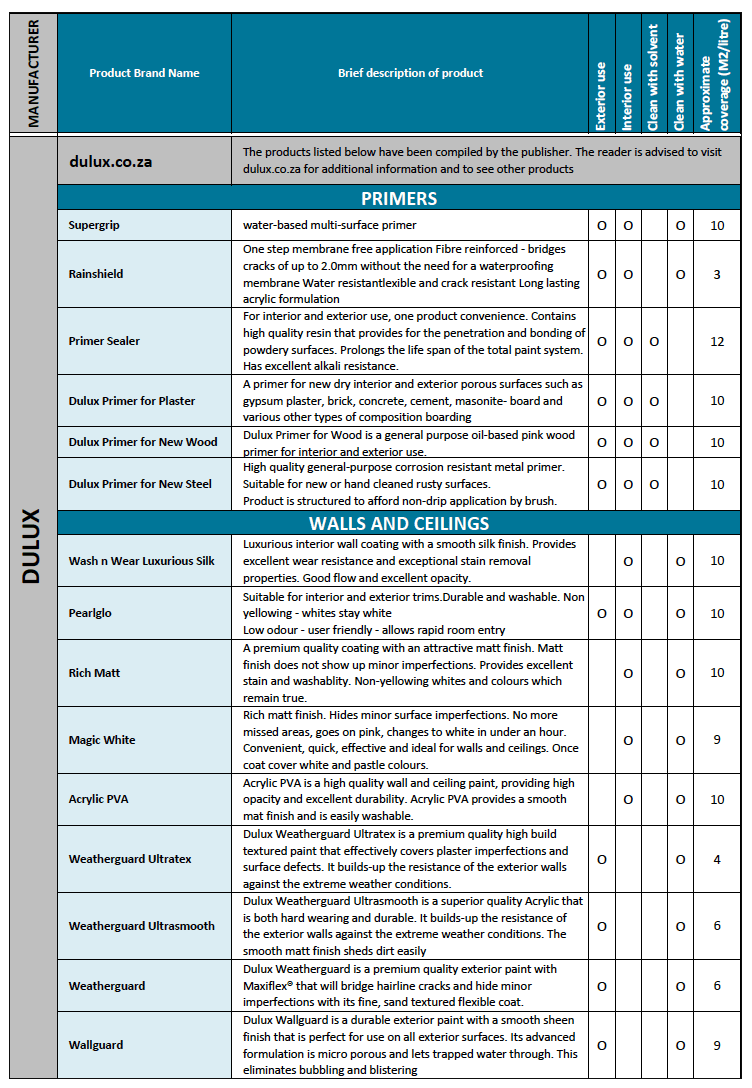
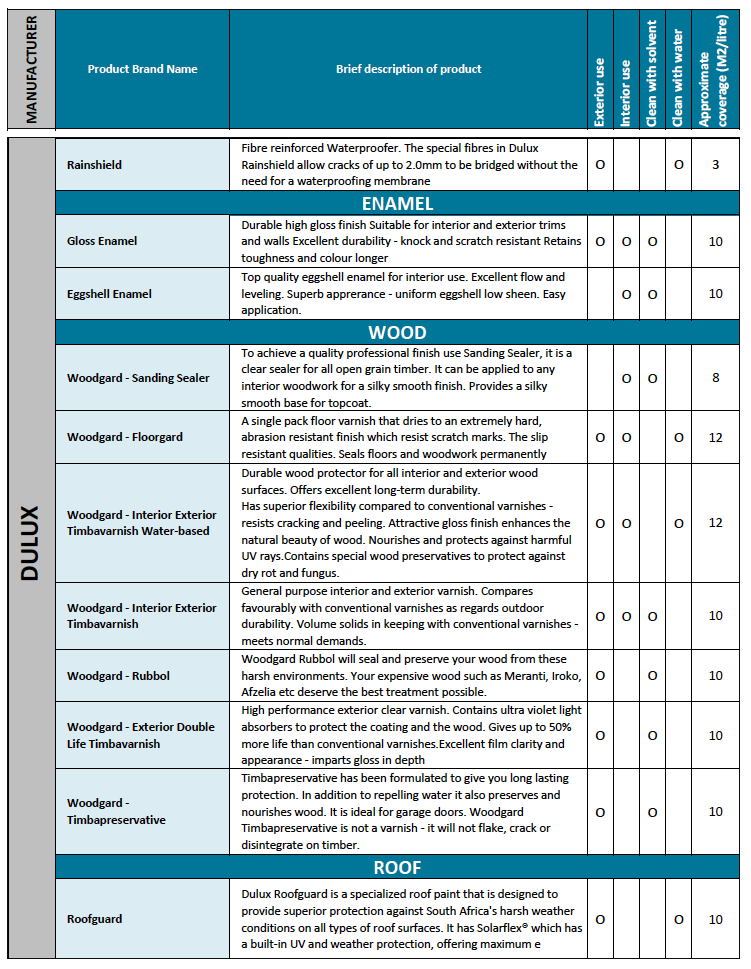
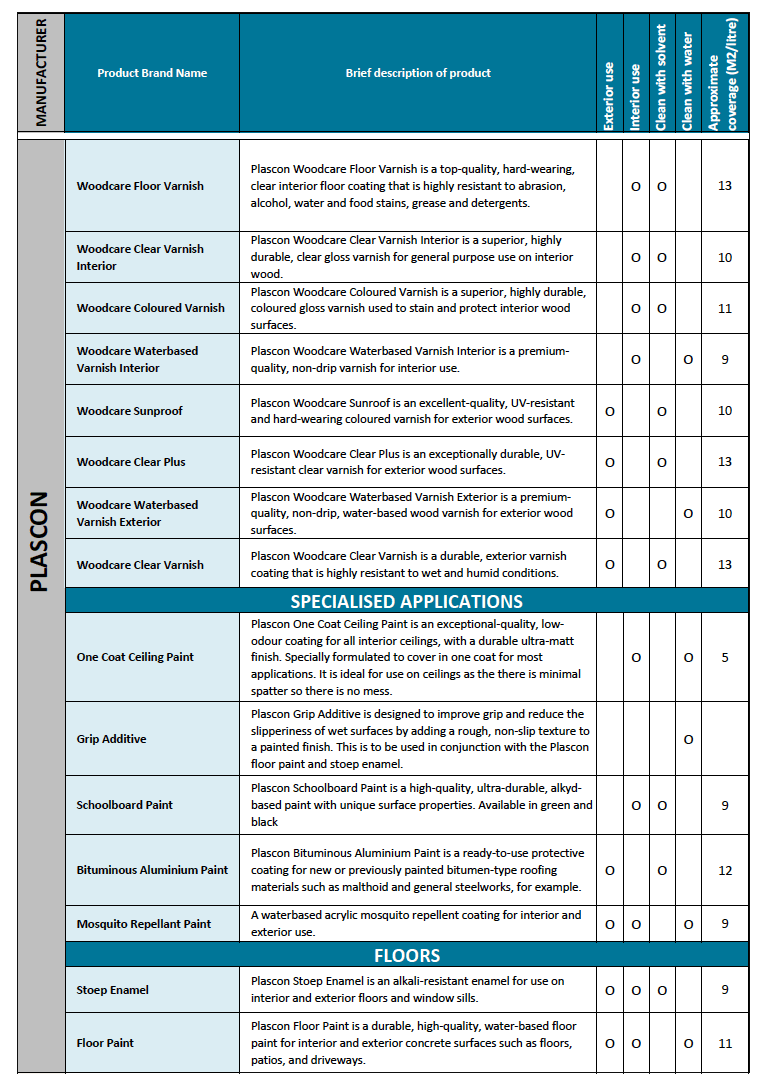
Paint Users Guide
Solvents for Painting
Types of Paint
Paint
Consists of pigments, additives and binders in an oil or waterbased solvent. The pigment to binder ratio determines the degree of gloss. The glossier the finish the more hardwearing the finished surface. The quality of ingredients will determine ease of application and durability, cheaper paint generally contains more solvents than more expensive paint.
Acrylic paint
Acrylic paint is “water based”. This type of paint is resistant to fat, oils and grease, as well as some or minimal cracking. These paints dry by the evaporation of water. They contain a synthetic resin in the form of dispersion of tiny droplets suspended in water, during drying the resin droplets coalesce to form a film, which then undergoes curing. Many different resins are used, mostly co-polymers such as acrylic/ vinyl, acrylic/polyvinyl acetate (PVA), or acrylic/styrene. Pure acrylic paints usually contain co-polymers containing methyl methacrylate, these are the most durable binders for water based emulsion paints currently available. Water based paints, though porous enough to allow some drying of new plaster (and allow efflorescence to pass without harming the paint), should not be applied to surfaces that are very wet.
Alkyd paint
Durable exterior oil paint or varnish, with varying percentages of alkyd resins, usually in gloss, are easy to brush (but are easily over brushed too thin, so require care to give good film thickness). They are fast-drying and have good weather and abrasion resistance, as well as low permeability to water vapour. Alkyd resin is a mixture of alcohol and acid that forms a synthetic polyester resin and is often used in oil paint and varnish.
Enamel paint
Paint made with synthetic resin binders which dry to a smooth, hard film resembling enamel. Enamel paints flow well but need good undercoats. Compared with oil paints they are durable and hard.
Oil paint
High quality paint containing a large percentage of drying oil, such as linseed oil, soya, or tung oils, and a synthetic resin, such as alkyd. It dries by the evaporation of any solvent, then the oxidation of the oil, which usually has driers. Oil paints are used for final coats, undercoats, and some primers. If applied on alkaline fresh concrete, they may fail from saponification. Although oil paints usually contain some alkyd resin, they give a coating that is tough and durable, with a very flexible film more permeable than alkyd paint, which allows exterior woodwork to breathe. (The solvent vapours from large areas of fresh indoor paint can be hazardous to one’s health).
Polyurethane
This refers to the chemical link formed between a polyol and an isocyanate. These are usually two component paints like epoxies but single component types are also manufactured. The single pack types include urethane-modified alkyd resins where polyurethane is incorporated into the resin. Polyurethane paints are normally tougher than alkyds and are typically used for flooring and other exposed applications.
Rust converter
The rust converter reacts chemically with rust and stops further corrosion. On drying, the creamy white coating is converted to a firmly adherent, bluish-black film. Water-insoluble after curing.
General Guide to Painting
Guide To Painting Masonry
Potential Problems with Masonry Surfaces
Masonry surfaces include bricks and cement plaster. In some instances gypsum-based plasters or skim coatings are also used. These surfaces provide specific challenges for the painter.
- Most masonry surfaces are weak, friable porous and sandy.
- Cement plasters are seldom aged long enough to allow the alkaline lime content to neutralise with carbon dioxide from the air. The surface is alkaline as a consequence.
- Moisture and damp are often present during and after application of paint. This can prevent good film formation as well as cause blistering in the dry paint. It is good practice to locate and remove all sources of water ingress into a structure before painting. A reputable waterproofing contractor should be capable of doing this.
- Efflorescence can be a problem on bricks. This is due to water carrying soluble salts from within the brick to the surface. The salts are due to poor or inadequate firing of the bricks resulting in the formation of soluble salts within the brick (usually sulphates from sulphur contamination).
- Fading and discoloration sometimes occurs when painting cement plaster as well as gypsum plaster. This is normally due to lime or alkali attack on the finishing coat in the case of cement plaster. The solution is to use an alki-resistant plaster primer as a barrier film between the plaster and the topcoat. On gypsum, a white patch often develops if the plaster is painted with a waterborne product before the gypsum has been adequately cured. The white effect is due to soluble sulphate being extracted into the wet paint. It tends to bleed through subsequent coatings as well. The solution is to ensure the plaster cures overnight before painting and that a bonding sealer should be applied. This prevents extraction of soluble material into the finishing coating,
Surface Preparation
This is the critical part of any painting project: poor preparation is the principal cause of coating failure. Cement plaster should be strong and hard. If it is not, this indicates a poor sand/cement/water mixture. Painting over poor plaster will usually result in flaking, blistering and efflorescence defects – which are not due to the quality of the paint system. The masonary surface should be dry, sound and clean and cured for a minimum of 14 days, with a moisture content, measured with a Doser Hygrometer (or equivalent), of BD 2 scale – 8% or less.
- Brush off all loosely bound sand particles
- Open out any cracks using a sharp knife
- Seal all cracks or surface imperfections using a bonding sealer. Leave to dry 2hours
- Fill cracks or surface imperfections using a crack filler. Leave to dry for 4hours. Sand the surface smooth.
- If surface is highly porous or friable, apply a bonding sealer over the entire surface. This will strengthen the surface and reduce the possibility of coating failure.
- The use of gypsum-based fillers and skim coatings are not recommended. These materials have inadequate flexibility and wet strength.
Guide To Painting Gypsum Surfaces
Surface to be clean, dry and dust free with a moisture content of less than 15%. Apply one coat bonding liquid or suitable plaster primer with an overcoating that is recommended by the manufacturer; then apply two coats emulsion paint to comply with SABS 1586 colour and gloss designation (matt, sheen, gloss) as specified, with an overcoating time between coats as recommended by the manufacturer.
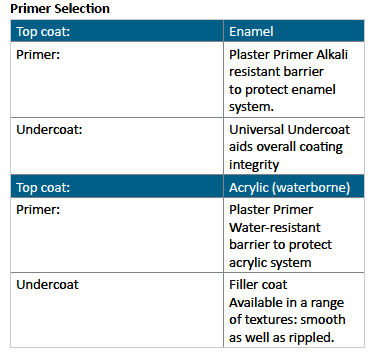
Painting with solvent based paints:
Make sure walls are 100% dry. Apply one coat alkali resistant plaster primer to comply with SABS 1416 on one coat plaster or bonding liquid for gypsum plaster with an overcoating time of (as per manufacturers Instructions) hours; then apply one universal undercoat to comply with SABS 681, grade 1; then finish with one or two coats alkyd enamel paint to comply with SABS 630, type 2, and of grade (Premium, standard or economical), colour and gloss designation (matt, sheen, gloss) as specified, with an overcoating time between coats of (as per manufacturers instructions) hours.
Guide To Painting Roof Tiles
About Roof Tiles
Roof tiles are usually made from concrete or clay (less common). Concrete tiles are prone to carbonation due to the effects of carbon dioxide and water in the atmosphere, which forms a very weak acid called carbonic acid. This extracts the cement from the surface of the tiles and produces a weak, friable surface layer. The effect becomes more severe as the tiles age on a roof. Clay tiles do not have this problem, but tend to be highly porous. This can lead to poor paint film curing.
Surface Preparation
This is the critical part of any painting project: poor preparation is the principal cause of coating failure. Both types of tile can be prepared in the same way. The object of surface preparation is to provide a strong surface before applying any paint. The necessary steps are as follows:
- Wash the surface thoroughly using water and a strong brush. This should remove all loosely bound sand particles and any poorly adhering paint coatings. A high-pressure water jet is recommended.
- Rinse the roof with clean water and then leave it to dry out. The moisture content should be below 15%. This can be measured using a moisture meter.
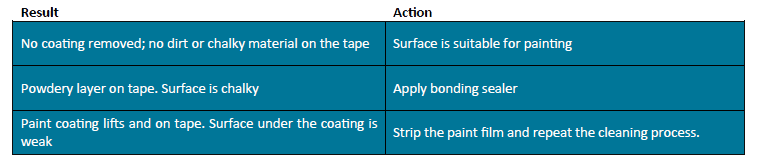
- Check the adhesion of any existing paint coatings by pressing adhesive tape (e.g. masking tape) onto the dry surface. Pull the tape off the surface and inspect the underside of the tape. See table below.
- Check the porosity of the surface before painting by applying a droplet of water. If it is readily absorbed into the tile then the first coat of paint must be diluted 20% with water (i.e. add 5 litres water to 20 litres roof paint).
- If it is not possible to remove all sand particles, it is then recommended that a bonding sealer be applied to seal any residual particles.
- If a bonding sealer has been applied to the surface, leave it to harden for at least 2 hours before continuing.
Paint Application
Apply roof coating to the prepared surface using a roller (wool or “Propile” type); brush or by airless spraying. Two coats are recommended for optimum durability and quality finish. Allow the first coat to cure for at least 2 hours before applying the final coat.
Quick Calculation for the quantity of paint required
- Estimate the plan area of the roof by measuring the length and breadth of the walls.
- Multiply this area by 1,5.
- Estimate the paint quantity needed by dividing the above area by 7.
- This should produce a slight excess of paint, which is useful for touch-up work as required.
Other Important Information
- Never apply paint if rain is forecast, or expected, during the day of application.
- Apply paint after 8h00 (summer) or 10h00 (winter) to ensure the roof is not too cold or damp.
- It is recommended that the paint is applied before 12h00 to avoid excessive roof temperatures and to allow the paint to harden sufficiently before any afternoon rain may occur.
- Always use the same batch number for touch-up work. This reduces colour/sheen variations, which otherwise may be visible on the painted roof.
Guide To Painting Galvanised Iron Roofing, Pipes And Gutters
About Galvanised Iron
Galvanised iron is steel that has been dipped into molten zinc metal. This increases the corrosion resistance of the steel. The resulting material has a bright silver colour and is highly resistant to red rusting. Old galvanised iron may lose the protective zinc coating and red rusting may then occur. The surface of zinc metal oxidises rapidly to form a protective carbonate/oxide layer, which protects the zinc from further damage. This layer causes most paint failures because it can be relatively weak. This results in paint flaking. Zinc metal also inhibits the curing of enamel paints. This is the main cause of poor adhesion of enamels applied directly to galvanised iron without the correct primer. Waterborne acrylic paints adhere well to clean galvanised iron and have superior exterior durability compared to enamels. However, galvanised iron is prone to “white rusting” in humid or corrosive environments and a properly designed primer is necessary for long-term durability.
Surface Preparation
This is the critical part of any painting project: poor preparation is the principal cause of coating failure. It is very important to remove surface dirt, grease and other contaminants as well as loose paint coatings and surface oxidation (e.g. dull, matt grey surfaces) in order to ensure optimum adhesion and durability of the paint system. The necessary steps are as follows:
- Wash the surface thoroughly using water and a strong brush. This should remove all loosely bound contaminants and any poorly adhering paint coatings. Use a spatula or flat blade to check adhesion of any existing paint coatings. A high-pressure water jet is recommended.
- Apply a product like Promac Grannozinc to any exposed metal. This dissolves surface oxidation and helps to remove any oily contamination. Leave in contact with the roof for 5 minutes maximum, and then rinse the roof with clean water. Leave it to dry out. Apply the primer within 2 hours of cleaning to avoid possible re-contamination of the surface.
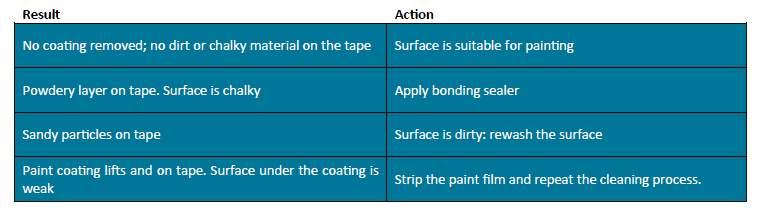
- Check the adhesion of any existing paint coatings by pressing adhesive tape (e.g. masking tape) onto the dry surface. Pull the tape off the surface and inspect the underside of the tape. See table on next page.
- Prime exposed metal using Promac Promogrip Primer (Galvanised) and leave to cure for at least 2 hours before continuing. If red-rusting is present, then Promac Uniprime is specified.
Paint Application
Apply primer and or suitable roof paint to the prepared surfaces using a roller (wool or “Propile” type); brush or by airless spraying. Two coats are recommended for optimum durability and quality of finish. Allow the first coat to cure for at least 2 hours before applying the final coat. The same method can be used for gutters and downpipes but a brush or small roller should be used.
Quick calculation for the quantity of paint required
- Estimate the plan area of the roof by measuring the length and breadth of the walls.
- Multiply this area by 1,25
- Estimate the paint quantity needed by dividing the above area by 7.
- One litre of paint will cover approximately 30m of 30mm radius down pipe or gutter.
- This should produce a slight excess of paint, which is useful for touch-up work as required.
Other Important Information
- Apply paint after 8h00 (summer) or 10h00 (winter) to ensure the roof is not too cold or damp.
- It is recommended that the paint is applied before 12h00 to avoid excessive roof temperatures and to allow the paint to harden sufficiently before any afternoon rain may occur.
Guide To Painting Concrete Flooring And Paving
Overview
Floor coatings are specially designed to be tough and abrasion resistant. Special properties such as acid and oil resistance may be required for certain floors, e.g. in garages and workshops. Cast in situ concrete is often used for driveway and other paving applications. This material is often not cured properly (i.e. using an impermeable membrane such as a polythene cover) and subsequently the surface layers fail to cure adequately and a sandy, friable surface is produced.
Surface Preparation
This is the critical part of any painting project; poor preparation is the principal cause of coating failure. The object of surface preparation is to provide a strong surface before applying any paint. The necessary steps are as follows:
- Wash the surface thoroughly using water and a strong brush. This should remove all loosely bound sand particles and any poorly adhering paint coatings. A high-pressure water jet is recommended.
- Rinse the floor with clean water and then leave it to dry out. The moisture content should be below 15%. This can be measured using a moisture meter.
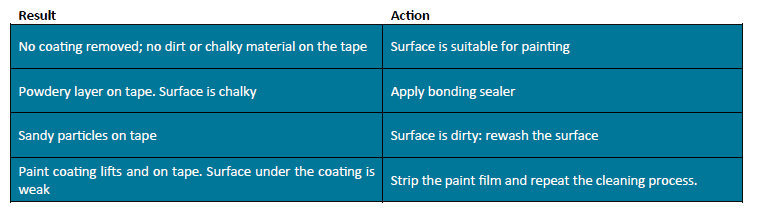
- Check the adhesion of any existing paint coatings by pressing adhesive tape (e.g. masking tape) onto the dry surface. Pull the tape off the surface and inspect the underside of the tape.
Paint Application
Acrylic Coating System: Apply bonding liquid to the surface, leave to cure for at least 2 hours, then apply suitable acrylic paint to the surface using a roller (wool or “Propile” type); brush or by airless spraying. Two coats are recommended for optimum durability and quality of finish. Allow the first coat to cure for at least 2 hours before applying the final coat.
Epoxy Coating System: Mix the two components together. Add 15% lacquer thinners. Apply to the surface using a brush or mohair (enamel) roller. Leave to cure overnight then reapply without diluting the paint. Note that this product has a pot life. If its consistency starts to thicken, do not use the product.
Enamel Coating System: Apply Plaster Primer using a mohair (enamel) roller or brush. Leave to cure overnight then apply Stoep Enamel using a mohair (enamel) roller or brush.
Guide To Painting Wood
Introduction
Wood has a natural beauty that is usually enhanced by the use of transparent coatings called varnishes. Wood has to be protected from damage by water, sunlight and abrasion. There are various varnishes available for different end-uses:
Surface Preparation
This is the critical part of any painting project; poor preparation is the principal cause of coating failure. The object of surface preparation is to provide a strong surface before applying any paint. The necessary steps are as follows:
Sand the surface using successively finer abrasive papers. Sand in the direction of the grain. The use of a sanding sealer will improve the quality of the resultant finish.
Remove dust from the surface by wiping with a damp (not wet) lint-free cloth.
Paint Application
Clear Varnishes: Apply selected varnish to the surface, leave to cure overnight, and then apply a second coat. Brushing is the preferred method. Further coats may be required over porous soft wood (e.g. SA pine).
Solid colour topcoats (enamels): Apply wood primer by brush or roller. Leave to cure overnight then lightly sand the surface before applying Universal Undercoat. Then lightly sand the undercoat and dust off. Apply the selected enamel topcoat and leave to cure overnight. Apply a second coat of topcoat for optimum quality of appearance.
Solid colour topcoats (acrylic): Apply wood primer by brush or roller. Leave to cure overnight then lightly sand the surface before applying selected acrylic topcoat and leave to cure for at least 4 hours. Apply a second coat of topcoat for optimum quality of appearance.
Guide To Waterproofing And Treating Damp
Waterproofing
The objective of waterproofing is to stop water entering a structure. The best way to stop water ingress is through proper design. Unfortunately buildings contain many flat, horizontal surfaces and also joints such as those between roof tiles and parapet walls, which can promote water entry. Cracking in masonry and leaking pipes are other problem areas.
Principles of Damp-proofing
- Find the water source.
- . Insulate the water source (e.g. fix leaking taps or drains; apply waterproofing to parapet walls etc).
- . Leave the surface to dry out to below 15% moisture content.
- Remove old paint coatings down to sound bare plaster.
- . Apply a suitable paint system.
Waterproofing Systems
Fabric reinforced acrylic
This is a two part system that utilises waterborne acrylic waterproofing impregnation of polyester non-woven fabric reinforcement. It allows complex shapes to be insulated. The fabric is a carrier for the acrylic waterproofing compound and the resultant effect is similar to canvas.
- Apply a thick coating of acrylic waterproofing compound to the clean, prepared surface.
- Embed the fabric into the compound while it is still wet. Press fabric down well and ensure no bubbles are formed.
- Apply a second coat of acrylic waterproofing compound over the fabric, ensuring complete saturation of the fabric. Failure to do this often results in blistering and poor waterproofing. Leave to dry for at least 4 hours.
- Apply a third coat and leave to dry for at least 4 hours. For optimum weather resistance, apply a suitable roof paint as a final coating.
Fibre-reinforced mastic
This product contains special fibres that provide extra reinforcement and prevents the need for use of a reinforcing fabric. The product is applied as a thick layer by trowel to a clean, sound surface. Leave the product to cure overnight before applying a weather-resistant top coating.
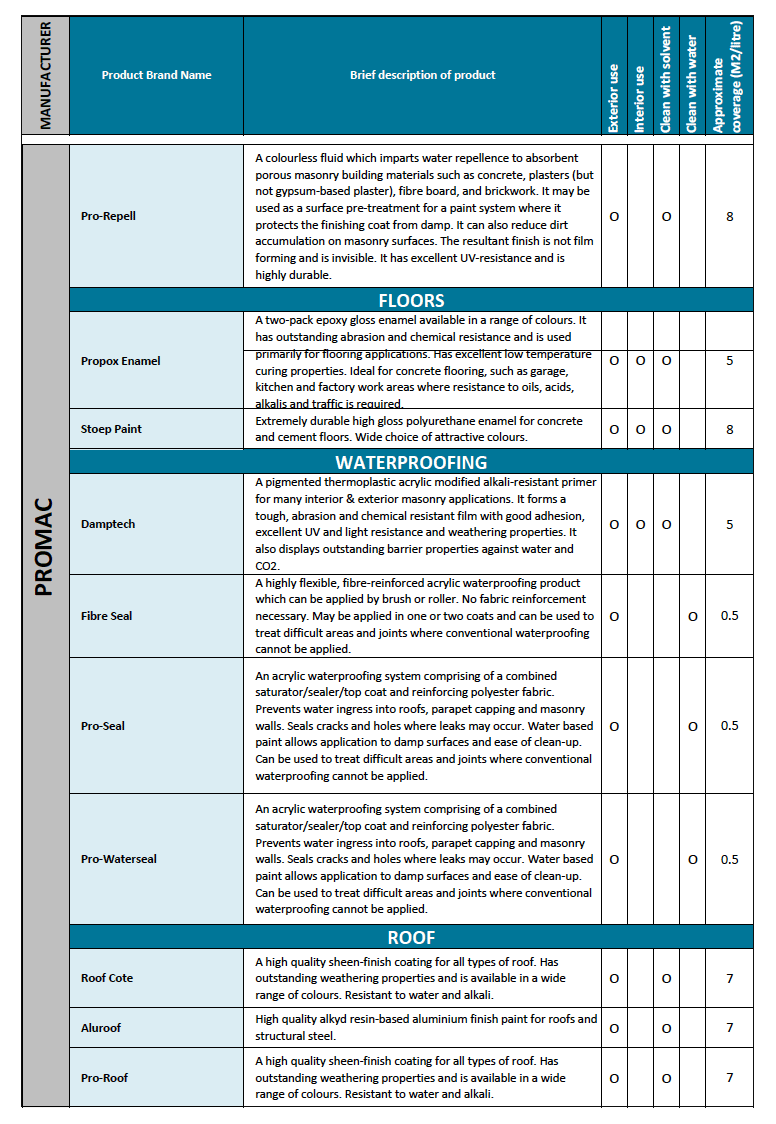
Water-repelling Fluid
This is a silicone-based clear fluid that makes masonry surfaces water repelling. Liquid water does not wet treated surfaces and this prevents water entry into the surface. Water vapour can pass through the surface, therefore allowing the surface to dry out. The use of a waterproof barrier under a paint system protects the coating system from water entering behind. This reduces the damp patch effect that can occur on some walls. The water repellent does not leave a varnish-like film and is invisible. It does not bind friable or weak surfaces and does not function over gypsum or paint surfaces. It is ideal for treating face brick, ceramic tiles and concrete surfaces.
Surface Preparation
This is the critical part of any painting project; poor preparation is the principal cause of waterproofing failure. The surface must be sound and free from dirt, loose particles, oils etc.
Paint User Guide

Solvents for Painting
Solvents are used both for thinning paint and for cleaning tools and equipment. There are numerous solvents used for different applications. Listed below are common types of solvent. Water is the most common and convenient solvent and is used in many different paints. It is important to note that paint should not be thinned unless indicated by the manufacturer on the tin or packaging.
Common solvents
- Mineral turpentine (turps)
Mineral turpentine (sometimes referred to as white spirit) is a petroleum-derived clear, transparent liquid which is a common organic solvent used in painting and decorating. Mineral turpentine is an inexpensive petroleum-based replacement for the vegetable-based turpentine. It is commonly used as a paint thinner for oil-based paint and cleaning brushes. Mineral turpentine is chemically very different from turpentine, which mainly consists of pinene, and it has inferior solvent properties.
- Lacquer thinners
Lacquer Thinner is usually a mixture of solvents able to dissolve a number of different resins or plastics used in modern Lacquer. Twentieth-century lacquer thinners frequently contained alkyl esters like butyl or amyl acetate, ketones like acetone or methyl ethyl ketone, aromatic hydrocarbons like toluene, ethers such as gylcol cellosolves, and or alcohols. It is an interesting solvent because it’s composed of half-a-dozen or so individual solvents and manufacturers vary these to control solvent strength and evaporation rate. Lacquer thinners is commonly used for spray paitning.
- Methylated spirits
Denatured alcohol is used as a solvent and as fuel for spirit burning stoves. Because of the diversity of industrial uses for denatured alcohol, many additives and denaturing methods have been used. The main additive has traditionally been 10% methanol, giving rise to the term “methylated spirits”.
Paint Brushes and Paint Rollers
A common mistake made when purchasing paint brushes and rollers is that they are often purchased on a price point. The consumer, painter or contractor should first consider the finish required and the quality of paint used. A good quality PVA / Enamel paint requires a better brush or roller than an undercoat would require.
Choosing the correct Academy paintbrush
There has been a major change in paint brushes over the past five years with more paint brushes being made from synthetic filament. In the past, all paint brushes were made from Hog Hair. Selecting the correct paint brush plays an important role for your painting application. Academy Brushware offers an extensive range of paint brushes with a selection of synthetic, mixed bristle and 100% hog hair (pure bristle) paint brushes.
Pure Bristle Paint Brushes:
Kraftsman, Prestige, Setter and Everyman
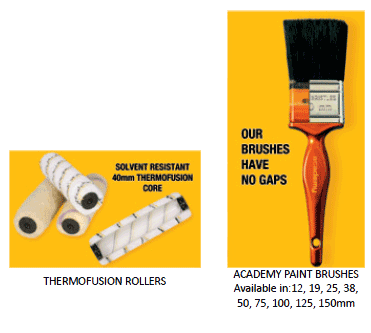
Our range of superior brushes covers the full spectrum of sizes from 12mm to 150mm. But it’s the part you can’t see that makes the Academy brush special. Under the ferrule, we don’t leave gaps to make the bristle look longer than they actually are. Instead, we epoxy the pure bristles into our exclusive, imported resin handles, to ensure that they stay where they are supposed to. The ferrule supports this system, making our brushes amongst the finest available. Our exclusive, imported handles are ergonomically designed to give you a superior, comfortable grip, ensuring a painless application of the job at hand. Once you have tried an Academy Brush, you won’t put it down.
Mixed bristle Paint Brushes:
Millennium Range- Layman, Bee, Handy, Ecoman:
Millennium Range- Layman, Bee, Handy, Ecoman:
As natural hair gets more and more precious each year, Academy has stocked a range of paint brushes which composes of a combination of synthetic and natural fibre. The combination of these two fibres provides for longer sequences of painting without interruption.
Synthetic Bristle Paint Brushes:
Millennium Range- Deziner, Ebony and Ivory:
Academy offers a range of modern synthetic bristle brushes which are excellent in the fact that they offer flexibility and strength. These brushes also have the advantage of being cheaper than natural hair.
Fibreglass Paint Brushes:
Millennium Range- Blondie:
Fibreglass applications require brushes with stiff bristles for drawing resin through the fibreglass matt providing better air release. Academy’s paint brushes for fibreglass applications come in various sizes and can be used for applying epoxy paint, fibreglass and resins and for general purpose use.
Choosing the correct Academy paint-roller
The choice of roller depends on the finish required and the type of paint used. Regarding the roller, the shorter the pile the smoother the surface, the longer the pile the rougher the surface.
Paint rollers are available in 50mm, 100mm, 160mm and 225mm – depending on the type of roller required.
Academy Brushware has followed closely the footsteps of the international markets and modern trends. Hence its introduction to the local market of the latest technology available, “thermofusion”. It entails the pile fabric to be heat bonded or fused to a 40mm polypropylene core with very obvious advantages over the previous methods used. The technique uses no glue and staples to secure the leading edges; the bond between the fabric and the core is outstanding, so much so, it can be termed indestructible under ordinary use applications. No known solvent or paint medium has any effect on the core, or bonding formed between it and the pile.
Enamel Paints on Smooth Surface:
Short Pile Roller
Short Pile Roller
Academy’s Pink Mohair, White Mohair roller, Smooth Sponge rollers and Radiator rollers are the best choice for this type of application.
PVA Paint on Smooth Surfaces :
Short Pile Roller
Academy’s Propile roller is the most popular roller for this painting application.
PVA Paint on Medium Surfaces :
Medium Pile Rollers
Academy’s Ecopile (undercoat), Furpile or Lambswool rollers are suitable. For a textured finish we recommend use of the
Textured roller.
PVA Paint on Rough Surfaces :
Long Pile Rollers
Ruffpile, Sheepskin or Eezypile rollers are the perfect choice for a Quality Finish!
Academy’s paint rollers are colour coordinated in order to provide the consumer with an “Easy to Choose, Easy to Use” concept to ensure the correct paint roller is used for the correct application. Simple painting tips and cleaning instructions are provided on the sleeve of the rollers for the consumer’s convenience.
References
Academy Brushware – www.academybrush.co.za
Alexander G D & Alexander G C. 2010. Buildaid Building and Pricing Guide 2010/11. Johannesburg: Buildaid Publishing.
Alexander G D & Van As F. 2008: Civil Technology. Johannesburg: EWA Publishing
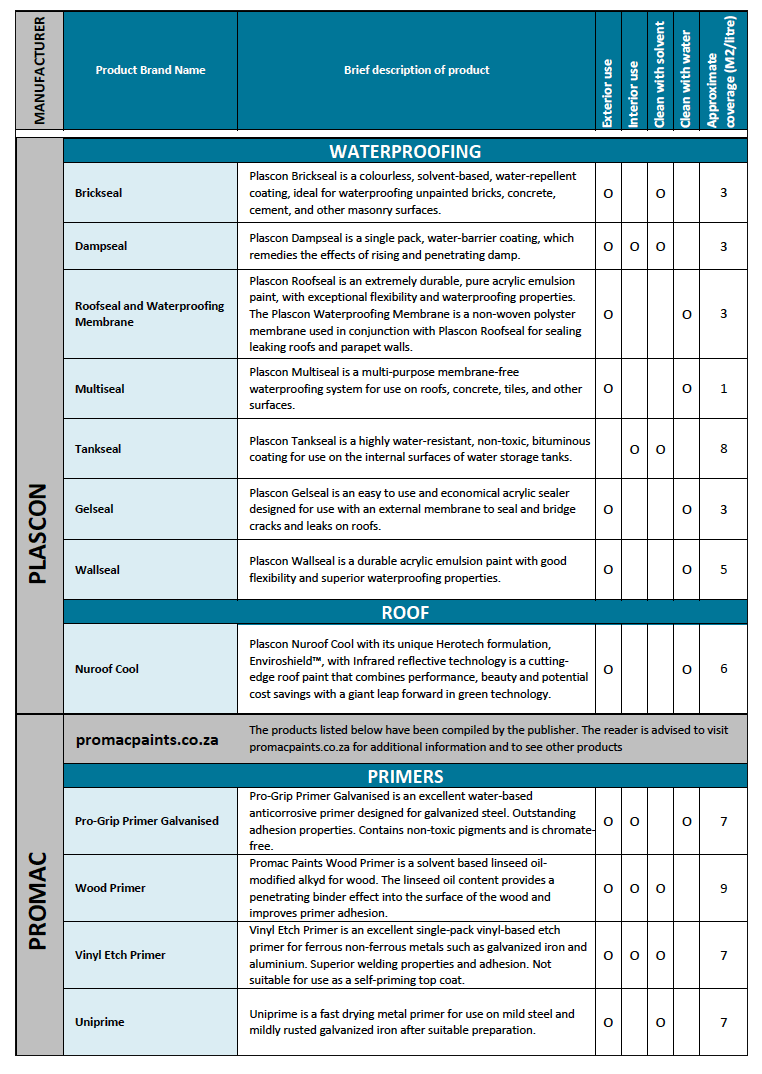
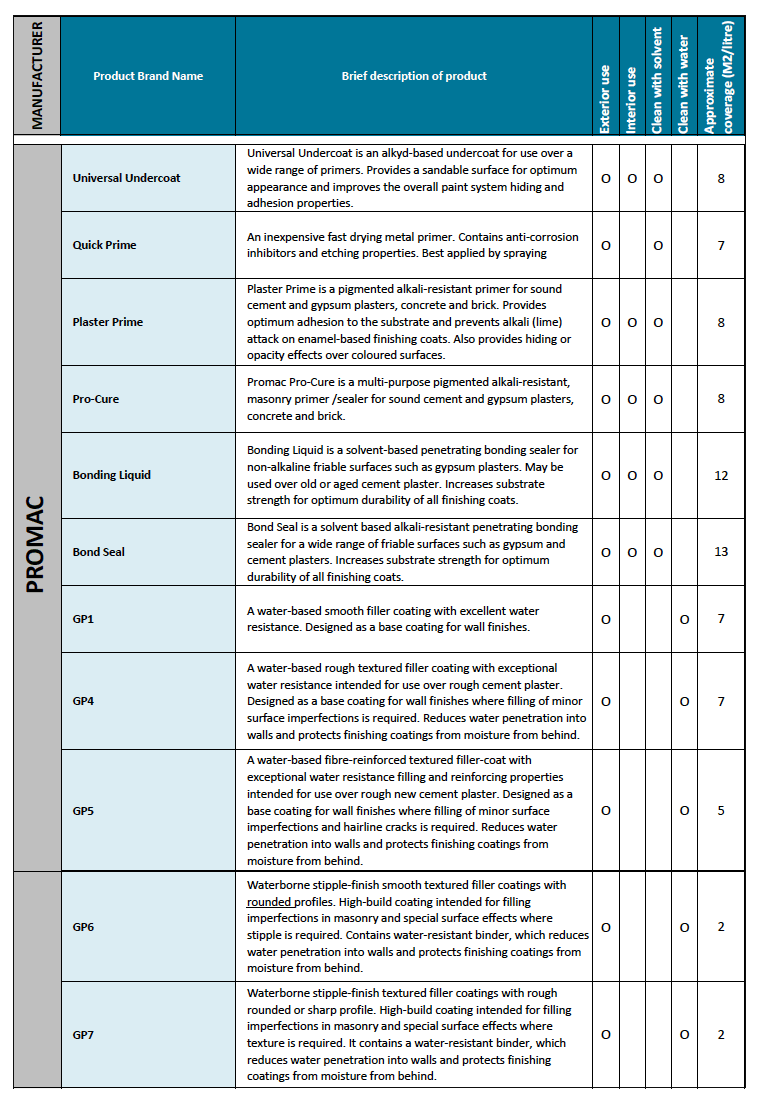
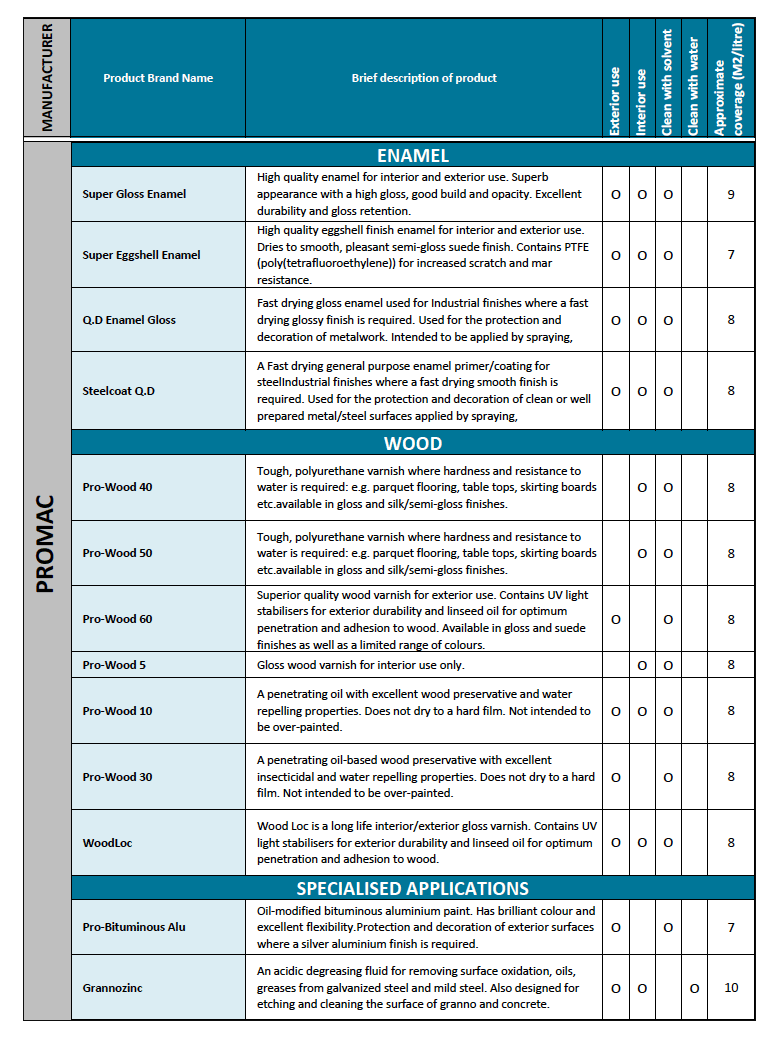
Promac Paints – www.promacpaints.co.za
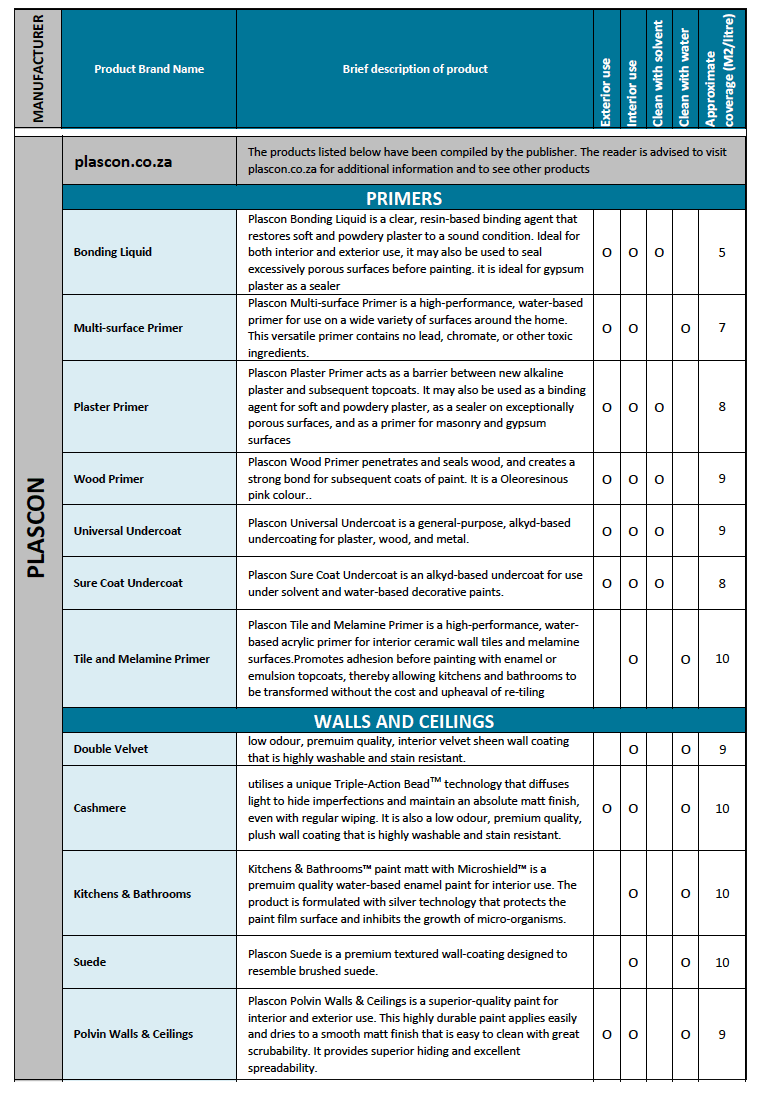
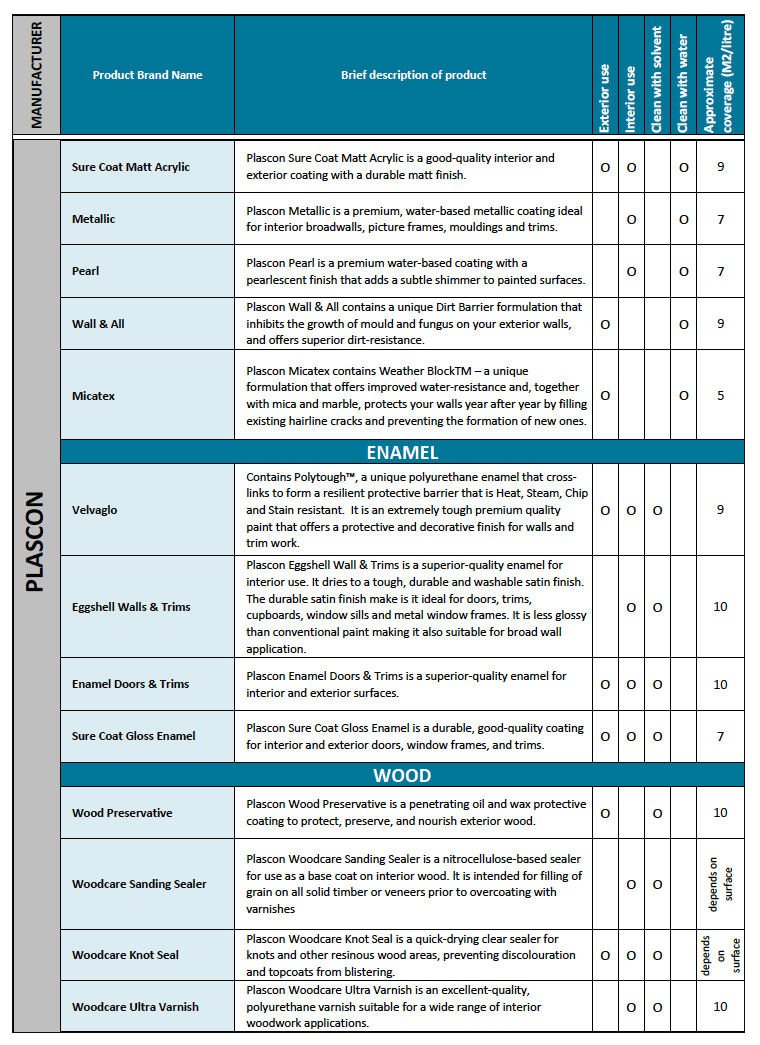
Plascon – www.plascon.co.za
Alexander G D & Alexander G C. 2010. Buildaid Building and Pricing Guide 2010/11. Johannesburg: Buildaid Publishing.
Alexander G D & Van As F. 2008: Civil Technology. Johannesburg: EWA Publishing
Promac Paints – www.promacpaints.co.za
Plascon – www.plascon.co.za