Chapter 25
TILING
Introduction
Terminology
Typical Performance Requirements
Tile Types
Successful Tiling
Tile Adhesives and Grouts
Tiling Accessories
Your Guide to Tiling
Introduction
There are tiles for all environments however there is no one particular tile that is suitable for all situations.
Wall and floor tiles perform two functions: an aesthetic, decorative function and a technical function in as much as they should be made from materials that can resist different types of environmental stress without breaking or deteriorating.
These two functions are fundamental and essential; there cannot be one without the other. It is therefore essential that you choose a tile that is both aesthetically and technically suitable for your application.
The most common type of wall and floor tiles used today are provided with a glazed finish, although ceramic tiles are found in a wide range of other finishes, in both glazed and unglazed finish.
With unglazed tiles, there is no glass or any other coating applied to the tile. Because these are invariably ‘full-bodied’ tiles, which means that the colour goes right through the body of the tile (the same on the face of the tile as it is on the back), this results in very durable tiles that do not show the effects of heavy wear. The most common unglazed tiles are the red quarry tiles or the granite-looking porcelain tiles.
When tiles are used as a flooring finish, they are categorized as a hard jointed finish, with some main performance requirements and properties of these products discussed under flooring; (which draw a comparison of these types of materials being used as a flooring surface versus others described in that section).
What is most important to the would be user is to understand the requirements for wall as opposed to floor tiles and selecting a tile that has been constructed for the specific area of use determined by the expected level of wear and environmental conditions. When selecting tiles for exterior use, it is necessary to determine exactly what level of performance is required and to balance this need with the correct level of absorption. It is also important to determine how these tiles will be laid and by whom.
Terminology
Absorption
Percentage amount of moisture absorbed by weight.
Backsplash
The area located between the countertop and upper cabinets.
Bevel
A sloped surface contiguous with a vertical or horizontal surface.
Bicottura
‘Bi’ meaning twice and ‘Cottura’ the Italian word for cooked, therefore tiles that are twice cooked or fired. Also called Double Fired.
Bisque
When you look at a glazed tile from the side you can see two layers. The body of the tile, or largest layer, is called the bisque. The top part is called the glaze.
Blending
The proper positioning of adjacent floor slabs, or tiles, by their predominant colour.
Buttering
Placing mortar or adhesive on tiles with a trowel before setting them into position.
Ceramic
Attractive, water-resistant, hard wearing floor tiles or wall tiles of accurate shape usually much thinner than quarries. They are made from refined powder pressed to shape dry, then fired to hardness until vitrified or fully vitrified; the face may be glazed or unglazed but in most cases it is found to be glazed.
Cure time
The time required for the thin-set below the tile to become hard and set.
Cut stone
Finished, dimensioned stone ready to set in place.
Deco
A decorative accent piece.
Dust-pressed tiles
Glazed or unglazed tiles made by subjecting a mixture of ceramic powders in moulds to high pressure and then firing the resultant product at a suitable temperature.
Exposed face
The visible side of any stone element.
Extruded tiles
Tiles made by shaping the bodies in the plastic state in an extruder, and cutting the column thus obtained into predetermined lengths.
Field tile
When creating a pattern with different ceramic tiles, the more prominent tile that is throughout the largest areas is called the ‘field tile’.
Flagstone
Thin slabs of stone or simulated stone used for paving surfaces such as walkways, driveways and outdoor areas.
Glazed
An enamel glaze of many possible colours and patterns; glazing liquid is prepared from a glass derivative called frit and coloured dyes, which is fired on to the surface of ceramics for decoration, which in turn makes them vitrified and practically impervious and easy to maintain.
Grout
The material used to fill the joints between tiles.
Igneous
Any of the various volcanic rocks, solidified after the molten state, such as granite.
Impervious tiles
Tiles that have less than .5% moisture absorption. These tiles are frost proof and can be used in exterior areas or on the outside of buildings for vertical services.
Joint
The space between tiles that is filled with grout.
Listelle
An accent tile in a rectangular format generally used as a linear design element.
Moisture absorption
See Water absorption (porosity) under typical performance requirements.
Monocottura
‘Mono’ meaning once, therefore tiles that are cooked or fired only once.
Mosaics
Tile sizes of 50mm x 50mm or smaller are usually referred to as mosaics and are used to create patterns and decorative work. See Mosaics under Tile types.
Natural stone
A product of nature; a stone such as granite, marble, limestone, slate, travertine, or sandstone that is formed by nature, and is not artificial or manmade.
Non-vitreous tiles
Tiles that absorb 7% or more moisture; they are suited for indoor use only.
Patina
When the surface of a material has changed in colour or texture due to age or exposure to various elements, it is referred to as patina.
Porosity
The amount and size of the pores in a stone. Travertine is very porous and granite is not.
Quarry Tile
A clay floor tile made from ordinary clays, that are cut in succession from a single extruded column and then either pressed or not pressed and fired in a kiln. The tiles may be glazed or unglazed.
Quartzite
A highly hardened, typically metamorphosed member of the sandstone group. Quartzite contains a minimum of 95% free silica. Quartzite can look similar to slate, but is actually harder and denser.
Relief
Carving or embossing raised above a background plane.
Riven
Natural stone that is split; not sawn or cut.
Sealant
An elastic adhesive compound used to seal joints, for example silicone sealant; where it stiffens becoming rubbery and adhering to the sides.
Sealer/sealing
A coat of paint or a proprietary liquid that is applied to a surface to form a barrier against absorption and to retard staining.
Semi-vitreous tiles
Tiles that absorb from 3% to 7% moisture; typically used for indoor applications only.
Shade variation
Shade variation is inherent in all fired ceramic products and certain tiles will show greater variation within their dye lots. Shade variation is usually listed on the back label of each sample with a low, moderate, high or random rating.
Slab
Large, thin, flat pieces of stone cut from large blocks of stone.
Slate
A metamorphic rock commonly derived from shale, and composed of mica, chlorite and quartz; ideal for external applications.
Split tiles
Tiles that are extruded as double tiles joined back to back and that are separated after firing to yield single tiles with ribbed backs. The tiles may be glazed or unglazed.
Substrate
Is the surface which is to receive a coating, finishing etc. e.g. adhesive for tiling. It may require treatment to control suction as well as surface preparation and dusting; generally any substrate must be clean and dry before application.
Terracotta
Italian for burnt clay; a finer-grained ceramic than brick or tiles, used for making hollow clay blocks, tiles, ceramic veneer wall facings, etc. It is moulded to shape and fired at 1200°C.
Terrazzo
A smooth, hard, non-dusting topping of marble or granite chips in a cementitious or resinous matrix, which is ground and finished after setting.
Threshold
A flat strip usually aluminium or brass projecting above the floor between the jambs of a door at interior and external doors intersections.
Through body porcelain tile
A solid porcelain tile consisting of no surface glaze; the colour pigments are consistent throughout the body of the tile – top to bottom.
Trim
The framing or edging of openings or angles with a trim to protect and make tile edges look better.
Tumbled finish
A weathered, aging finish created when the stone is tumbled
with sand, pebbles, or steel bearings; often found with mosaics.
Unglazed
A tile that is not coated with an enamel glaze prior to the tile being fired in the kiln e.g. quarry; i.e. they have no additional surface applications and are typically more dense and durable than glazed tiles – for example a quarry tile.
Vitreous tile
A tile with less than 3% water absorption. These tiles are usually frost proof and ideal for most wet areas such as pools and are recommended for external applications.
Warpage
The departure of one corner of a tile from the plane in which the other corners lie.
Typical Performance Requirements
Dimensions and Surface quality
The quality of a tile (more specifically a ceramic tile) is related to the regularity and uniformity of the individual tiles in terms of:
- Length of sides
- Thickness of tile
- Straightness of sides
- Rectangularity
- Flatness (centre and edge curvatures)
- Warpage
- Surface quality (cracks, specks, holes, etc)
- Shading and tonality
Note: Tiles are usually referred to by their nominal size, not their actual size. During the firing process, ceramic tiles will shrink, on average by about 10% in size.
Grading
Tiles are graded according to their quality with respect to the factors mentioned above. Tiles are usually graded into one of the following categories:
First Grade
The best quality from the particular factory
Second Grade
Some minor defects
Third grade
Significant defects and blemishes
Commercial Grade
A mixture (In varying proportions) of first and second grades
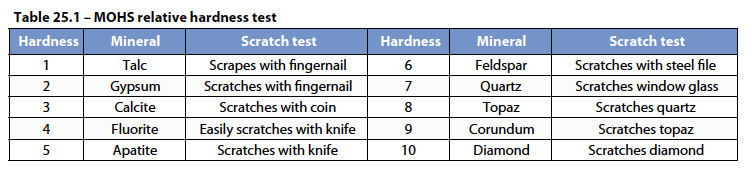
Scratch Hardness
The scratch hardness of the surface of tiles is measured according to the MOHS scale where different minerals are used to see if they scratch the surface of the tile. The scale goes from MOHS 1 (soft) to 10 (hard). See table 20.1 below: Floor tiles should have at least a MOHS 7 hardness with harder wearing areas such as public hallways MOHS 8 or higher. Wall tiles should be at least MOHS 4 or higher.
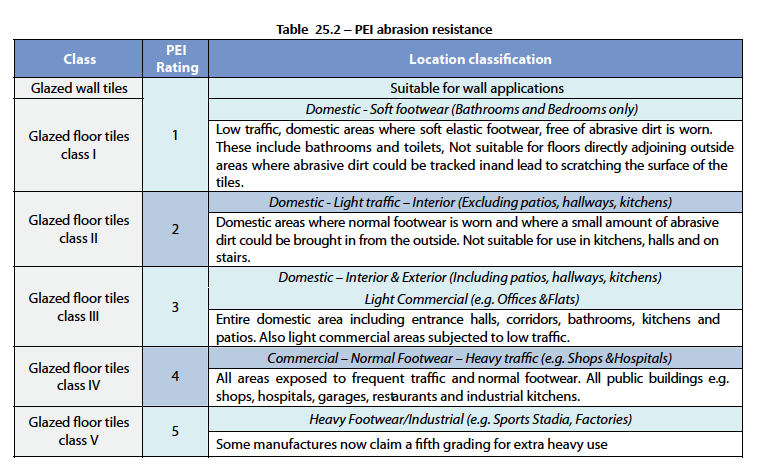
Resistance to abrasion
Floor tiles in particular must be resistant to wear of the tile surface caused by traffic over the tiles. Abrasion resistance is measured according to the PEI (Porcelain Enamel Institute) Method. Tiles are normally classified into four categories according to the standard PEI grading: (although not all, due to the growing choice of imports).
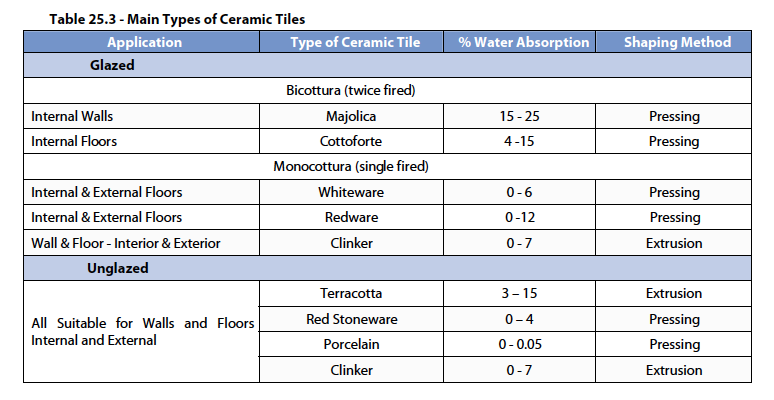
Water absorption (porosity)
Tiles are classified according to water absorption (see table below). Generally, the lower the water absorption the stronger the tile will be, hence floor tiles normally have lower water absorptions than wall tiles. Density and moisture absorption have an indirect relationship to each other; as the density of the tile increases, the moisture absorption rate becomes less. Tile density and moisture absorption are important to understand when selecting tiles for different applications.
External applications usually require tiles with low moisture absorption, firstly because of the possibility of freezing of moisture within the tile body. Secondly, the higher the porosity the higher the possibility of staining and hence higher maintenance costs. To explain this point further:
- Non-vitreous tiles have water absorption of 7% or greater, and are only suitable for indoor use as a wall tile.
- Semi-vitreous tiles have water absorption greater than 3% but less than 7%, and are suitable for indoor use only.
- Vitreous tiles have water absorption of less than 3% but more than 0.5%, and although they are referred to as frost resistant, they cannot be used in exterior areas where freeze/thaw conditions could cause cracking.
- Impervious tiles (usually porcelain tiles) have less than 0.5% moisture absorption, are frost-proof and can be used in exterior areas.
Note: The thickness of a tile can also have relevance to water absorption, particularly when a tile is produced by extrusion or cast. Some tiles may have an absorption level above 3% but easily pass the frost resistance and mechanical loading tests due to the structure and dimensional thickness.
Are tiles slippery?
There is no such thing as a non-slip tile. There are many factors that contribute to a slip and fall, for example, the overall building design, chemicals on the tiles (including water), whether the person was running or walking, etc. Ceramic tiles are rated according to their contribution to the risk of a slip or fall. It is therefore recommended that you seek advice from the tile retailer as to the suitability of a particular tile for its intended use.
Some simple actions you can take to manage slips and falls are the replacements of floor mats at entrances and wet floor areas, strategic placement of handrails for the elderly and regular cleaning of pedestrian areas to prevent a buildup of everyday grime and the immediate clean-up of water or spillage that may occur on the tiles.
Tile Types
There are numerous types of clays utilized, in particular the red bodied tiles, a trade mark of Italian manufacture. Tiles are manufactured from a number of different materials, which are discussed below. Many of the performance requirements, like grades, surface wear resistance and porosity apply to all types of tiles.
Ceramic
Modern ceramics through a wide range of colours, textures, sizes and shape, allow the designer an infinite variety of aesthetic effects. They are extremely functional, in that they do not burn, do not scratch or abrade easily, and are inert to attack by many chemicals, which would normally do serious damage to other finishes. Ceramic tiles are indeed a traditional material for wall and floor coverings dating back thousands of years. The making and fixing of ceramics are amongst the oldest crafts in the world. In today’s times, new manufacturing processes, raw materials and new types of glazes, considerably increases the ranges of ceramic tile available.
The raw materials used for the tile body are usually natural occurring materials consisting mainly of clays, quartzitic silica sands and carbonates or feldspars. The raw materials are usually batched and milled and then spray dried ready for forming; the moisture content dependent on the method of forming to be used. Tiles are formed to the required shape either by extrusion (split tiles), extrusion and cutting (punch tiles), or dry pressing. After forming, the tiles are further dried to remove the remaining moisture content, and are then fired in kilns of various types.
During this firing process, physical and chemical changes take place. Tiles with different characteristics in terms of porosity, strength and hardness are produced depending on the raw materials and firing temperatures used. Porosity is an important parameter, which has bearing on the behaviour of the tile and its possible end use; see performance requirements above.
In the case of glazed tiles, there are two main ways of firing the tiles. In The once-fired method (Monocottura), the glaze is applied directly to the green ware, which is then fired, cooled and sorted. The twice-fired method (Bicottura) calls for the green ware to be fired first, and after cooling and sorting the glaze and decorations are applied to the bisque and the second firing takes place.
Clay
Clay could mean any floor or wall tile made from clay. Manufacturing processes vary in complexity, from extensive treatment and refining of the material for ceramic tiles to simpler shaping and firing for terracotta and quarries. See ceramic, porcelain, quarry and terracotta.
Exposed aggregate
Glass
Glass tiles (mosaics) are produced to exact specifications with a natural tumbled finish and in colours that reflect the subtle hues that can be found in our natural environments. Glass tiles also offer an exciting range of bright colours, which have endless potential for any home, used on their own or in combination with other types of finishes.
Granite
Granite poses few problems from wear, as the stone is very hard and durable. Many floors provide years of use without having to be re polished. Granite tends to be more porous than marble and the lighter colour granites can be very porous; granite can be sealed with a penetrating seal to eliminate the porosity problem. Granite consists primarily of quartz, mica and feldspar. Available in a myriad of natural colours and in other striking colours like black, granite is a product that can be relied upon to exceed expectations of durability in any application.
Limestone
Limestone is the most abundant of non-clastic sedimentary rocks, composed principally of the mineral calcite (calcium carbonate), the mineral dolomite, or some combination of the two. These natural stones are valued for their luxurious texture and consistent colour. Limestone is generally softer and less dense than granite and more homogeneous in appearance.
Marble
Marble is a metamorphic rock possessing a distinctive crystalline texture. Marble is composed principally of the carbonate minerals calcite and dolomite, singly or in combination. Available in a wide spectrum of colours, ranging from cloudy pale tones to rich dark hues and veining. Marble is typically suited only for interior applications. It is extremely popular in bathrooms and living areas for floor and wall tiling. Polished Marble is not recommended for kitchen floors due to possible spillages of acidic/corrosive substances. Patinato Marble can be used in both interior and exterior applications.
Mosaics
A decorative wall or floor finishing made of small cubes or pieces of marble, glass, burnt clay, pebbles, etc. that have been glued to a mesh backing to create a single tile. They can be laid as plain unicoloured sheets or made into a pattern. Mosaic has excellent water and frost resistance and its frequent joints improve slip resistance. Whether the cubes have been cut into squares or strips, laid flat or has some relief – the effect is stunning! Where natural stone has been used, these solid stone tiles have been quarried, honed and tumbled to bring out their natural tonings and textures. Mosaics are available in a range of sizes and are ideal for indoor or outdoor applications. See Glass.
Porcelain
Porcelain is a more recent development of ceramic tile, but it is composed of finer clays and fired at much higher temperatures. That process makes porcelain tiles more homogenous, much stronger and less prone to moisture and stain absorption; porcelain has a very low water absorption rating – less than 0.5%. For these reasons, porcelain can be used for both indoor and outdoor installations and because the colour goes all the way through, small scratches or chips are less noticeable.
Quartzite
Quartzite is one of the hardest natural stones available and is composed of metamorphosed sandstone giving it these much harder qualities, quartzite is not only impressively durable but also boasts a velvety texture and a wide variety of colours, ranging from dark grey to warm copper, silver and white. Mineral elements locked within the stone give Quartzite its characteristic sheen while flecks of quartz add sparkle. Available in a natural or honed finish, Quartzite is an excellent choice for walls or floors and is particularly popular for outside areas.
Quarry
A clay floor tile made from ordinary clays, usually ‘as-dug’, formed by extrusion then fired in a kiln. There are many different sizes and shapes, including copings and stair treads available. They have attractive red-yellow colours (Flashes), are usually hard wearing and non-slip. They are porous and should not be polished, but can be sealed using a penetrating sealer. Some manufactures to produce low porosity types.
Sandstone
Sandstone is predominantly composed of consolidated quartz and sand grains which are cemented together over a long period of time. The versatility and durability of sandstone together with the rich variety of earth tones, textures and rustic look makes it a popular stone in both residential and commercial applications. Sandstone is processed from raw slabs, cut into specific module tile sizes and can then be polished to a honed finish (matt finish) which can be either calibrated or un-calibrated.
Simulated stone
All simulated stone products are reconstructed (cast stone) having the appearance of natural stone; although it may be intended to be used in substitution for natural stone, and indeed made to look like it, simulated stone is in effect a concrete block made with cement and suitable aggregate and various pigments and admixtures. Available in a myriad of different sizes, thicknesses, shapes and textures.
Simulated Terracotta
Simulated terracotta is manufactured in very much the same way as simulated stone, except in the finishing, which is, produced a lot smoother using finer aggregates.
Slate
Slate is composed of wafer thin layers formed from shale, sedimentary rocks and clay formed over millions of years, compacted to a durable hardness. Strong, hard-wearing and luxuriously tactile, Slate offers a robust alternative for both floors and walls. Superbly coloured slate combines rich blues, browns, gold’s and a metallic sheen for a stylish and provocative choice of tiling.
Terracotta
Literally ‘baked earth’ or burnt clay: clay moulded and kiln fired at 1200°C to make a hard compact material used for bricks, wall and floor tiles, roof tiles and ornaments. Whether left in its raw brownish-red, sometimes yellow or blue state or coloured with paint or slip (diluted clay that is more ductile); Terracotta can be unglazed but is more usually covered with a clear glaze or an opaque colour, which is then called Faïence. Terracotta has a low porosity and even if unglazed is very frost resistant and durable.
Travertine
Travertine stones result from hot spring water penetrating up through underground limestone. When the water evaporates, it leaves behind layers of dissolved limestone and other minerals, giving it its banded appearance. Travertine stones are generally light-coloured beiges and tans. Travertine however is not recommended for areas exposed to trolley traffic.
Note: A natural tile that is porous needs to be sealed and maintained. Maintenance prolongs the life span of all types of tiles.
Successful Tiling
Selection of products
Choosing the incorrect type of tile for the application can be disastrous. Careful consideration must be given to the expected performance of the tile in terms of traffic requirements, resistance to scratching and abrasion, physical strength, and porosity, particularly in external or wet applications. Similarly, the adhesive and grout system must cater for expected movement, vibration, and chemical attack. Naturally, the backing substrates must be suitably designed and specified to accept a tile finish.
Poor workmanship
Unfortunately, poor workmanship is all too common in South Africa. There is no formal registration of properly trained tiling artisans in this country, unlike parts of Europe and the U.K. Some of the most common faults found in shoddy workmanship are:
- Poorly prepared background surfaces
- Tiling onto green screeds or plasters
- Incorrect application of adhesives e.g. the “five spot” method
- No movement joints
- Butt-jointing tiles
- Poor setting out
- Subjecting newly laid tiles too early to service conditions
All too often clients spend hundreds of rand per m² on purchasing the tiles and then try to find the cheapest price per m² to lay them.
Standards
A summary for the installation of ceramic wall and floor tiles SABS 0107-1996: Code of Practice for the Design and Installation of (Ceramic) Tiling; is detailed below in ten key points:
- Allow sufficient time between finishing building operations and beginning tilling to allow backgrounds to dry out and stabilize:
- i. Building structures 6 weeks
- ii. Screeding to floors 4 weeks
- iii. Plastering to walls 2 weeks
- Select the correct type of tile for the expected service conditions, e.g. Glazed or Unglazed, PEI, MOHS, etc.
- Select the correct adhesive system for the tile, the background surface and the service conditions.
- Prepare the background surface correctly.
- Apply the adhesive correctly using an approved notched trowel. All floor tiles and external tiling must have a solid bed of adhesive behind them.
- Do not allow the adhesive to form a surface skin before the tiles are bedded.
Note: All expansion and movement joints must extend through the adhesive bed and tiles.
- Fix the tiles into the adhesive properly using a slight twisting action and bedding home using a rubber mallet.
- Always leave a joint (gap) between tiles (minimum 2mm wide for walls and 5mm wide for floors).
- Always provide movement joints filled with a flexible sealant such as silicone or polyurethane in all the tile panels:
- i. Around the perimeter of all floors
- ii. At 3m centres externally, in both directions (maximum)
- iii. At 5m centres internally, in both directions (maximum)
- iv. Around all obstructions and protrusions through the tiling panel
- v. Over the junction of different building materials e.g. where brickwork meets concrete.
- Allow sufficient time before grouting and before allowing traffic onto the tiles for the tile adhesive to set properly. (There are many quick set adhesives available today although they are more expensive)
Note: All of these points should be documented in a material and tiling specification at the planning stage of the project.
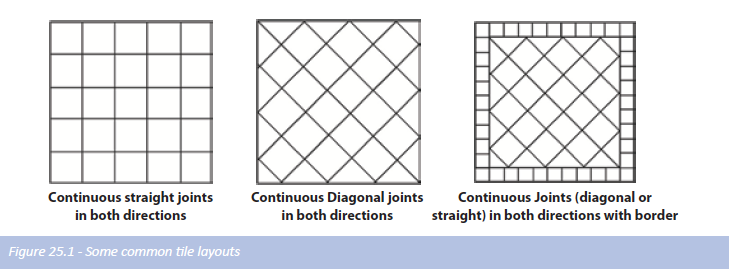
Tiling layouts
The setting out of tiling is imperative to ensure the installation is aesthetically appealing; which is dependent upon the size of the tiles to be used and the expertise of the tiler. It is always recommended that a drawing be provided, detailing the set out points considering the tile size, in which direction the tiles should be installed, movement joints etc. This will eliminate the common unsightly full tile on one side of the wall or floor of the room and a small piece on the other side.
Layout tips:
- If the floor to be tiled is not square, it is recommended that the tiles be layed diagonally which would then mask this problem.
- If the walls are not plumb (level) and the deviation is greater than 40mm over 2.0metres they should be re-plastered.
Tiling labour rates
Trying to save money on tiling labour is not wise. An average home uses approximately around 100m² of wall and floor tiling. An unskilled or “cheap” tiler will also waste a great deal more than a professional (as he normally doesn’t have the right tools for the job), this wastage could easily equal this perceived saving. Labour rates from reputable tilers will vary anything from R48.00 to R150.00 per m². The rule generally is that the more you pay per m² the better the finished job. One would be wise, however, to view work that the tendering tiler has done in the recent past. It would also be wise to ensure the chosen tiler has the required tools to complete the job, remembering that many tiles used today are larger than the typical 300mm square tile, which therefore requires special or larger tools for cutting.
Tilers will normally charge different rates for more complex installations such as stairs and reveals and will charge more when natural stone tiles have been chosen.
Selecting your tiler
The creation of a beautiful well completed tiling installation is a very satisfying experience. To ensure that there are no expensive errors, regrets or reoccurring problems and that you actually have achieved what you intended does usually require skill and experience from a professional; however we offer the following list to assist you in selecting a tiler.
- Ask for a written quotation – It is very important for you to know the cost involved. A written quotation demonstrates that both parties understand what work needs to be done, to achieve what is required. The more detail in the quote, the better, as it assists in avoiding disputes at a later date. This should be agreed on before any works starts.
- Ask the tiler whether they have any qualifications or trade experience.
- Compare Prices – Obtain 2 or 3 quotations. This will give you a realistic idea of how much the installation should cost. Remember that price is not the only criteria and that you may get only what you pay for.
- Check References – A reputable tradesperson will always allow you to make contact with 2 or 3 of their recent customers so that you can make enquiries about the quality of their work and their performance amongst other things.
Ask yourself these questions
- Was the tile layer easily contactable?
- Did they arrive on time?
- Do they appear to know what they are doing and do they have time to do the job?
- Was the quotation delivered on time, fairly priced and did it cover all work required and what was discussed?
- Has the tile layer returned my calls?
- Am I comfortable with this person?
Price is not everything. Lowest prices could mean poor workmanship, but the most expensive prices do not necessarily guarantee the best workmanship.
If the quotation is fair (remembering everyone is entitled to make a profit), the references are good, the timing is suitable and you feel comfortable that the tiler understands what you are trying to achieve, then choosing the right tiler for your tiling requirements should be achievable.
Disclaimer: The information provided above is to be used as a guide only and should not be taken to constitute professional advice or a formal recommendation and the publishers exclude all representations and warranties in relation to the content. All consumers should seek professional advice when in doubt.
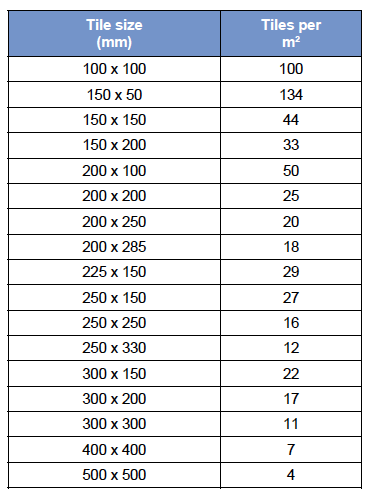
How many Tiles do you need?
You will need to work out the area to be tiled. Tile suppliers will be able to help you to calculate the number of tiles you will need for your project. You can also use the handy conversion chart below.
Tiles are produced in batches, and it is important to make sure you have enough tiles from the same batch for your project, so order slightly more than you need and remember the more you cut the more wastage you will have. Any extras can be stored for future repairs.
Note: Exact tile sizes can vary from manufacturer to manufacturer and some can include the joint width in their calculation of tiles/metre.
Tiling Adhesives and Grouts
It is important that the correct adhesive system be used for the surface conditions and the tiles being used. In addition, there are different adhesives available to suit different wall and floor applications, with some providing greater flexibility while others are rapid setting and others provide background waterproofing. It is therefore important that the correct adhesive is specified for the application and the manufacturer’s instructions are followed. 24 hour drying time is the industry standard and the most economical; rapid setting products are suitable for fast track applications, but are a more expensive.
Tiling Accessories
A variety of extruded edging and decorative strips are available in a multitude of different materials like PVC, stainless steel, brass and anodized aluminium. These include edge trims, listello strips, protective edgings and stair nosing’s. PVC tile edgings provide many benefits to the installer. They will protect the tile from impact damage on vulnerable corners. They also give a finished appearance to otherwise raw tile edges. Installers find that they provide a true edge to work too, giving the installation a neat accurate finish. Aluminium and brass profiles are able to withstand greater impacts than their PVC counterparts. At the same time, they can also offer a very high quality of finish if the anodised version of the aluminium profile is chosen. The high grade brass used in tiling profiles makes them suitable for use where a high resistance to wear and weathering is required. It should be noted that due to the requirements of the latest hygiene regulations, the use of stainless steel profiles is recommended even in areas of low impact risk. Note: many floor trims can be used in wall tiling applications e.g. straight and square edge trims.
Common Wall trims
Round edge trim
This edge trim protects the edges of wall tiles on external corners. Round edge trims give corners a straight and perfectly rounded decorative finish and are good for dimensional alignment. The round edge trims speed up installation by eliminating time consuming mitering of tiles and improves the tile finish by covering sharp edges.
Concave edge trim
This trim can be used to cover uneven edges between tiled wall and floor corners or between wall and wall internal corners or between tiled wall and kitchen/bathroom surfaces (horizontal surfaces).
Your Guide to Tiling
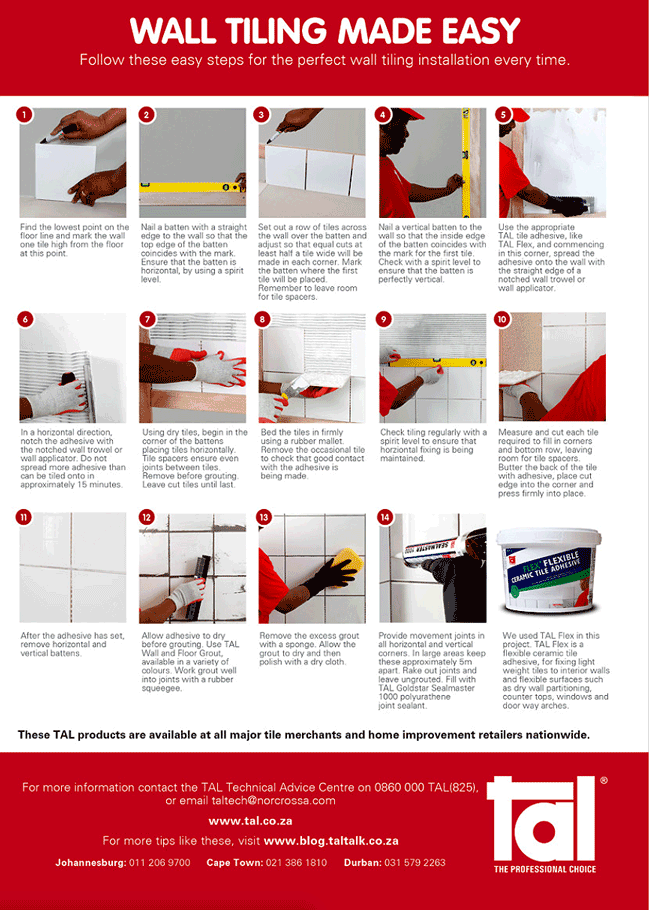
Wall tiles
Setting out
Planning ahead is essential for a good result. Along a length of timber, mark the tile widths to help you identify where the tile will start and finish, remembering to leave space for the joints, which must be at least 2mm wide. Set out horizontal position of the tiles so that the same size cuts are made either side of windows etc. Avoid small difficult cuts as they can spoil the appearance. Plan each wall carefully, remembering that any patterns/designs will need to be matched in the corners of the room. For plain tiles each wall should be centralised avoiding any small cuts.
Getting started
- Find the lowest point of the base you are working to (skirting’s, bath top, work surface etc.) with a spirit level.
- Place a tile against the lowest point and draw a line on the wall along the top of the tile.
Note. The starting point of the line will depend on the setting out of the tiles, as the tile against the floor may be a cut tile.
- . Nail the batten along the wall to this line. Use the spirit level to ensure it is level. The first line of tiles will rest on this batten.
- Draw a vertical (plumb) line at one end of the wall, one tile width away from the edge. Use this to check that the tiles are in line vertically.
Adhesives
There are many different types of adhesive available on the market. As all conditions vary, it is most important that you seek advice so as to use the correct type. Always follow the manufacturers’ instructions.
- Spread the wall tile adhesive using a notched trowel or spreader onto the wall. Work in small areas of about 1 m² at a time, so that tiles are fixed before the surface of the adhesive forms a skin. Press and twist the wall tiles into the adhesive starting at the bottom and working upwards, one row of whole tiles at a time, using spacers (if required) to ensure a uniform joint. Check the horizontal and vertical lines with the spirit level every few rows.
Adhesives & grouting
- Remove surplus adhesive from tile surfaces with a damp sponge and from joints to allow room for grout. When the adhesive has set, remove the batten and complete the tiling.
- When tiles need to be cut, ask your tile supplier or merchant for a demonstration of the various tools available. There are tile cutters, hole saws, grinders and tile pincers that will help to achieve professional results.
- In awkward locations it is often easier to apply the wall adhesive onto the back of the tile instead of the wall. For complicated shapes, use cardboard to make a template and transfer the design to the tile.
- If the tile does not have a glazed edge, a neat finish on external edges and corners can be achieved with the use of a tile edge trim incorporated at the time of tiling. To prevent the seepage of water around baths and basins, a plastic sealing strip or silicone sealant should be used at the joint.
Grouting
Do not begin grouting for at least 12 hours after fixing. There are many types of grout, so ask your local Massbuild store for the correct grout for your application, especially when using highly glazed tiles. You can also contact TAL – see above.
Force the grout into the joints using a flexible spreader or grouting sponge. Do not use steel or hard rigid spreaders as these can cause scratching to certain tile glazes. Remove surplus grout from the surface with a sponge and ‘peg’ the joints with a rounded stick to achieve an even finish. Polish with a dry cloth.
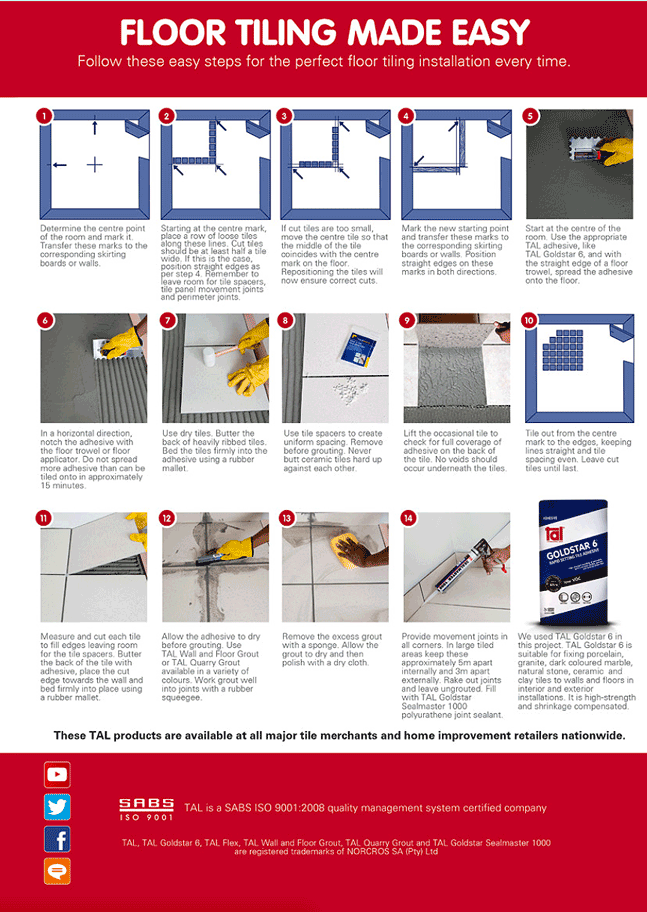
Floor tiles
Setting out
Planning ahead pays dividends, so spend some time on the setting out of the floor tiles. Laying ceramic floor tiles will raise the level of the finished floor, so if possible remove all fixtures before tiling. Mark a chalk line on the floor down the centre of the room parallel to the most suitable wall (normally this is achieved by viewing the room from the doorway). Lay the tiles down this line and then work towards the wall you think is best, leaving a joint between the tiles of at least 3mm. Tile spacers can be used to achieve a uniform size joint. Avoid small cuts, as they can be difficult to cut and do not look professional.
Cutting tiles
Floor tiles are generally harder to cut than wall tiles. Modern tools make the cutting of most types of ceramic tiles simple.
Adhesives
Use Rapid or Normal setting adhesives. Always consult your local Massbuild store for detailed advice and follow manufacturers’ instructions. Mix the adhesive as per manufacturer’s instructions and spread with a solid bed trowel onto the surface to be tiled. Lay each tile into the adhesive firmly with a slight twisting motion to ensure a solid bed and prevent voids under the tile.
Remove surplus adhesive from the tile surface with a damp sponge or cloth. Work in small areas of about 1 m² at a time so that tiles are fixed before the surface forms a skin. Every so often use a spirit level or straight edge to check that the tiles fixed are flat. Remove and adjust the amount of adhesive to achieve a flat surface, but don’t leave it too late or the adhesive will set.
Leave floor to set before grouting (usually 24 hours unless using a rapid set adhesive). In bathrooms, special attention should be paid to sealing the gap between wall and base, particularly where the location is on a first floor slab.
Grouting
Do not begin grouting or walk on the floor tiles for at least 24 hours (unless using a rapid set adhesive) to avoid the chance of disturbing the tiles before they have bonded completely with the adhesive. There are many types of grout – ask your local Massbuild store for advice on the correct grout to use for your application – also contact Tal – see above.
Force the grout into the joints using a spreader. Remove surplus grout from the surface with a sponge and peg the joints with a rounded stick to achieve an even better finish.
Movement joints (soft joints)
These joints are 6/8mm wide and filled with a flexible filler, which allow for movement and prevent tile damage. They are normally installed where flooring abuts a wall, steps, columns etc., on large floor areas and over structural movement joints. Floors less than 4 metres between walls will not normally need movement joints. For floors bigger than this they should then be divided up into 3 or 4 square meter panels where movement or soft joints can be installed.
Showers and bathrooms
When fixing tiles in wet areas such as in showers and bathrooms it is essential to tile onto an already water resistant background. Sand/cement plaster, dense concrete are ideal backgrounds. Plaster, plasterboard, timber and timber-based products such as MDF or plywood are absorbent and should be made waterproof by the use of a suitable waterproofing system.
Tiling Made Easy with Tal
References
Alexander G D & Alexander G C. 2010. Buildaid Building and Pricing Guide 2010/11. Johannesburg: Buildaid Publishing.
Alexander G D & Van As F. 2008: Civil Technology. Johannesburg: EWA Publishing
South African Bureau of Standards – SANS 10400 & various other standards. Pretoria. SABS Standards Division.
TAL – www.tal.co.za
The Australian Tile Council – www.austrailiantilecouncil.com.au
Alexander G D & Van As F. 2008: Civil Technology. Johannesburg: EWA Publishing
South African Bureau of Standards – SANS 10400 & various other standards. Pretoria. SABS Standards Division.
TAL – www.tal.co.za
The Australian Tile Council – www.austrailiantilecouncil.com.au