Chapter 27
SPECIALISED CONTRACTORS
Paving
Kitchens and Cupboards
Landscaping
Water Features and Ponds
Fire Pits
Balustrading
Skylights
Garage Doors
Paving
Overview
Paving is a hard horizontal outdoor surface that may consist of bricks, flag stones, tiles, concrete slabs etc. There are many different shapes of pavers – from small squares to more intricate designs. Within the different shapes, there are also many different strengths and thicknesses of pavers to address heavy to light traffic. Generally for residential use, 40-60 mm bricks or blocks are adequate and for commercial use, 60-80 mm bricks or blocks are recommended.
Both clay and concrete pavers are generally rectangular in shape, 200 x 100 mm, and usually available in thicknesses of not less than 50 mm with various other shapes and sizes available, such as cobbles or flags. Cobbles are typically 100 x 100 mm and 50 mm thick. Flags range from 600 x 600 mm to 250 x 250 mm, and are between 40-50 mm thick, depending upon the manufacturer used.
The most common method of construction when laying paving is known as (flexible) segmented paving, which entails the paving being laid on bedding sand, with a joint width between adjacent bricks or blocks of ± 2-6 mm and where the joints are filled with sand. Paving bricks or blocks are also either permeable or impermeable to water depending upon the material and system being used. Some manufacturers produce permeable paving drainage systems which prevent flooding by collecting and cleaning stormwater – making it an ideal solution when run-off from heavy rains from large areas like car parks, housing complexes, etc. overload sewers, stormwater pipes and cause flooding and other environmental damage. In-situ patterned concrete can also be used for paving (and particularly for paths and walkways) and is commonly referred to as patterned or stamped concrete.
Preparation
All paving requires acceptable hardcore and base material as a fundamental element. Base materials will generally consist of inert aggregate materials, including hardcore, cement or lime-bound aggregates, and may include site soils. They must be protected from water ingress both from below and above for all but the lightest of loadings. Soil excavation, removal of soft spots, preparation, weed killing and compaction are critical to durability of the paving (see compaction). Paving should be specified for the maximum load anticipated; it is common for infrequent but foreseeable loads such as removal trucks or emergency vehicles to be ignored in design, and failures can occur very quickly as a consequence.
- Sub-grade material: The sub-grade is the upper part of the soil, natural or constructed, which supports the loads transmitted by the overlying paving. The sub-grade should be well drained and compacted prior to laying the base-course material.
- Base Course material: The base course is the foundation for the pavers and will vary in thickness depending on the type of sub-grade and whether the paved area is for a footpath/walkway or for vehicle access. This thickness will vary between 50 mm and 120 mm. In light duty applications, footpath pavers can be laid without a base course where the sub-grade material is compact and uniform (see below). The compacted surface should be tight or close-knit to prevent migration downwards of the bedding course material.
The assessment of the in-situ material strength or imported material and layer works design to support design traffic are the responsibility of a professional engineer or competent person. Compaction of hardcore, granular or cement-bound bases should be carried out with plant that suits the application. Suitable plant ranges from smooth, tyred or vibrating rollers, or vibrating compactors, tampers or rammers, and also depends on the area to be compacted.
The degree of compaction; the number of passes of the plant; is determined by the chosen equipment and the thickness and nature of the material as specified by the engineer or competent person. For domestic driveways and paving subject only to pedestrian traffic, natural ground will provide sufficient strength for the paving subject to the following:
- If the ground is formed from fill material, compaction will be necessary to avoid settlement.
- The ground must not be subject to saturation from subsurface water or surface water ponding.
- The ground surface must be free from weeds or tree roots and finished smooth to the required tolerance.
Note: If any doubt exists regarding the suitability of in-situ material for light duty paving, an engineer or competent person should be consulted.
Kerbs
In order to retain the integrity of the bases, it will be necessary to provide kerbs or edgings. Different heights, lengths and profiles are available, most often in concrete. Kerbs in simulated stone for domestic applications are also available.
Drainage
A further critical element for all paved surfaces is adequate surface water drainage. Cross-falls or crowning is essential to shed water and prevent puddling. The objective of good drainage is to prevent the accumulation of sub-surface water anywhere underneath the paved area. Sub-surface ponding may reduce the stability of the whole paved area or bring efflorescing salts to the surface, and thus detract from the appearance and durability of the paving.
To create good drainage, the sub-grade or excavated surface should have a fall (minimum 1:50) so that any moisture will drain to a drainage point. When paving against a building, it is recommended that the top of the paving be a minimum of 85 mm (1 brick course) below the damp proof course. Manufacturers of paving materials generally provide drainage channels and covers with guidance on how to calculate drainage requirements for different surfaces.
Bedding and jointing
Sand used as a bedding course material under paving must be a well graded coarse sand (washed river sand) or quartzite sand complying with SANS 1200 MJ: 1984. The sand should be between 20 mm and 25 mm thick and carefully screeded (levelled) with a straight edge prior to placement of the pavers. Cement can also be added to the bedding course material if required. Sand for bedding should be free from substances that may be damaging to blocks. In mining areas, the use of mine sand for bedding is generally acceptable. Similarly, experience has shown that certain relatively fine Cape Flats sands and sand from the Port Elizabeth area are acceptable. Such sands are the most economical as they are readily available.
For jointing, clean dry sand must be used and should pass a 1,18 mm sieve and contain 10-50% (mm) of material that passes a 0,075 mm sieve, complying with SANS 1200 MJ: 1984 and should be swept into joints between pavers.
A joint of approximately 3 mm wide should be allowed between each paving brick or block to ensure the correct filling of jointing sand. If the space is too small, it leads to spalling, damage to the brick or block and reduced load transfer between adjacent bricks or blocks. If it is too wide, it prevents load transfer between bricks or blocks.
For grouting, the bedding sand can be used as joint filler in some applications where the joints are wider than 5 mm, which is the simplest and cheapest option (this is not recommended as the bedding sand is often too coarse). However, sand can be washed out or removed by ants and constant maintenance is required to avoid movement of the pavers and failure of the sub-base. Consider specifying a 1:4 cement sand slurry or dry grout mix, depending on the product being laid and the installation procedure being adopted.
Tips on how to lay paving
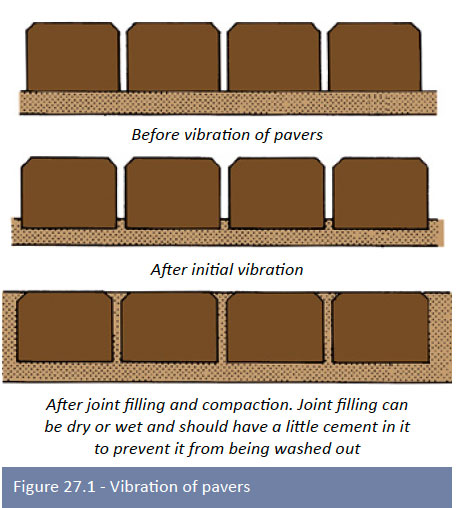
Vibration
The manner of vibration/compaction of paving units should be such that damage to the units is prevented. The vibration of the paving bricks/blocks into the bedding sand transforms the paving from a series of unrelated independent blocks into a uniform whole.
The purpose of vibration is to achieve the following objectives:
- To drive the paving unit into the bedding sand so that the bedding sand layer will not be compressed when the design load is applied.
- To force the bedding sand into the joints between units so as to achieve the wedging action of the sand.
- To level the surface of the pavers.
Under normal conditions the bedding sand will be forced into the joints to a height of approximately 20-30 mm.
Step one:
At least two compaction passes using a plate compactor should be made over the paving as soon as practical after laying and before the introduction of any jointing sand.
Step two:
The joints should not be filled until all cuttings have been inserted, all the necessary adjustments to line and levels have been made and the paving has been subjected to at least two passes of the plate compactor (step one). Sand for jointing is swept into the joints until they are full, and sufficient passes of a plate compactor should be made to settle the joint filling. The procedure should be repeated until the joints remain full after compaction.
Shapes
Paving bricks and blocks come in a variety of shapes which are classified as follows:
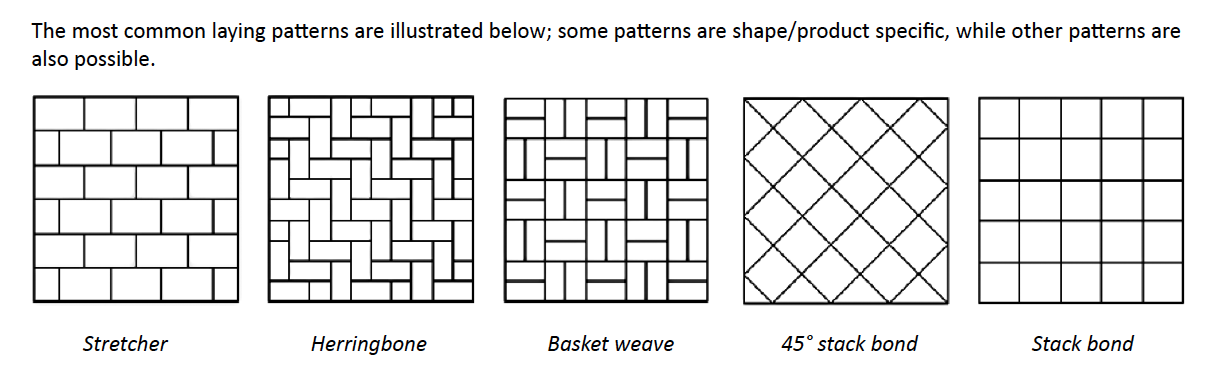
- Type S-A: allows geometrical interlock between all vertical faces of adjacent blocks (possible to lay in herringbone bond). When keyed together these blocks resist the spread of joints by their plan geometry. Typically used in roads and heavy duty applications
- Type S-B: Allows geometrical interlock between some vertical faces of adjacent blocks (not possible to lay herringbone bond). When keyed together these blocks resist the spread of joints parallel to the longitudinal axes of the blocks
- Type S-C: Allows no geometrical interlock between the vertical faces of adjacent blocks (non-interlocking) and relies on its dimensional accuracy and the accuracy of laying to develop interlock
Chamfers on paving bricks permit easier handling and laying of units, reduce likelihood of spalling and chipping of surfaces and reduce suction of joint sand.
Clay pavers
Clay pavers and paving blocks have been used for hundreds of years in a number of different applications offering a durable functional surface.
These applications include roadways, parking areas, pedestrian walkways, patios, swimming pool surrounds, etc. Clay pavers and blocks are available in a number of different formats and in a wide range of colours and textures, providing contrast and facilitating mixing and matching and the use of patters to compliment any architectural style.
Strength
Clay paving bricks have an average compressive strength (MPa) ranging from 26MPa to 70MPa depending upon the manufacturer and brick chosen. The high degree of vitrification provides for superior flexible strength and abrasion resistance, ensuring fired clay pavers offer long term function and form.
Shapes and sizes
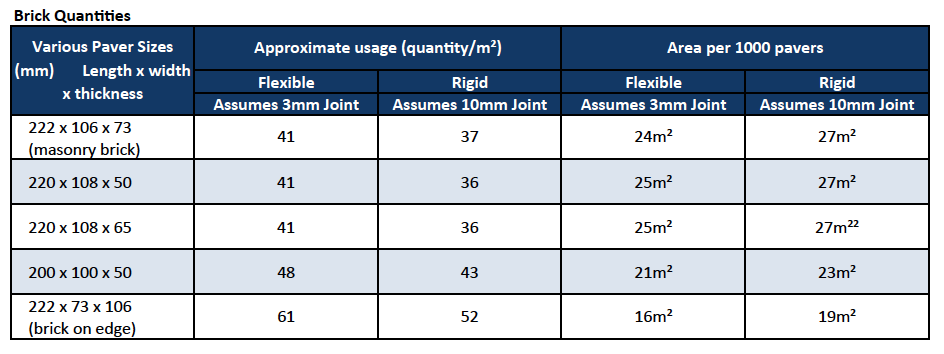
Mainly rectangular S-C; sizes vary from manufacturer to manufacturer with the following sizes being the most popular 220 x 108 x 50 and 200 x 100 x 50 (see brick quantities).
Concrete pavers
Concrete bricks and blocks are manufactured from various types of aggregate (sand and other materials like ash mixed with small stone particles, and mixed with various pigments) creating the texture and colour, mixed with cement and water, which is then vibrated into a mould creating the shape and size and profile of the brick/block.
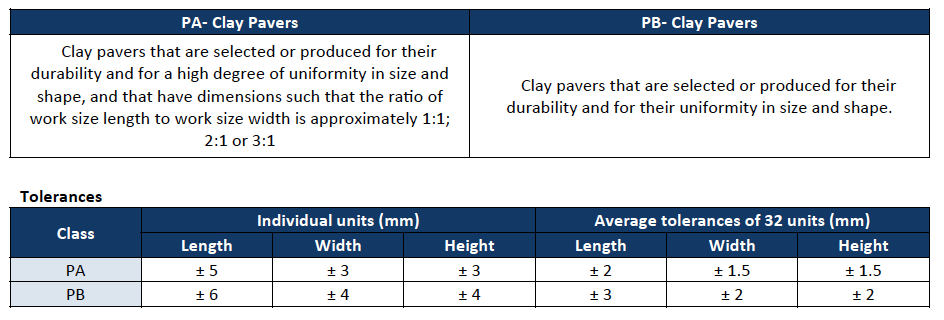
Tolerances
It is important for blocks to be within the required dimensional specification (see table below). This is to ensure a smooth finished surface as well as good interlock between pavers.

Strength
Concrete paving bricks/blocks generally have an average compressive strength of 25MPa wet strength (Class 25 SANS1058). This is significantly higher than the strength of bricks (7 MPa). The reason for this is to ensure that the bricks/blocks have adequate resistance to traffic loading and to abrasion from traffic, both vehicular and pedestrian.
It is also important to note that although the required average strength is 25 MPa, the minimum strength for individual blocks is 20 MPa. Very often it will be this lower figure that will dictate the average strength for compliance with Class 25 blocks. Where the quality control is poor it is virtually impossible to satisfy this latter requirement. Some blocks, more particularly interlock types used in heavy traffic applications are also available in a higher compressive strength of 35MPa which is recommended to ensure the higher probability of durability.
Shapes and sizes
Concrete paving bricks and blocks can be divided into three types based on shape (see shapes). Research shows that type S-A blocks develop the best resistance to both vertical and horizontal creep and are generally recommended for all commercial and heavy duty applications. Type S-B and S-C blocks are generally selected for aesthetic reasons.
Thickness
Concrete paving brick/block thicknesses vary between 50 – 80 mm; generally for domestic use, 50 – 60 mm blocks are adequate and for commercial use 60 – 80mm pavers are recommended. The thicker the bricks or blocks the better the paving will resist vertical deformation and horizontal creep. However, there is a cost implication and thickness selection should be based on application. Experience has shown that very little benefit is gained from pavers which are thicker than 80 mm. However, such pavers can be manufactured for special applications.
Natural stone
Apart from its natural beauty and extensive durability, natural stone is a material found naturally in many different types, shape and form; from rocks to slabs. However, in paving applications their use is limited and they are only available as granite cobbles. Many other natural stone products are used for tiling horizontal surfaces and are therefore not classified as paving products.
Granite Cobbles with four hand chiselled edges provide excellent resistance to wear and atmospheric agents. Granite Cobbles are suitable for exterior areas of high foot and vehicle traffic. And are available in the following sizes: ±100 x 100 x 50mm
Simulated stone
All simulated paving products are reconstructed (cast stone) having the appearance of natural stone; although it may be intended to be used in substitution for natural stone, and indeed made to look like it, simulated stone is in effect a concrete block made with cement and suitable aggregate and various pigments and admixtures.
Paving products
Simulated stone paving products are structurally sound for use in driveways, parking areas and village squares and are
often laid as header courses or used as borders with other products such as cobbles.
Products can be laid as normal segmented paving allowing minimal movement or they can be laid rigid.
Strength
The strength of simulated stone products range from approximately 25 MPa to 40 MPa, depending upon the product and manufacturer chosen.
Sizes
All sizes, dimensions, etc. shown herein are nominal and subject to manufacturing tolerances and are broken down into three categories, namely paving products, flagstones and cobbles.
Flagstones
Flagstones can also be defined as tiles; however they are often mixed with cobbles and used on their own in paving applications especially for outdoor walkways, pool surrounds and patios.
Colours
The variety of colours that one can choose for paving products is massive, making it impossible to describe or illustrate. Every manufacturer has their own colours to suit product ranges and they also have unique colours to some ranges which include blends and multi-blends. We suggest that once the reader has decided upon a product that would best suit their application, they contact one of the manufacturers listed for details on specific colours and if required samples.
Paving patterns
Paving can be laid in different patterns to meet aesthetic and structural performance requirements. If we consider for a moment the aesthetics of paving, four fundamental aspects present themselves:
Vehicle access
Vehicle access ramps to buildings should not be steeper than] 1 in 6, and transition points should be eased to stop vehicles grounding. Ramps to basement car parking should not exceed 1 in 10, or 1 in 7 for short lengths with a transition length at the top and bottom of the ramp. Ramps falling towardsthe basement should incorporate drainage channels. If the slope of an
access route is steeper than 1 in 20, it is classified as a ramp and should comply with the requirements of the National Building Regulations; SANS 10400.
Footpaths and walkways
Footpaths and walkways should be designed for ease of use, especially for disabled people. To permit adequate space for people to pass, a width of at least 1,200 mm should be specified. Where traffic on an access route will be busy, consider a minimum width of 1,800 mm.
The footpath can be reduced locally to 1,000 mm or more around unavoidable obstructions such as existing buildings or trees. Lesser access route widths may be permissible in lightly trafficked areas.
Salt Staining/ Efflorescence
All paving materials contain salts, magnesium and calcium, which can cause staining. Some sub-grade and base course materials also contain a high proportion of salts. If drainage provisions are adequately adhered to and the bedding course specification adhered to, the risk of efflorescence or salt damage is minimised.
Kitchen and Cupboards
Overview
It’s well known that the kitchen is the most popular area in the modern house. So it’s only right that a lot of time and effort should go into ensuring that it is aesthetically appealing, practical and functional. Kitchen design frequently disregards comfort, functionality and practicality. They have for example, hard floors, fixed counter heights, insufficient storage, inadequate ventilation, etc.
Design
Design is a critical element when one realises just how important these rooms are. Some people want practical kitchens while others might want a designer look; however, all usually want the best technology that modern design can offer. Technology and design are making kitchens become integrated work areas filled with hi-tech fittings, appliances and accessories. Fridges and dishwashers are integrated into the total look, hidden behind joinery, while cupboards have been replaced by deep drawers which close silently with just a touch of the hand. The importance of having sufficient storage space in a kitchen is essential and cannot be achieved by just having only large cupboards, in which everything tends to get untidy and jumbled. Shelves, drawers etc, are necessary to provide optimum storage space and require careful planning in the design process. Paramount to the design process are other elements that require consideration within the kitchen i.e. lighting, power points, plumbing points, worktop heights, appliance sizes, colours etc.
All fittings and accessories chosen for a kitchen should where possible be free from awkward corners and mouldings and have smooth, grease and dirtresisting finishes, which can be easily kept clean by wiping over. While many will argue that a kitchen with all the functionality that modern design and technology offers is too expensive; one must consider the life span of the kitchen and its durability, not only in design but also in function. All too often, a kitchen that is found to be impractical, which includes aesthetics, is replaced within five years of the installation. This may also include structural changes to the actual room. One must then answer the following; is a kitchen that is functional and durable that can stand the test of time then too expensive?
Unlike other home furnishings, a kitchen is not tangible. It is a virtual product. It is only real after it has been installed. While you may be assured of design; the functionality, build quality, and fitting cannot be assessed from a drawing, making the choice of manufacturer a further important element.
Planning the kitchen
- The first step is to have a plan drawn of the kitchen showing the door(s) and the way they open; position of window(s) including heights and widths; (All too often windows are installed that have a sill height lower than the finished worktop height). If it is an existing kitchen the position of plumbing, electrical (lighting and power) and other service points should also be shown.
- The following step is to decide what requirements are needed, e.g. storage, eating, cooking, preparation space, dish washer, cooker hood, microwave, water point for fridge, gas supply and laundry requirements. One can use the example below as a checklist to ensure you haven’t left anything out; (This list does not cover every eventuality and is only provided as a guide).
- Then decide what atmosphere or style you want to create e.g.
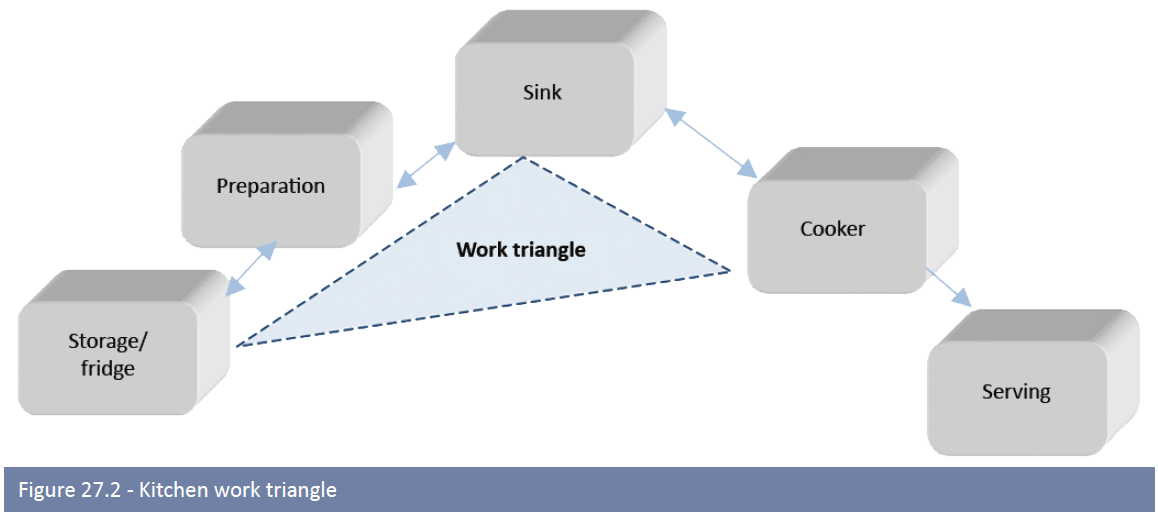
- This step is to decide what shape or working arrangement would best suit the room and your requirements. The most efficient kitchen is one where all activities can be done in a logical sequence or work-flow. Themost travelled route in your kitchen is from the sink to the cooker or hob and should not be disturbed by any through circulation. Professional kitchen planners talk about the work triangle formed between the sink, cooker and refrigerator (see below). To avoid unnecessary movement from one point to another, it is recommended that the total length of the work triangle should be between 3600mmm and 1800mm. (This excludes kitchens with a separate laundry or scullery and in many of these cases a prep bowl is installed close to the cooking area). According to most kitchen suppliers, there are four basic types of kitchen;
- a) U shaped – suited to small kitchens.
- b) L shaped – this design is functional and requires little space, it can also accommodate a kitchen table.
- c) One wall or straight line – the basic functions are performed in a straight line making this design suitable for an open plan arrangement.
- d) Island units – a work surface is set in the middle of the kitchen thereby forming the island. The island usually contains the hob and oven or stove. The island also offers other usage options, from being an attractive focal point and functional room divider, an informal eating area, to a food preparation and cooking counter. While an array of options presents itself, one cannot overlook two of the most fundamental influencing factors of the island, namely size and placement. One needs to ensure that there is sufficient room to move around the island without restricting a functional work flow. The size off the island is determined by the space that can accommodate it. Lastly services must be carefully planned for this configuration, as they can be very difficult to retro-fit if decided as an afterthought.
- The final step is to plan the services that are required, be it power points, plumbing connections, gas, etc. See services check list after appliances in this section.
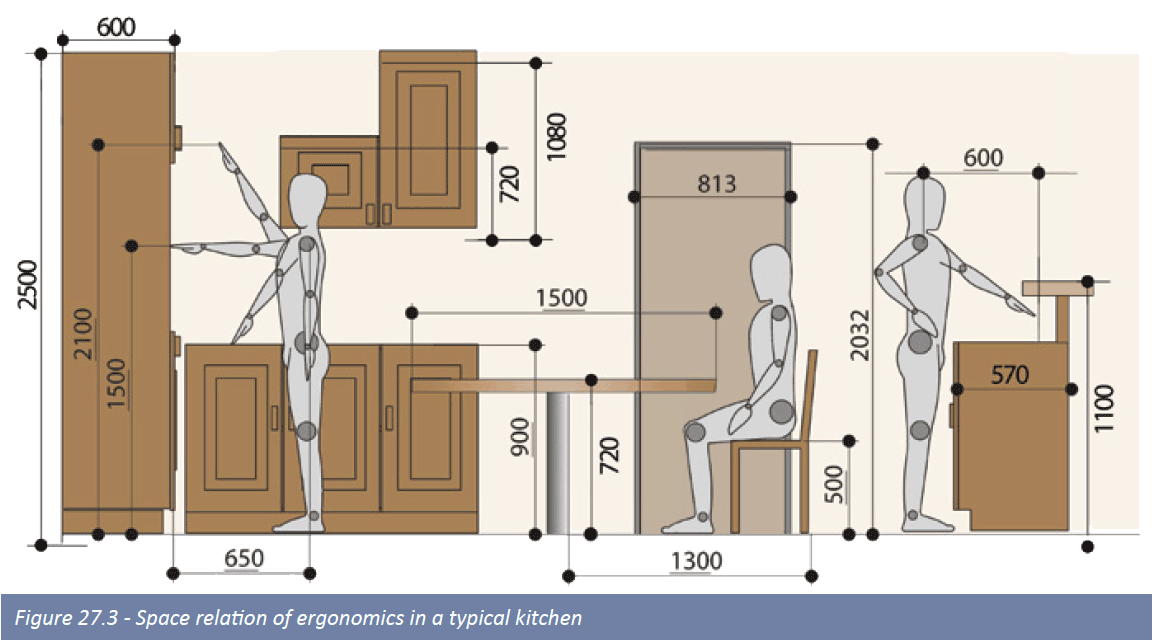
Ergonomics
The word ergonomics refers to the way in which a person can comfortably fit or move around in a space, which is an important element in the design and layout process.
Kitchen Cupboards
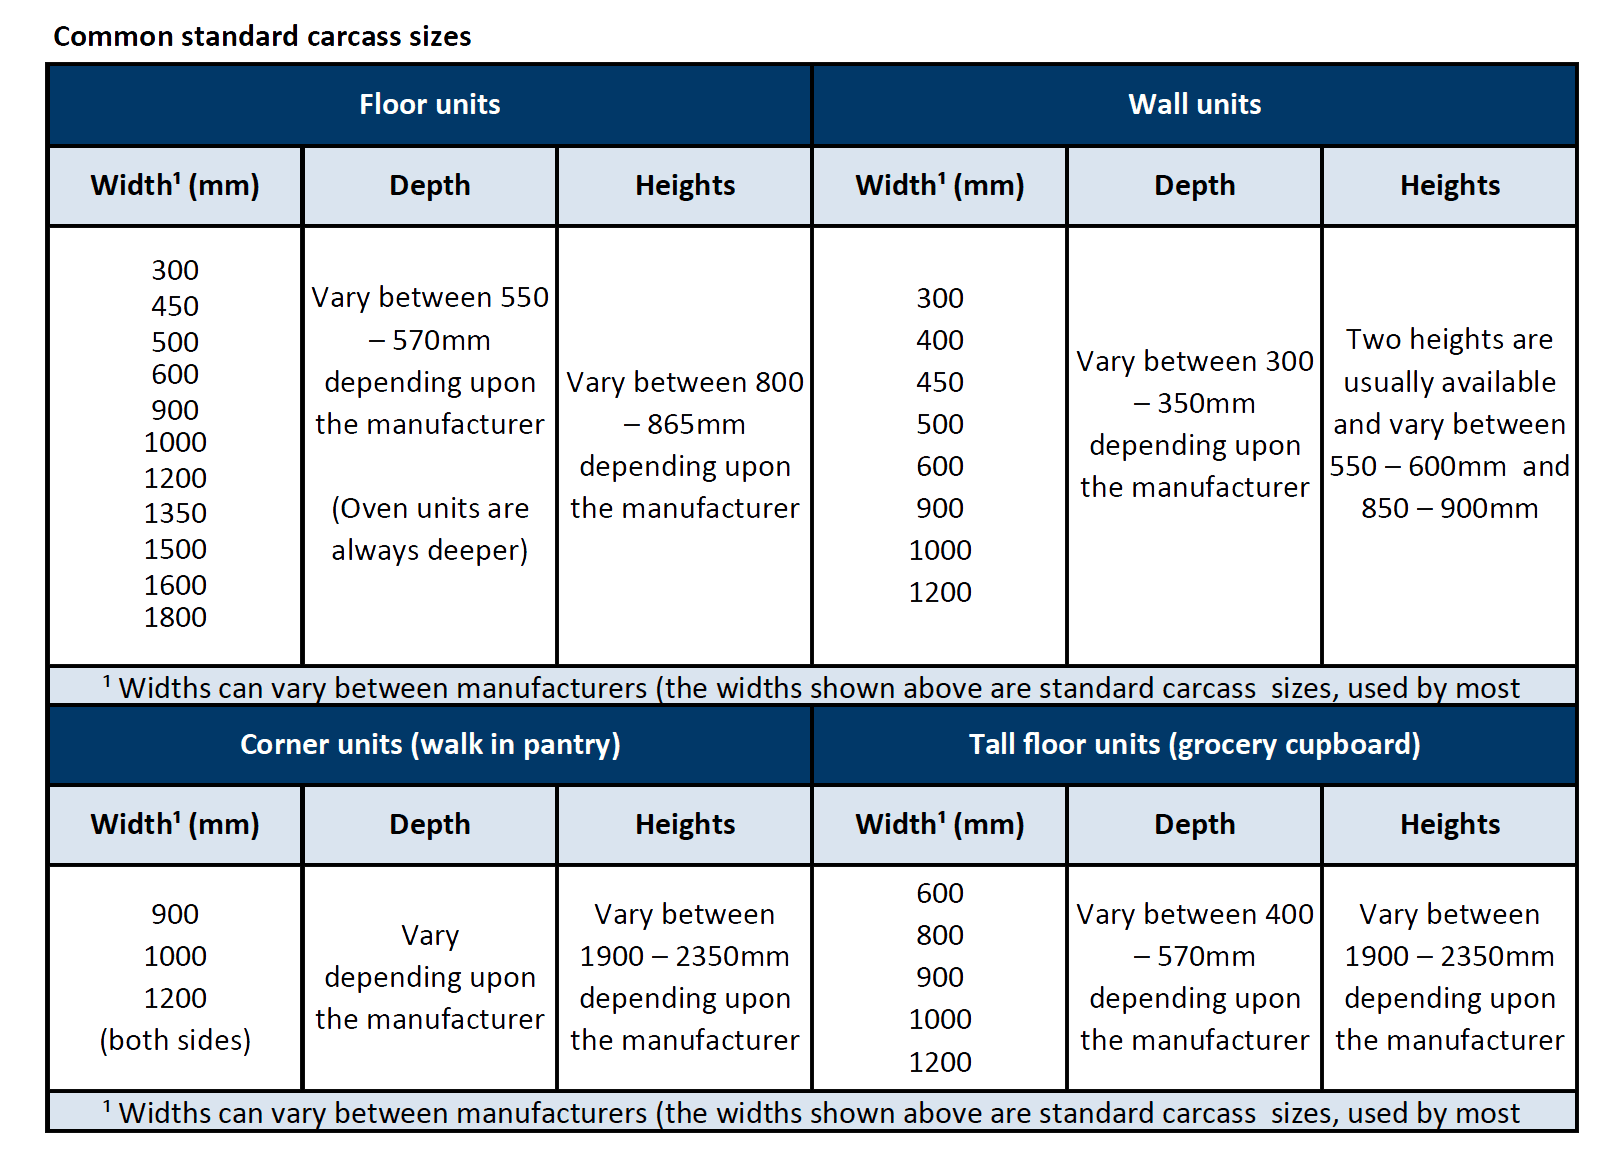
Kitchen cupboards and carcasses are typically produced from a range of raw and decorative wood based panel products which include allied complementary panel products, like raw particle board, veneers, solid wood, high pressure laminates, and decorative laminates. A number of different natural wood types and plain colours are available in a number of different finishes far to varied to describe in this publication.
In the table on the following page are the sizes of the most common standard cupboards (carcasses) manufactured, which are used in combination with fillers and exposed panels when fitting a kitchen. These sizes can assist in deciding what kitchen layout would best suit the room size. A number of cupboards (carcasses) are purpose made by specialist kitchen manufacturers and are often referred to as Custom Crafted Cabinetry; these types of cupboards are usually found in designer kitchens and are not mass produced.
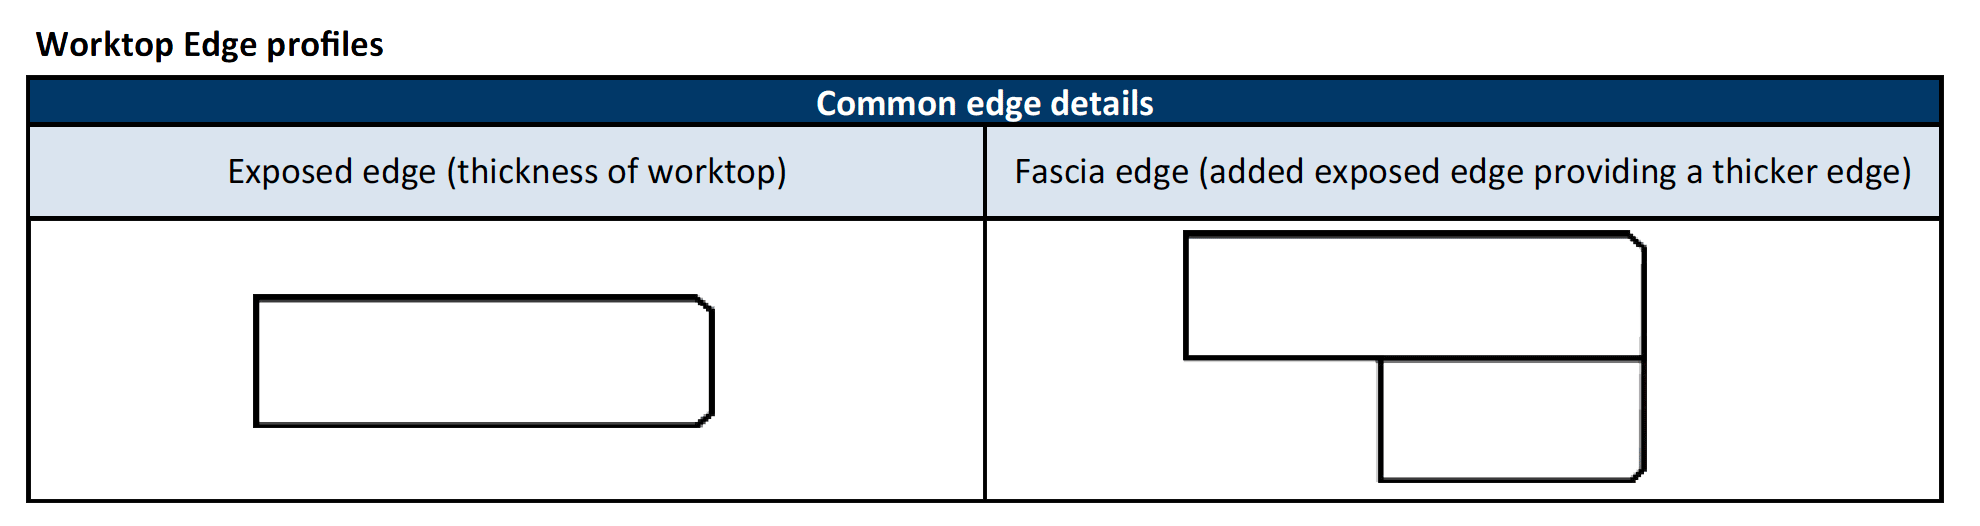
Worktops
Kitchen tops are available in four common types; laminates, granite, solid surfacing and engineered quartz or often referred to as composites; all available with different edge profiles (see below). Other worktop types like concrete which can be tiled or pigmented are available while other natural stone slabs like marble are also used as worktops, however they are used more as vanity tops, as they are not as durable and can be very porous (see vanities).
The choice of worktop is often chosen based on price and would sometimes include the following criteria:
- Scratch resistance
- Heat resistance
- Impact resistance
- Staining
- Moisture resistance
Laminates (Formica – decorative laminates)
A composite panel consisting of a Formica HPL (High Pressure Laminate) bonded to a moisture resistant BisonBord particleboard substrate with a suitable backer, incorporating a vapour seal sealant for protection against moisture ingress at surface/backer interface.
Available in the following standard sizes:
- 32mm x 600mm wide x 3530mm long – postformed along front edge (one side)
- 32mm x 640mm wide x 3530mm long – postformed along front and back edge (i.e. both sides)
- 32mm x 900mm wide x 3530mm long – postformed along front and back edge (i.e. both sides)
- Available in a large variety of colours and finishes; loglare, gloss or glaze, with one or two edges being postformed to specified radii.
Granite
Granite slabs/worktops are either 30mm or 20mm thick (nominal); thicker slabs can be produced for specific applications. 20mm slabs can only be used where adequate support is available. Widths and lengths of worktops differ depending upon the actual installation. There are no standard granite sizes as such; however standard widths of 600mm to 1000mm are usually available in all granite types. Granite slabs/worktops require fabrication into customised final products and can therefore only be priced accurately by the granite fabricator chosen. All granite worktops usually require an approximate delivery lead time of 2 to 4 weeks for fabrication. Granite slabs are available in a large variety of colours and finishes, e.g. honed – Machining of the surfaces with abrasive tools or polished – Mechanical polishing of honed surfaces with polishing tools or flamed or Flamed/brushed.
Solid surfacing
Solid Surfacing is a homogeneous, composite acrylic modified polyester resin system with pure inert filler and proprietary colorants. Creating a non-porous, hygienic, stain and chemical resistant, workable, renewable, versatile work surface; also offering a number of different edge profiles, with almost any profile size and shape available. The solid composition creates colour and pattern throughout the material. Products are available in a large variety of colours and finishes.
Artistic expansion is achievable by means of customised edge profile design utilizing contrasting solid surface colours and other decorative materials as inlays.
Solid surfacing worktops require fabrication into customised final products and can therefore only be priced accurately by the fabricator chosen.
Quartz surfaces
Quartz surfaces (composites) are composed of natural quartz aggregates, pigments and polyester resins providing exceptional properties that make it the ideal material for all kitchen surfaces that require ease of maintenance. Surfaces offer enduring quality and good looks, having superior strength and flexibility and available in a variety of modern and vibrant colours.
Quartz surfaces are available in the following standard sizes; 1440mm wide x 3060mm long, in two thicknesses 20mm or 30mm. Also offering a number of different edge profiles.
Worktop heights
It is difficult to arrive at a universally suitable height for working surfaces. Different activities usually require different levels for comfort and of course we are not all of the same height. The most practical solution to the problem is to try and incorporate different working areas, each at a different level. Most kitchen worktops are installed to a finished height of approximately 900mm, which is a suitable height to most people and typically forms the main working area in the kitchen, including the wash-up area (sink).
However, research has shown that many women would be more comfortable with a sink rim height of approximately 975mm and a further consideration is a central table or a separate worktop at a lower working surface height of approximately 750mm, which provides a surface more convenient for jobs requiring downward pressure. These various heights and changes in level can create detailing problems and are therefore not always practical and some kind of compromise is necessary, consequently the common finished height of 900mm.
Doors & Draw fronts
Kitchen Doors and drawer fronts are mostly manufactured from decorative wood based panel products which include products like supawood and particle board, which can then be foiled with decorative melamine’s and other decorative plastics and in combinations of these different products. Solid wood and veneers are also used in the manufacture of doors and draw fronts.
A number of different natural wood grains and plain colours are available in myriad of different finishes too varied to describe in this publication. However, doors can be categorised as follows:
- Solid doors (solid natural wood)
- Semi solid doors (solid natural wood frames with panel (veneer) inserts)
- Sprayed doors (Painted doors)
- Panelled doors (Supawood (MDF) or particle board).
- Glazed doors (solid or MDF frame with glazed panel)
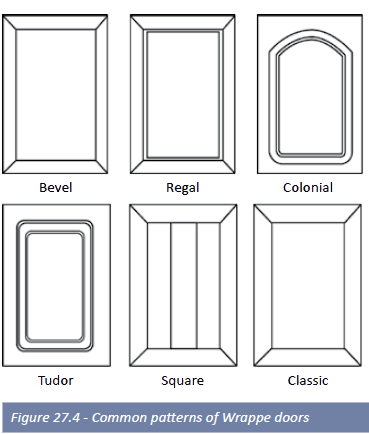
The most common type of doors used in kitchens are panelled doors, available in the following types:
These doors will complement the most up-market decor taste and style. These attractive and durable doors can be made in a wide variety of sizes, patterns and exciting colours.
The foil is usually 300-micron thick, thus ensuring high quality and durability. Available in plain or wood grain, where only rounded corners can be wrapped; the board used for these doors is MDF (Supawood).
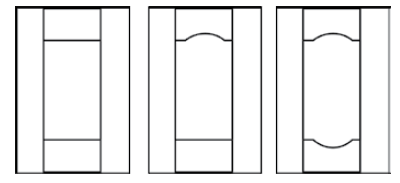
Wrappe doors can be produced in the more expensive American Shaker style. The additional 19 mm thickness produces an elite style in three distinctive patterns: square cut, single arch and double arch. A wide selection of foil colours are available. Wrappe doors are available in a number of different patterns (see below), which include doors with glass cut outs and lattice doors. Wrappe doors can be edged and wrapped on a 45° angle; Doors are available in a number of standard sizes to suit cupboard (carcass) sizes, with special sizes available on request.
Postform doors
Postform doors are a well-priced range that offers basic but attractive Renolit foiled doors that are used for their refined and smoother appearance. Doors are available in a number of standard sizes to suit cupboard (carcass) sizes, with special sizes available on request.
Transfer doors
An attractive and affordable range manufactured from 16mm MDF board coupled with robust melamine, produces an attractive wood-like finish in a range of colours. Transfer Doors have an exciting wide range of edging colours to complement any kitchen colour scheme. The edging is applied in a very visible S-like profile, which makes an attractive finish to any door.
Doors are available in a number of standard sizes to suit cupboard (carcass) sizes, with special sizes available on request.
Impact doors
Impact doors are attractive and robust and popular in large contracts and high traffic areas. Using a melamine finish fused to high quality chipboard (particle board). The technique allows ample options to mix and match the extensive range of finishes and textures, with a wide selection of 3 mm plain or wood grain PVC edgings to contrast or match.
The square-line door allows the maximum effect of the surface finish to be displayed to brighten up even the smallest kitchen. Doors are available in a number of standard sizes to suit cupboard (carcass) sizes, with special sizes available on request. These doors can also be produced in MDF board on request at a premium.
Accessories
A number of accessories like, light shields, Scotia’s, wall end display units and microwave units are available to match the colours chosen of the doors by the door manufacturers.
Sinks and Wash troughs
See Plumbing section for taps and mixers
Taps – Mixers -Valves
Kitchen mixers can be defined in the following categories
- Retractable
- Standard pillar type
- Wall mounted
- Prep bowl mixers
Most kitchen mixers including prep bowl mixers have a swivel spout to allow for multi directional use.
Valves or stopvalves or undertile stopcocks are often used as cut off valves for the water supply to laundry equipment like washing machines and dishwashers and are typically located above the counter to enable easy isolation of the water supply without having to move the appliance.
Ironmongery
The variety of ironmongery especially in handles and knobs for cabinets and cupboards is so vast it would be impossible to describe in this publication. The choice is usually determined by the style and design of kitchen. Handles and knobs are available in an array of styles from funky – to theme – to traditional.
Manufactured from a variety of different materials:
- Aluminium
- Brass
- Nickel
- Plastic
- Stainless steel
- Wood
- Wrought iron
Ventilation
Good ventilation is essential in the kitchen to prevent condensation on walls, ceilings and fittings and ensure quick dispersal of cooking odours. A kitchen window may be sufficient, but more often than not it is not really adequate, unless a number of windows are fitted within the room creating cross ventilation. A cooker hood and mechanical ventilation is always recommended, which can be either direct extraction or have the air circulate over special filters, usually carbon; see appliances.
To ensure sufficient ventilation for a particular application, it is essential that the correct size of fan is selected. Selecting the correct fan depends on two factors; performance and application.
Specifying the type of fan required
- Calculate the volume of the room in cubic metres (m³) (length x width x height)
- Multiply the volume of the room by the number of air changes required. The total indicates the extract performance of the fan or fans required.
- Find the fan extract performance which most closely corresponds to the total.
In the case of domestic Kitchens 10 – 15 Air changes per hour is recommended.
Note: It is always better to estimate on the high side rather than risk unsatisfactory ventilation.
Lighting
Whenever possible arrange kitchen fittings to take full advantage of day lighting. Artificial lighting should be planned to give as uniform a light as possible over the working surfaces and to avoid shadows. If ceiling mounted fluorescents are being used, use two fittings fitted towards the corners of the room rather than one central fitting (except in a very small room).
Additional lighting over cooking areas and the sink are always recommended. Other lighting like cupboard lighting, concealed under counter lighting and spotlights are all a matter of preference and can greatly enhance the overall appearance of the kitchen. Under counter lighting has become one of the most important sources of light in the kitchen; not only because it provides excellent task lighting, it also provides superb aesthetic value.
Undercounter lighting positioned towards the front of a cabinet ensures unobstructed light onto a work surface, eliminating shadows. If the kitchen has natural stone or quartz stone worktops then under counter lighting is essential in bringing out the sparkle and glitter within these resilient surfaces, as well as highlighting features such as splash backs.
There are several options to choose from when selecting the style of under counter lighting such as mini track and recessed lights, flexible rope lights and strip lights. Strip and rope lighting is ideal for general task lighting, while individual recessed light fittings are better suited for highlighting specific areas.
The types of lighting available include:
- LED
- Incandescent
- Fluorescent
- Halogen
There are two options when it comes to the installation of under counter lighting; the plug-in method or the hard wired method. Plug-in units are simple to install and are best suited for small areas, retro-fit applications and if visible wires are not of concern. The fittings are attached to the underside of the wall unit (cupboard) and connected to the nearest power point. Whereas hard wired points are installed by the electrical contractor during construction and are connected to a separate light switch in the kitchen.
Storage
- Cabinet organisers, lazy Susan, spice trays, baskets, pull outs, draining racks, vegetable baskets, wine racks, laundry basket.
- Drawer organisers – spice trays, cutlery tray, knife tray.
- Bins
- Concealed bins
- Counter top bins
Waste disposal
Food waste disposal units are a new millennium-style kitchen appliance which effectively grinds various food wastes to tiny pellets and paste. These are then drained through the plumbing system thus reducing trips to the dustbin and eliminating unpleasant odours. Meal clean-ups now become fast and easy, where no food is left lying around, protecting your home against insect and rodent infestation. The disposers compose full sealing plastic protective installation and low noise units, and last for many years if installed and used correctly.
Worktop legs
Table top legs are available in a number of different shapes; square or round or shaped or tapered, in a number of finishes like, satin chrome, matt black, stainless steel, brass, white. Available In different diameters and sizes.
Heights (mm): Typically: 710 + 25 (¹) Or 870 + 25 (¹) Or 1100mm
Table leg adjustors are available which are inserted into the legs and can adjust to a maximum height of 25mm.
Cabinet legs
Exposed cabinet legs are becoming more and more popular with the modern kitchen, with leg systems ideally suited to a situation where there are multiple units of varying sizes and the legs can be placed at equal intervals cupboards.
There are also plastic prepack systems available that suit kickplate (covered) applications that assist with the levelling of the cabinets (carcasses).
Appliances
The information provided below is intended to assist with specifying sizes and functional features of kitchen appliances and is not intended to catalogue or promote specific manufactured products.
Energy efficiency
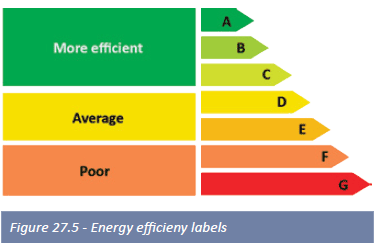
Energy efficiency labels on most kitchen appliances are informative labels affiliated to manufactured products. These labels are able to indicate a product’s energy performance in order to provide consumers with the necessary data for making informed purchase or specifying decisions. The more efficient a product, the less energy it requires and the more you get for your money. Not only is this saving of electricity good financially, but it is good for the environment too. The energy label ranks the appliance’s efficiency from “A” to “G”.
These are categorised in Figure 27.5 – Energy efficieny labels For more details on specific energy labelling see heading under each appliance type; namely dishwashers, fridges/ freezers and washing machines.
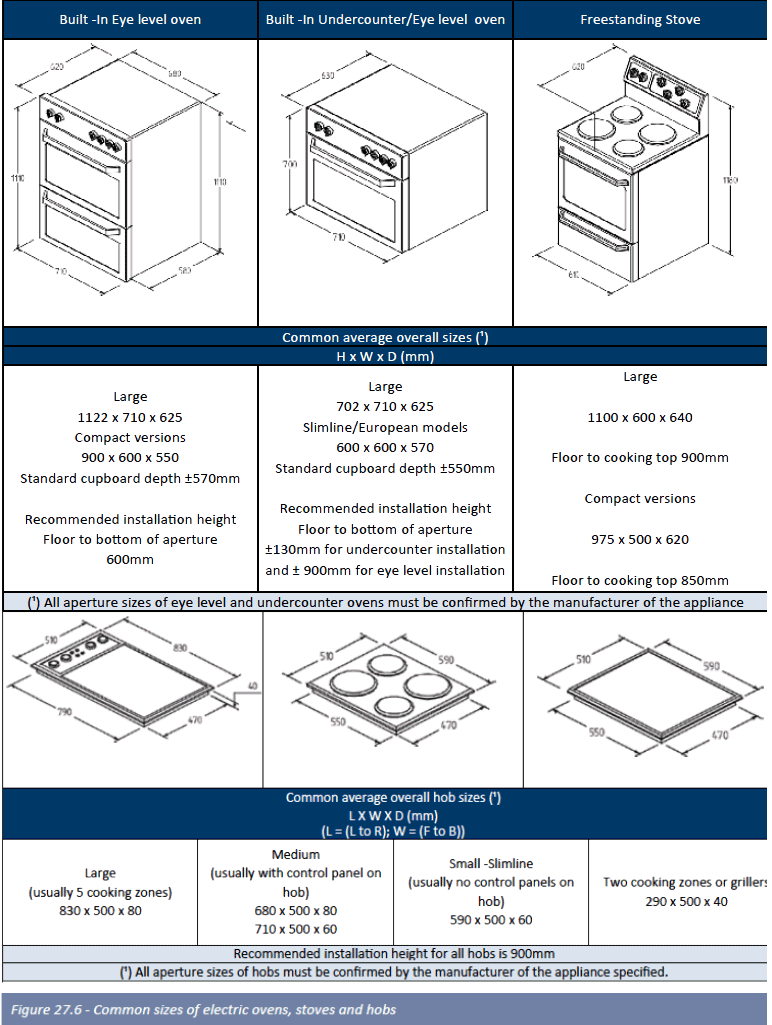
Electric ovens, stoves and hobs
Firstly let’s define the difference between an oven and stove;
- An oven is defined as an enclosed “compartment” for heating or cooking food etc.
- A stove is defined as an “appliance” burning fuel or using electricity for heating or cooking which includes an oven and a flat heating surface with hotplates or burners.
Ovens are available from entry-level models through to technologically advanced models with electronic timer controls with multiple cooking functions, in different sizes and available in the following configurations; single, or double. Ovens can be installed undercounter or at eye-level (some ovens are specifically produced as eye-level ovens only).
Electric stoves are available in a number of different sizes, offering conventional and multi-functions variations with solid, Ceramic and Ceran smooth top cooking surfaces. Hobs are available in numerous variations; Solid plate, Ceramic or Ceran cooking surfaces, with most electric hobs having 4 (four) cooking zones.
Listed below are some of the more popular terms or cooking functions that require consideration when choosing or specifying an oven or stove; as many often simply refer to an oven or stove as a multi-function oven.
This is not entirely accurate as these functions are not necessarily available on all ovens or stoves and you will usually find various combinations of these functions available, depending upon the manufacturer and model of oven or stove chosen.
- Defrost – The unheated air circulates inside the oven speeding up the natural thawing process. In ovens where this function is not indicated by a specific position on the selector knob, defrosting can be done by selecting the fan assisted cooking function and setting the temperature knob to 0.
- Grill – This uses the upper grill only and is ideal for toasting bread or for browning meat and fish.
- Fan Assisted (Using grill element) – Heat is generated by the grill and distributed by the movement of the back fan, making this mode ideal for cooking thick meat and poultry such as Guinea-fowl or for grilling/browning large surface areas at the end of cooking.
- Convection – top/bottom heat – The oven is heated from both above (top heating element) and from below (bottom heating element). This is the traditional cooking mode that allows food such as bread to be cooked evenly, using one rack height only. It is also ideal for roasts.
- Fan Assisted (Using top and bottom heating elements) – The air is heated by the top and bottom heating elements while forced circulation is guaranteed by a fan. This provides for rapid and uniform cooking, ideal for pies, flans, cakes and roasts, allowing two different dishes to be cooked on two different rack heights at the same time without the worry of tastes and aromas mingling.
- Fan Assisted – The circular heating element heats the air and the fan distributes it perfectly. The hot air that circulates uniformly inside the oven reduces cooking and heating time and is ideal for cooking various dishes at the same time on three different rack heights without aroma or tastes mingling. This delicate fan assisted mode is ideal for baking pastries and cakes.
- Separate bottom heat – Separate bottom heat allows you to brown cakes and pastries or to heat dishes in a Bain Marie.
- Multi-power – The circular heating element is turned on and is accompanied by the partial action of the top and bottom heating elements and the fan. This provides the same advantages as fan assisted cooking plus optimal temperature distribution inside the oven for rapid, uniform cooking. It is ideal for the preparation of food requiring thorough cooking and a nice outer crust such as meat roasts and fish as well as pasta bakes. Up to three different rack heights can be used without the worry of aromas and tastes mingling
- Quick Cooking or intensive heat – Achieved by the combination of the circular heating element, along with the top and bottom heating elements and the fan (helping to distribute the heat uniformly through-out the oven interior). This is the most powerful cooking mode available by some ovens (different manufacturers). It is designed to concentrate heat towards the bottom, making this mode ideal for the preparation of pizza where the surface of the pizza remains soft while the bottom and sides, that get more heat, become crusty. It can also be used to reach a selected temperature rapidly and to proceed with the desired cooking mode afterwards.
- Fan Assisted (Using top heating element) – The combination of the upper heating element and the fan allows you to delicately brown any food’s surface. It is a particularly suitable function for preparing dishes such as lasagne, pies and pasta or vegetable quiches.
- Keep warm function – The keep warm function keeps the correct temperature for a longer period of time. Plates and cups are kept at the correct temperature by means of the preheat function.
- Tangential cooling ventilation refers to the cooling process. The same fan that is used to evenly disperse the heat during the various heating functions and ensure optimal temperature distribution throughout the oven, is also utilised during the cooling ventilation process to ensure that cool air is consistently and evenly dispersed throughout the oven. Further tangential cooling ventilation assists with the creation of the thermal barrier within the oven which keeps the heat inside the cavity while the lateral surfaces and oven door remains always cold to the touch.
What is a cooling fan?
The cooling fan is the system that pushes fresh air through the cavity and structure to reduce the temperature. It maintains the temperature inside the cavity and protects oven components and kitchen furniture. It also ensures that ovens fitted with these fans remain cool to the touch during cooking.
Sizes
The sizes shown below are the average overall sizes of electric cooking appliances intended to assist with the planning process of the kitchen and are to be used as a guide only. Each appliance requires an activity space of at least 1000mm x 1000mm. For full dimensions showing overall and aperture sizes of the appliance, the specifier or reader should contact the manufacturer.
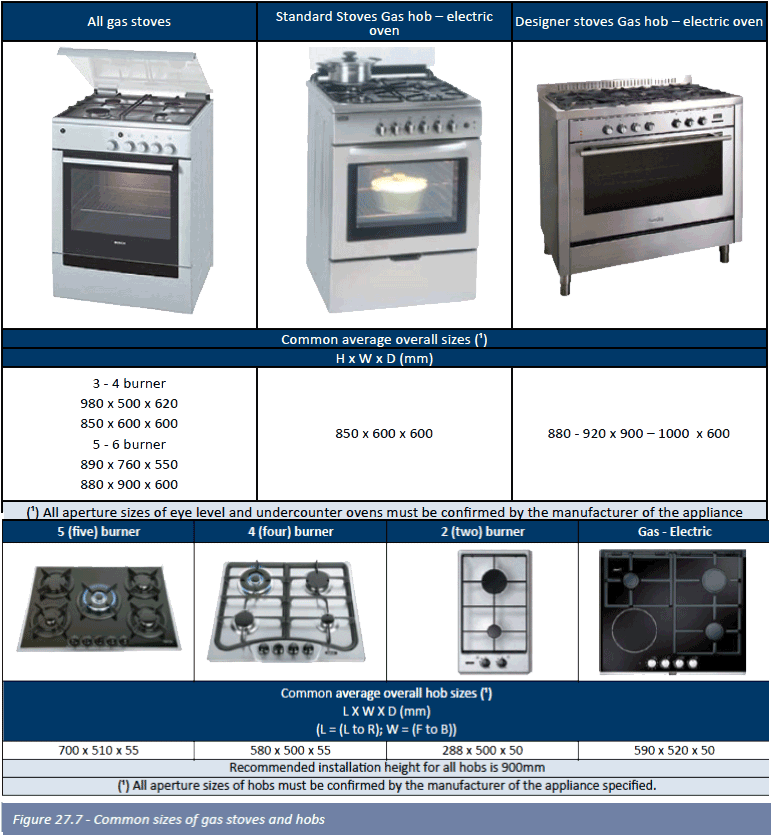
Gas Stoves and hobs
Gas, an element with numerous benefits, which is both economical and effective, has firmly established itself alongside electricity in the kitchen. The majority of Europeans, professional chefs and amateur gourmets in particular, are confirmed supporters of this invisible energy and the precision heat it supplies. The latter is a particular benefit in contemporary cuisine with emphasis on fresh, lightly cooked dishes, not to mention the pleasant atmosphere evoked by a hob with an open flame in a modern kitchen ambience.
Gas hobs and stoves include four, five and six burner products. Many manufacturers also offer gas/electric stoves, which combine the advantages of gas surface cooking with the convenience of multi-function electric ovens.
Gas hobs are available in numerous variations of gas burners and in combination with gas/electric cooking surfaces. A number of the cooking functions above are available on gas stoves.
Freestanding gas cookers are enjoying a renaissance. These classic models, with gas hob, control panel and oven, which in this simple form, were to be found in every household in the past, have been transformed by many manufacturers today into designer objects, enhancing the aesthetics of any kitchen.
Gas stoves are typically free standing; built-in gas ovens are not available.
Hoods/extractors
What is the difference between an extraction hood and a filtering/recycling hood?
With cooker hoods of the air extraction type; the kitchen air is extracted externally by the fan via a ducted vent or through an outside wall or into an air shaft. Aluminium filters in the extraction hood catch the grease and purify the air within it. In contrast to the exhaust-air principle, which exchanges the air in the kitchen, the recycling system filters the cooking fumes by passing them through grease filters and activated charcoal filters which stops grease and purifies the air within the kitchen environment. Which is better extraction or recycling?
The installation of extraction hoods are recommended wherever possible because they are:
- More efficient in removing the smell from the air
- Safer, as it expels any eventual dangerous gases (replaced by fresh air coming from outside)
- Quieter because air recycling produces more noise
- More economical as no charcoal filters have to be replaced periodically
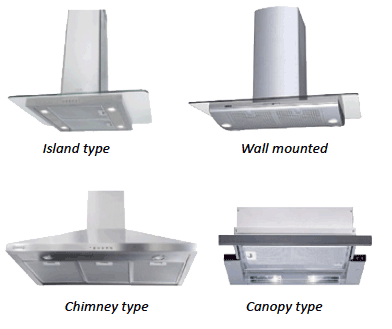
Types of extractors/cooker hoods
- Island extractors/cooker hoods designed to be fitted above a central work surface
- Chimney type extractors/cooker hoods designed to be fitted against walls.
- Canopy type extractors/cooker hoods are fitted into specially prepared cupboards.
The majority of extractors/ cooker hoods are manufactured from stainless steel, with some manufacturers offering powder coated options in black or white.
Sizes
Generally extractor/cooker hoods are available in two widths; 900mm and 600mm. (It is always recommended to specify a hood that is at least the same width of the hob specified.)
Depths vary depending upon the type and size chosen, and can vary between 470 mm to 600mm.
Heights are typically adjustable and can vary between 560mm to 1200mm.
Dishwashers
Energy labelling
The energy label for dishwashers has gradually been introduced to the whole of Europe since 1999. The aim of this is to reduce energy consumption, while at the same time not having any adverse effect on the cleaning and drying performance of the appliance. Dishwashers in general, use the Eco 50°C programme as its standard programme upon which energy consumption is rated. The energy label for dishwashers comprises 3 classifications namely:
- Energy efficiency
- Cleaning performance
- Drying performance
The values are determined according to the re-formulated norm EN50242.
Plumbing requirements
A 40/50mm drainage point and 15mm cold water connection are essential for the operation of this appliance which needs to be specified. A hot water connection can also be specified as an additional option for some machines. Some manufacturers offer the Aqua-stop safety system which prevents any kind of water damage, no matter whether it occurs at the feed or drain hose or through a leak in the appliance itself.
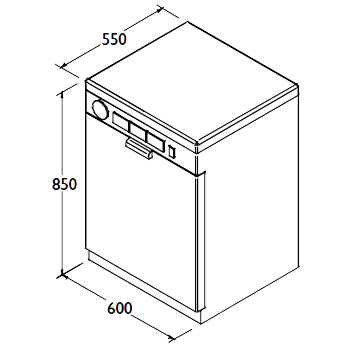
Sizes
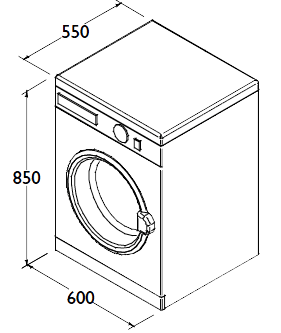
Front-loading machines are convenient to load and can stand permanently in a position under a worktop. A plan area of 600mm x 600mm (W x D) should accommodate most machines, with a minimum height allowance of ± 850mm with the lid or worktop* fitted or ± 810mm without the worktop* fitted (*worktop of the appliance). And need an activity space of approximately 1000mm x 1000mm.
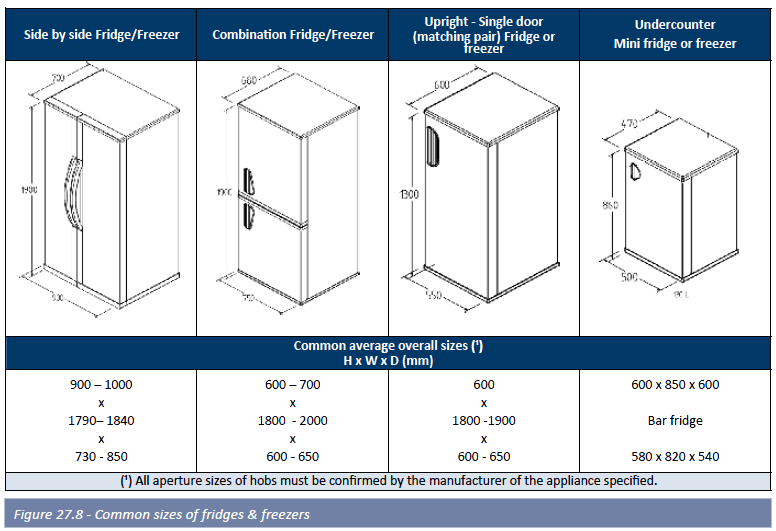
Fridges and Freezers
Fridges and freezers are available in various combinations; side-by-side refrigerator/freezers, combi refrigerator/ freezers and upright freezers. Capacities vary from 190 to 380 litres. Undercounter mini refrigerator and mini freezer sets are also available. Chest freezers are also available but seldom used in the modern kitchen.
Energy labelling
Fridges and freezers are the most hardworking appliances in your kitchen as they are on the go 24 hours a day, seven days a week. The energy label is able to provide information about their performance and physical characteristics. These include the annual consumption of energy (in kWh p/a) as well as the storage volume of the compartments (in Litres).
It is important to note that the energy label supplies the net volume as opposed to the gross volume of the unit. This is the usable volume of the fridge as opposed to the overall volume, and can therefore be relatively important when making a decision as to which unit is best for you.
No-frost technology
Many refrigerator-freezer combinations and freezers with No-frost technology allow you to freeze and store food at all levels throughout the freezer compartment, just freeze wherever there happens to be available space. In freezers and fridge/freezer combinations equipped with No-Frost the cool air is distributed over the whole compartment by specific ventilation. The air is not as humid as warmer air and the thawed water evaporates outside the fridge. The result is dry cool air and no ice on side panels, rear or food. These types of refrigerators freezers do not require defrosting.
Plumbing requirements
Fridges fitted with ice and water dispensers require a 15mm cold water connection installed behind or within close proximity of the fridge. Sizes Double door (side by side) fridge/freezers need careful planning as most dimensions given are provided with the doors closed.
However, in practical terms extra space is required for the proper opening of the doors at 90° and more especially at 135°, which is usually required to adjust and clean removable compartments and shelves, as can be seen by Figure 27.8 on the following page.
Washing machines and tumble dryers
Energy labelling
The energy label for washing machines compromises 3 classifications (ranging from “A” to “G” rating) namely: The values are determined according to the reformulated norm EN60456. From the point of view of economy in the use of energy, depending on circumstances, it is perhaps better to use machines that draw water from the main domestic hot supply, rather than heating it in the machine; this would therefore require a permanent hot water connection to the machine. Tumble dryers energy labelling – There is a difference between condensation and vented dryers, with condensation dryers having a lower energy efficiency. There are two drying systems to choose from; condensor drying and vented drying; or, Vented Tumble Dryers Plumbing requirements Washing machines – A 40/50mm drainage point and 15mm cold water connection are essential for the operation of this appliance which needs to be specified. A hot water connection can also be specified as an additional option for some machines. Some manufacturers offer the Aqua-stop safety system which prevents any kind of water damage, no matter whether it occurs at the feed or drain hose or through a leak in the appliance itself. Tumble dryers – a duct might need to be provided for a venting hose if a vented dryer has been specified which the plumber can install.
Sizes
A plan area of 600mm x 600mm (W x D) should accommodate most washing machines and tumble dryers, with a minimum height allowance of ± 850mm with the lid or worktop* fitted or ± 820mm without the worktop* fitted (*worktop of the appliance). And require an activity space of approximately 1000mm x 1000mm.
Washer dryer
A washer dryer can be specified if space is at a premium. The size of the appliance is similar to that of standalone washing machines or tumble dryers. The washer dryer would require the necessary plumbing as required for a washing machine.
Accessories (small appliances)
Other small appliances like coffee machines, scales, blenders, toasters etc also require consideration in respect of work space and storage in the kitchen, which includes power points. (There is nothing more unsightly than electric cords lying all over work surfaces which can also be hazardous in the event of water spillage or accidental damage).
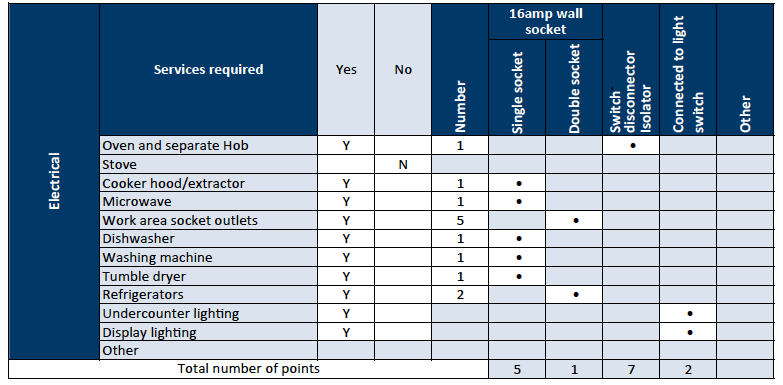
Services check list
Below are examples of services that are usually required in the kitchen and these lists can be used to assist you in your planning and budgeting for electrical and plumbing services/points in the kitchen.
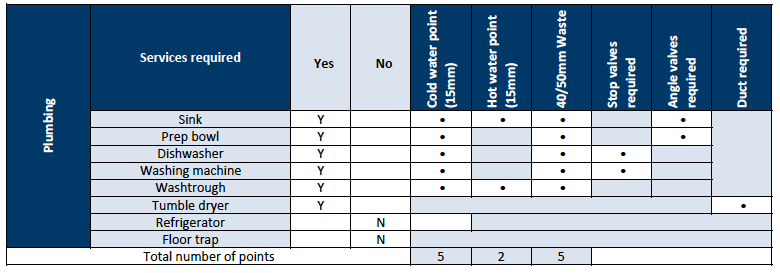
All drainage work to buildings shall be carried out by a registered plumber and comply with all the requirements of the local authority and with the National Building Regulations and the deemed-to-satisfy rules of part of SANS 10400, before the property may be occupied and the drains put into use.
Built in cupboards
Built in cupboards can be designed in a variety of modular units to accommodate different hanging space sizes and shelving space sizes. Cupboards can be built into wall recesses or can be fixed against walls (exposed) then exposing the cupboards sides. Built in cupboards are normally custom made but are also available in kit form from certain manufactures; also available are built in steel frames, having the necessary shelving and doors fitted later. Built in cupboards are available in myriad different finishes with different door types and finishes.
Design
The availability of wall space forms an important criterion in the layout and cost of built in cupboards. Cupboards satisfy two practical functions; the storage of clothes and related accessories and for general storage e.g. Linen. Standard built in cupboards can be fitted to straight walls, recesses and corners; while purpose made cupboards can be fitted in almost any location and are available to suit any design or arrangement. The importance of having sufficient storage space in a home is essential and cannot be achieved by just having large deep cupboards. Shelves, drawers, hanging rails, etc., are necessary to provide optimum storage space and require careful planning in the design process. Gone are the days where it was simply accepted that a bedroom cupboard would typically have two thirds hanging and one third shelving.
Cupboards, shelves and hanging spaces should be both practical and pleasant to look at. Various heights and depths can be used. There are no standard heights so to say, although the overall height should never be taller than the reach of the user. There must be sufficient height for clothes to hang without touching the floor, especially woman’s clothing like dresses. There also needs to be sufficient clearance depth to avoid the shoulders of clothing like jackets from touching the back wall and the closed door.
Planning cupboards
- The first step is to have a plan drawn of the room showing the door(s) and the way they open; position of window(s) and widths; It is then necessary to plan the optimum layout of the furniture so one can position the cupboards in the most suitable space, which would usually be the longest wall available without windows. Remember not to position cupboards too close to windows or doors to allow for sufficient overhang of curtain rails, and sufficient swing of the door(s) through 90° to allow for the easy access for furniture removal etc.
- The following step is to decide what requirements are needed and what percentage of the overall linear length of the cupboard each function would approximately take, e.g. storage, hanging space, shelving, drawer units, shoe racks, trouser/skirt racks, baskets etc.
Cupboards
Cupboards and carcasses are typically produced from a range of raw and decorative wood based panel products which generally include MFB (Melamine Faced Board) a high quality board comprising a single layer of melamine impregnated decorative paper fused under heat and pressure to both sides of a high density smooth surface particleboard (chipboard) or Supawood (Medium Density Fibreboard (MDF)) substrate to form a homogenous construction. Available in an extensive colour range making it the perfect choice for a variety of interior cupboard applications.
Manufactured knock-down built in cupboards are usually available in combinations of widths between 450mm and 600mm i.e. 900mm or 1200mm or 1500mm wide. Which are then used in combinations with fillers and exposed panels to suit most applications. Heights vary from 1800mm; 2100mm and 2400mm (the latter usually with top storage shelf). Economical cupboards normally comprise white melamine faced particle board (MFB) to exposed side panels, internal divisions and shelves; have no backing panels and are fitted with matching doors.
Most cupboards are normally supplied without backing and it is therefore important to remember that cupboards requiring backing cost more as further materials are used and extra fitting charges are incurred.
The use of Metal cupboard frames with fitted hollow core doors are seldom used in modern homes today.
Doors & Draw fronts
Cupboard doors are manufactured in the same way to that of kitchen cupboard doors, it is therefore not necessary to repeat this information and the reader can simply refer to that sub section.
In many built in cupboard layouts the drawer units are incorporated internally within the cupboard and therefore don’t require matching drawer fronts and typically make use of the same material used for the side panels, shelves etc. Should the drawer units be exposed matching drawer fronts would be used.
Numerous different natural wood grains and plain colours are available in a number of different finishes too varied to describe in this publication.
Ironmongery
See Ironomongery in the Carpentry & Joinery section
Vanities
Design
A vanity can be described as a vanity top with a cupboard under and by definition do not include free standing basins whether on a pedestal or fixed to the wall. There are no design imperatives that require consideration as vanities are usually chosen as a matter of personal preference which include the number of basins, looks and other factors, as described below:
Vanities can be grouped into two specific styles
- Floor mount
- Wall mount
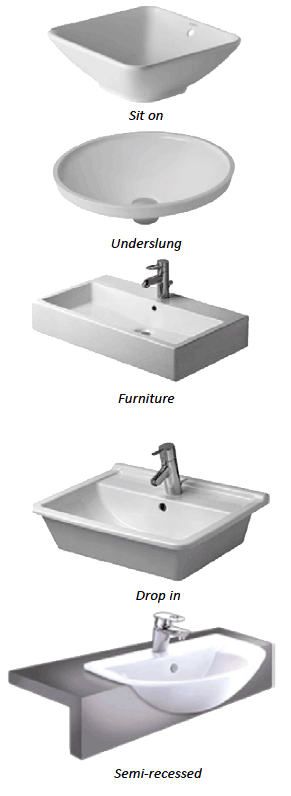
And designed to suit the following basin types
- Drop In basin
- Sit on basin or vessel basin
- Undercounter or underslung basin
- Semi – recessed basin
- Furniture basin
A vanity cupboard is a functional component where water is used and can be spilt, splashed, etc. Therefore, the most important consideration when choosing a vanity is not so much in the style or design but rather in the choice of materials to ensure the durability of the unit; which also includes proper installation of the top.
Heights of vanities will vary depending upon the basin type chosen and the thickness of the top; remembering that the front rim height of a pedestal basin is typically 800 mm. And in some instance a rim height of 900mm may be acceptable when basins are being used by adults.
CupboardsVanity cupboards and carcasses are typically produced from a range of decorative wood based panel products which include allied complementary panel products, like supawood, veneers, solid wood, high pressure laminates, and decorative laminates.
Most vanities available today are mass produced and are sold at Sanitary-ware, Plumbing and/or Building material merchants and are manufactured in a number of different sizes and combinations. Many different natural wood types and plain colours are available in a number of different finishes far too diverse to describe in this publication. In the case of floor mounted vanity cupboards, it is important to have sufficient space for ones feet to fit under the cupboard, without bumping ones toes.
A number of vanities (carcasses) are purpose made by specialist cupboard manufacturers and are often referred to as Custom Crafted Cabinetry; these types of vanities are usually found in designer homes and are not mass produced.
Tops
One of the most important elements to any vanity cupboard is the top which should be non-porous; tops like concrete which can be tiled or pigmented have been used extensively in the past as tops. The modern trend is more toward the use of natural stone slabs like marble or granite as tops. Marble is one of the most beloved of all natural stones and has long been prized for its magnificent luster and durability. Available in a full spectrum of colours, ranging from cloudy pale tones to rich dark hues.
Marble should be sealed with penetrating seals to ensure better durability and can be maintained with natural waxes. It is not necessary to repeat the information on other types of tops available; the reader can simply refer to the kitchen worktop sub section above.
Landscaping
Gardening can be very rewarding and also a lot of fun. Some gardeners become quite proficient in the pastime. There is a difference when it comes to landscaping and a property owner is advised to use a professional. If conducted by a reputable professional the design and implementation phase incorporates but is not limited to the following:
- Existing site conditions & analysis
- Pre-planning and feasibility studies
- Complete bill of quantities
- Cost estimation for construction, professional services and related project expenses
- Maintenance analysis and costing
- Co-ordinating with various parties (eg. Architects, Builders etc)
- Time scheduling and project milestone development
- Coordination of utility connections
- Conceptual, schematic and preliminary design
- Design development: materials & plant palette recommendations
- Co-ordinating of landscape elements: grading & drainage, irrigation, paving, garden structures, water features, site lighting and planting.
- Plan checking
- Post project completion maintenance.
How much should one spend on a garden?
There is no set standard but to spend 5% of the value of a home on a well designed and laid out garden is the least amount that should be considered.
It is generally recommended that from 7,5% to 10 % should be spent to include water features, paving and other features within the garden design. Typically an average landscape on a 1000 square meter stand can cost between 50k and 200k.
Implementation
Before one starts the professional will create a detailed project plan and then work closely with any sub-contractors to make sure that they are scheduled so as to optimize the project’s efficiency and assure that the project stays on schedule. The professional will also make sure that the ongoing building of the project follows the plans so that the finished project ends up exactly as envisioned. During this phase, site cleanliness and safety is an on-going priority.
A typical implementation incorporates the following:
- Project planning
- Site and soil preparation
- Irrigation
- Hardscaping and garden lighting
- Planting
- Lawning
- Maintenance plan
Water Features and Ponds
While there are many types of ponds, they all require a shell or lining in order to contain a body of water. These are the most common shell types:
Brick and mortar
This is the most precise pond-building method and as such, it works particularly well for contemporary-style water features where the shape of the pond must be geometric or linear.
A reinforced concrete slab is poured and this forms the base of the pond. Bricks are used in order to construct the walls of the pond. These walls are then plastered (remember to provide smooth corners using the plaster) and water-proofed (using one of many alternatives available at your local DIY store).
Concrete shell
This method requires that a hole be dug for the pond. This hole is then lined with a reinforced concrete shell, which is then waterproofed in the same way as the brick and mortar pond. A water proofing additive can be mixed to the concrete mix in order to provide additional waterproofing integrity to the shell.
Pond liner
This is a very quick and easy way of creating a pond. It involves the digging of the pond (be careful to remove any stones that may be jutting out into the pond area as these can tear or cut the liner once the pressure of the water is present), which is then covered in a layer of river sand, a layer of hessian or similar material (helps protect the pond liner from damage by stones) and finally the pond liner (this is a rubber sheet that is laid in the hole and cut to size).
A pump is required in order to provide the pond with circulation as well as to take water to and from any filter(s) that may be used to assist in keeping the pond clean of algae and foreign materials.
In some cases, it is advisable to have a separate pump system for filtration and a second pump or set of pumps that provide circulation. This is particularly important where a large volume of water must be moved (for example, over a waterfall) as a filter will restrict the pressure of the pump to a degree, resulting in possible under-performance of your water feature flow.
Circulation of the pond water helps keeps the water aerated and prevents stagnation. It also provides water flow for waterfalls and spouts – these are the parts of a water feature that provide a soundtrack for the space and are very important to get right.
Ideally, a water feature should provide a calm, relaxing feel and should also provide a kind of ‘white noise’ that masks the sound of nearby traffic and other invasive and distracting sounds. However, a water feature can also be too loud or create an uncomfortable sound. This typically happens when the water drops into the pond from a place that is too high. The water can break up in mid-air and land horizontally on the pond water below, creating an unnatural ‘slapping’ sound. A maximum drop of about 800mm from the spout into the pond should provide a nice sound, provided the water flow is of a sufficient volume. When selecting a pump for your water feature pond, it is important to ensure that the pump provides the correct water flow (water volume) as well as the correct pressure (for spouts and water falls). When building water falls or using spouts, be sure to establish the ‘head’ (height difference between the water level of the pond and the spout or waterfall) of the feature when buying a pump.
The water volume (litres per hour) that the pump must be capable of circulating is based on the volume of the pond (the water contained in the pond should ideally be circulated once every hour) as well as the amount of water volume which is to fall from any water falls or spouts.
The water in the feature pond will need to be filtered in order to keep it in good condition and free of debris. This is achieved through a process of filtration.
There are a number of different filter types which can be used individually or as a filter set, including:
Sand filters
This is essentially the same filter type that is used for a swimming pool and it uses a chamber filled with sand to filtrate the water from physical debris
Bio-Filters
These use living material (such as plants) in order to capture and degrade pollutants in the pond.
UV Filters
A UV filter will not ‘filter’ the water in the popular use of the word, but rather clarify or sterilize the water by shining a UV light on water passing through it, thereby reducing or eliminating algae growth. These are often used together with plants in the pond which aid in keeping the water clear.
Fire Pits
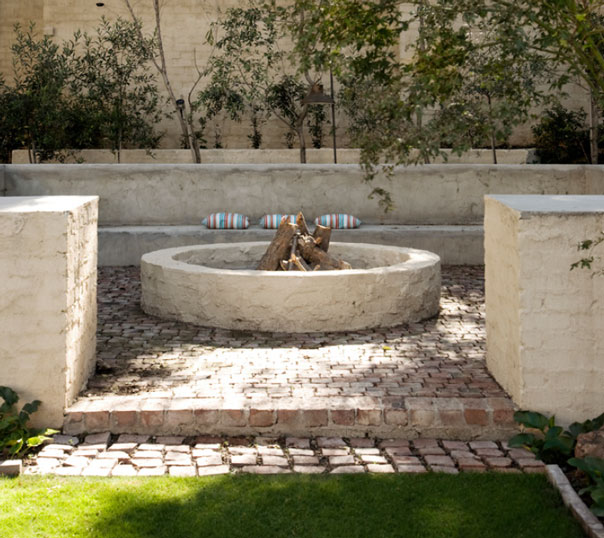
A fire pit is a great place to spend time in the garden. It can simply be a place to relax around a flickering fire or it can be a place to cook and entertain friends and family.
There are many different designs of fire pit areas, some are basic graveled areas with a brazier in the center (most cost-effective version) and others have a more elaborate constructed seating area which are integrated with water features, patio areas, roofing structures and outdoor kitchens.
In terms of the fire pit itself, you have a few options when it comes to the type of fire, including:
Wood-burning
This is the most traditional, cost-effective and easy to install fire pit type. It is simply an open pit where you can burn anything from firewood to charcoal, wooden logs or planks.This is of course the most basic type of fire and will provide a nice flame, lots of warmth and of course some smoke. The pit itself can be constructed from brick and mortar with decorative cladding, a nice clay brick, face brick or paint technique.
You could also use something quirky and imaginative such as an old wheelbarrow or a large tractor tyre rim that has been modified to hold a fire. We recommend using a small grate (about 50mm higher than the slab below) on which to build the fire. This will aid in providing air to the fire and will also limit the intensity of the fire on the slab or bricks below. Fire bricks can be used for the walls and floor of the fire pit if you would like to err on the side of caution. However, if you use a grid as mentioned above and don’t build fires that mimic a steel smelting furnace, the intensity of the fire is not usually a problem for normal brick and mortar.
A number of small air holes can be made around the sides of the fire pit in order to assist in providing air to the flames. These can simply be a small gap between the brickwork at regular intervals or something more decorative such as a copper pipe or a moulded fitting that provides a design detail around the fire pit. Timber is fuel for the fire and ideally there should be place close to (or incorporated into the design) for storage of timber. Where possible, the timber should be kept out of the rain so that you always have a supply of dry timber ready for your fire.
Bio-fuel
These burners are typically manufactured out of stainless steel. They are fitted into a fire pit and use bio-fuel (a version of denatured methanol/methylated spirits) in order to provide warmth and a nice orange flame without smoke. Bio-fuel burners are not a very cost-effective form of fire but they do make it possible to have fire pits in very confined areas as well as areas where smoke can become a problem such as indoors.
Gas
Gas burners offer similar benefits to bio-fuel burners and are convenient and clean to use. They provide a nice orange flame without smoke and can be used indoors. The gas burner is fitted into the fire pit in a similar way to bio-fuel burner. Provision needs to be made for gas bottle storage, unless of course you are connecting up to your existing household gas infrastructure.
The height of the fire pit determines how the heat is radiated around the fire pit area. The lower the pit, the more heat will radiate at a lower level. In other words, if you require the fire pit to warm up people sitting in it’s vicinity, it would be best to have the fire pit at floor level or up to around 300mm in height. If you build a high fire pit (500mm and higher), heat will only radiate above the knees. Not all fire pits are required for heat, some are required in order to create a wonderful atmosphere so height is not always a critical factor.
The diameter in the case of a round fire pit and the width in the case of a square pit is somewhat determined by the area in which the pit is to be built. It would look strange to have a tiny fire pit in a massive entertainment space. Having said that, a massive fire pit is usually only economically viable when using a wood-burning fire pit as gas and bio-fuel burners are typically quite small and costly. Using multiple burners in order to create a flame size that looks good in a large pit is not usually viable. In the case of a wood-burning pit, there is no limit to the size of the pit, but aesthetically it should fit the space. Also bear in mind that an enormous amount of wood would be required in order to keep a large fire burning.
Tips for fire pits in small areas:
- Ideally 600mm diameter is the smallest fire pit size (the space where the fire will be built, excluding the surrounding fire pit walls) that we suggest using. You can build a smaller one but if space allows, use 600mm as a minimum.
- Consider using a manufactured fire pit or a brazier in order to conserve space. As these are not permanent fixtures, they can also be taken with you should you sell your property.
Tips for fire pits in large areas:
- Ideally, we suggest a maximum diameter of 1,500mm for a fire pit. While you may be tempted to go beyond this, bear in mind that you will need plenty of timber to sustain such a large fire and to provide heat to people in the vicinity.
- With a large pit, try using a wider surrounding wall, even 500 or 600mm wide. This provides a great visual effect and provides for some seating right at the fire as well as a surface to keep snacks.
Seating around the fire pit can take the form of loose seating (wooden or metal chairs) on a patio area or a constructed seat which is built. Should you be building a seat, bear in mind that you should try to provide enough space between the front of the seat and the fire pit in order to allow for people to be seated while others pass between them and the fire pit with ease. This is usually around 600 to 800mm.
The width of the seat can also vary from a narrow seat to a wider seat that accommodates cushions for your back to a super wide seat that allows you to recline to some degree. Drainage is a very important aspect to remember when dealing with a fire pit. If you have a sunken fire pit area (including sunken seating areas) or simply a constructed fire pit, any water that accumulates in the fire pit (from rain, hail or simply from cleaning) will stagnate, providing a potential breeding ground for mosquitoes as well as a potentially foul odor. In the case of a sunken fire pit area, be careful not to allow the surrounding ground to slope towards the fire pit as this will introduce additional water to the area which would then need to be drained.
A 50mm PVC pipe (the same that is used for connecting swimming pool pumps) is usually sufficient to drain rainwater away from the fire pit (the whole area may require multiple pipes or the use of 110mm pipes). The pipe should ideally drain water from the pit under any paving or seating to an area of lower-lying ground away from the fire pit area. The plastic pipe should be fitted with a steel cover in the pit in order to prevent the pipe from melting during fire pit use. This is not an ‘off-the shelf’ product and would need to be custom-fabricated. The steel drain cover that we manufacture is almost like a floating disc that allows water to run under it while preventing hot coals from entering or melting the plastic pipe.
Drainage can be particularly tricky where the whole fire pit area (ie. The floor area around the fire pit) is sunken lower than the surrounding ground area, making it impossible to drain any water using a traditional drain and gravity. In this case, a sump should be built within the fire pit area. This would serve as a catchment area for rain water and a bilge pump would be used to pump the water out once a certain level is attained (use a pump with a float switch in order to automate this process).
Balustrading
The fundamental purpose in the design of balustrading or a barrier should be such to minimize the risk of persons falling, rolling, sliding or slipping through gaps in the barrier. Barriers should be designed so that the widest gap in the barrier does not permit a sphere of diameter 100mm passing through it, making due allowance for deflection under load. Banisters vary from simple, modern designs to richly decorated ones with turned wooden or steel balustrades (wrought iron).
It is important to make sure that the design is suitable for the style of house, remembering that mixing design elements can sometimes work, for example, a stainless steel and glass balustrade in an old house or, an ornate wrought iron balustrade in a modern house. Hand rails must always be comfortable to grip. Wooden rails must be smooth and preferably finished with a durable varnish or paint. Brass and other bright metals can also be used but usually require constant cleaning or shinning.
Terminology
Balustrade
A protective guard rail to prevent people falling, at the edge of a stair, landing, or balcony, with closely spaced infill such as balusters/stanchions from the handrail down to the fixing point in the floor.
Baluster
Vertical members in a balustrade between the handrail and bottom rail or floor.
Die
At the upper and lower ends of a turned baluster, the enlarged square part that meets the handrail or plinth.
Handrail
A rail at hand a height above floor level, or slightly higher in the case of the sloping handrail of a staircase. Handrails can be either on top of a balustrade, railing, or guard rail or supported by brackets from a wall and are usually manufactured from timber or metal.
Newel
A large vertical support member in a timber frame, usually thicker than a baluster.
Stanchion
A steel column or pillar.
Upstand
A concrete or brick beam on top of a floor, often a wall on the edge of a concrete slab or balcony to which a balustrade can be fixed.
Wrought iron
Decorative metalwork made from a tough malleable form of iron suitable for forging or rolling, not cast; typically beaten out or shaped by hammering.
Standards
Change in level (extract from SANS 10400 Part D 4.2)
- Any balustrade or wall provided to protect a change in level shall comply with the requirements of SANS 10400-B.
- The edge of any balcony, bridge, flat roof or similar place more than 1 m above the adjacent ground or floor level shall be provided with a balustrade or parapet wall not less than 1 m in height, unless unauthorized access of persons thereto has been excluded by a physical barrier properly erected and maintained.
- In the case of an interior balcony or a mezzanine floor, such balcony or floor shall be provided with a balustrade or wall not less than 1 m in height, provided that where such balcony or floor is used for public seating in rows such height may be reduced to not less than 800 mm opposite the seating in the front row.
- A balustrade or wall provided as protection at a change in level in any occupancy classified as E2, E3, E4, H1, H2, H3, H4 or H5 shall not have any opening that permits the passage of a 100 mm diameter ball, provided that such protection in any occupancy that is not an occupancy classified as E2, E3, E4, H1, H2, H3, H4 or H5, shall consist of at least a handrail and one other rail midway between such handrail and the floor.
The national building regulations code of practice for the application of the national building regulations covers the minimum standards required when designing balustrading, which is discussed further in SANS 10160: Code of practice for the general procedures and loadings to be adopted in the design of buildings and SANS 10137: Code of practice for glazing materials in buildings.
This section only covers balustrading and railings that guard a drop of more than 750mm, and excludes any heavy applications like vehicle traffic.
The design and installation of a balustrade using safety glass must be approved by a competent person (structures) or (glazing). It is a requirement of SABS 10160 that the safety glass of a balustrade within 500mm of the floor level must withstand an impact of 400J delivered by means of a 250mm diameter bag filled with dry sand to a mass of 30kg.
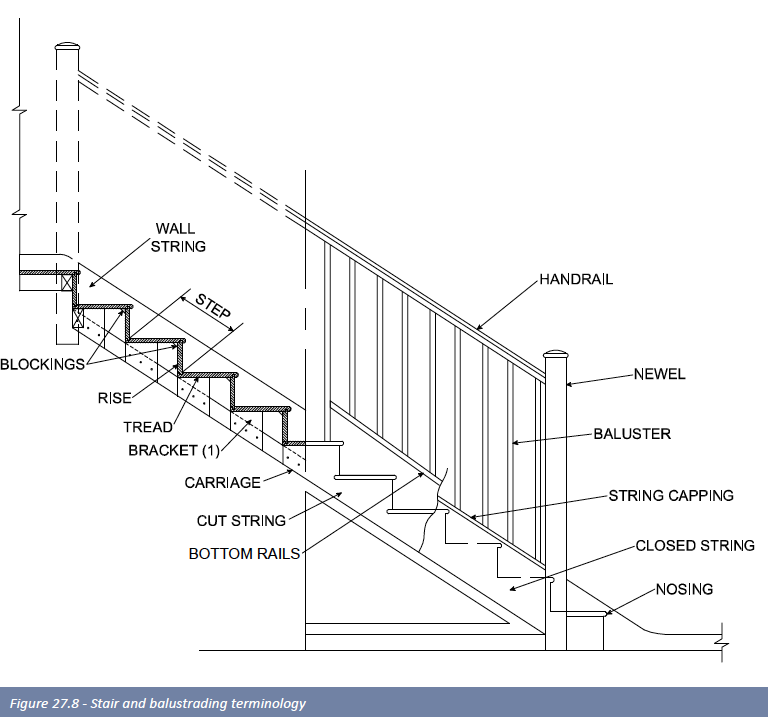
Skylights
Overview
Skylights (sometimes known as rooflights) can completely change the feel of a home or office by bringing in natural light and warmth, as well as the outside environment. They are defined as an area of glazing in a roof, either an opening light, a fixed light, or a simple rooflight sheet. Skylights let in, on average, five times more light than the equivalent area of a vertical window. Skylighting is a very practical and economical way of creating day lighting, and can greatly increase the energy efficiency of the building; as well as enhance aesthetics.
Design
Skylights can also be defined as sloped glazing which includes the fenestration of skylights and space enclosures which are tilted more than 15° from the vertical. Sloped glazing systems should be inclined by a minimum of 15° from the horizontal to ensure proper condensation and water infiltration control and to minimize accumulation of dirt above horizontal or purlin framing supports. Systems inclined less than 15° from the horizontal may require special consideration. Skylights can be fitted to almost any roof type, from pitched and ridge roofs to flat roofs or in an eave. All glazing materials are breakable. Sloped glazing installations situated above areas where people pass or work raises safety and liability considerations for the owner, designer, glazing and skylight manufacturer.
Breakage can result from any of the following causes:
- Excessive loading; wind, snow or concentrated loading;
- Impact loads from falling, like hailstones or wind borne objects like roof gravel;
- Thermal effects generated within the glazing material itself. E.g. a skylight can almost act like a solar panel, if heat absorbing glass is used and then fitted at an angle;
- Inadequately designed glazing system which does not provide proper support, clearance and drainage;
- Edge or surface damage to glazing material during manufacturing, handling, installation and maintenance.
Specification guidelines
Technical Structural
Technical Structural
Wind loads can affect skylighting in a number of ways, some of which should always be considered:
Wind can distort the overall shape of a skylight and can cause the rafters and other components to bend excessively. Wind can also cause uplift that can rip the skylight off the building. The direction the wind is blowing has a distinct effect on whether the wind will impose an inward (pressure) or outward (suction) force on the system. Both inward and outward forces can cause excessive bending of the skylight components. Outward forces can also cause the structure to be torn from the building.
Consideration at design stage should also be given to load distribution other than wind; these being superimposed loads which, if anticipated, should also be designed in accordance with SANS 0160. These loads can be divided into two groups; snow and hail loads; and imposed loads caused by people carrying out skylight or roof maintenance.
Waterproofing
In essence, one of the most important functions of a skylight is to resist the penetration of rain. It is the lack of ability to perform this function adequately that results in more failures than any other item. Most manufacturers provide pre-made flashings to suit specific skylights and roofing types and should provide a guarantee after installation.
Condensation
Condensation, while generally not a factor affecting human safety, is an important consideration in the design of overhead glazing systems. Skylights and space enclosures should be mechanically designed (through the use of a guttered weep system) to control both condensation and water infiltration.
Air leakage
Excessive air leakage will cause drafts, wind noise and discomfort to the occupants of the building and can also be a major source of energy loss in a building.
Deflection
The primary function of a skylight framing system is to provide a structurally sound support and water control system, which will accommodate the glazing infill under load – the choice of materials used for a skylight will take this into consideration.
Thermal factors
For most orientations, incident solar radiation or inclined glazing applications will be higher than on vertical glazing due to the angle used. Also, thermal stresses may be higher, as they are dependent on glass centre to edge temperature difference and not solely on the level of solar radiation. The increased level of solar radiation can affect the performance of the glazing material. Generally, a glazing material manufacturer’s brochure will include performance criteria e.g. shading coefficients, U values, etc.
Materials
Aluminium Extrusions
Aluminium Extrusions
Aluminium is the material of choice for skylight construction as it is lightweight and can be easily extruded into complex shapes necessary for skylight design. The stiffness of aluminium is one-third that of steel; an aluminium section can deflect three times that of an identical steel section under the same conditions without permanent deformation. The coefficient of thermal expansion is twice that of steel. Steel/aluminium interfaces must be carefully analysed or serious connection problems could result. The effect of thermal movement can also impact on various support conditions. Aluminium is anodic, so the potential for galvanic corrosion with other materials exists. Extruded aluminium sections should be fabricated from alloy 6063 or 6061 in temper T5 or T6 all in accordance with the latest edition of BS EN755: Aluminium and its alloys – extruded rod/bar, tube and profiles.
Aluminium Sheet
Ancillary members such as sills, flashings and infill panels, which may be formed from flat sheet material, must be fabricated from aluminium alloy 1200 or 3004 or 5251 of appropriate temper, in accordance with the latest edition of BS EN 573: Aluminium and aluminium alloys.
Timber and Steel
If used, structural timber or steel members should be of suitable strength and comply in all respects with SANS 10163 (wood) and SANS 10162 (steel).
Glazing
Once the design load has been determined (according to the building’s design load), the appropriate glazing thickness can be specified, using published strength information. Glazing materials are normally designed for uniform loads – and importantly, most published strength charts are based on a uniform one-minute wind loading and may not address the additional factors that affect performance in a sloped installation. Generally, glazing materials are available in a wide range of transparent tints and reflective finishes and the choice of glazing type and colour would depend upon the application. Skylight manufacturers should be consulted in this regard.
See Glazing section for more information on Standards.
Garage Doors
Garage door types
Sectional type doors
A sectional door is a popular type of door used today. The sectional Door can easily be made to suit any size or shape of opening, from single width to double and even triple width openings. It can be made to accommodate door heights of 3 metres and more. “Daylight” openings can be square, rectangular, arched or any other shape desired. The door comprises a number of sections which are hinged together and which run on rollers in a guide track. When automated, the door is safe, reliable and secure. However it’s more expensive than other types of door.
Tip-Up type (One piece) doors
Once a very popular type of door specified in residential applications, however, with the emergence of the sectional type door, tip-up type doors are no longer that popular, although they are cheaper than sectional type doors. The door passes through the opening as it moves and when fully opened is partially inside and partially outside of the garage. The Tip-Up door has two major disadvantages; it can only be used in openings which are square or rectangular in shape, and it also reduces the usable opening height by up to 150mm.
Metal roll-up type doors
This type of door is still one of the most popular types of door available, probably because it’s the cheapest type of garage door available. Whilst it can be used for a wide variety of opening shapes, there are limits to the size of opening that can be covered! Also, automation of this type of door requires some special adaptor kits and installation techniques. Doors are available in many different colours and finishes.
Measurements
Garage doors are always identified according to their position as viewed from inside of the garage. All dimensions are given in (mm) and are “finished sizes”, i.e. plaster and screed work is completed, also known as “daylight” measurements. SUVs have become very popular and are generally higher than vehicles of the past
Standard sizes
Garage doors are available in the following two standard sizes:
- Single doors 2440 mm wide x 2135 mm high
- Double doors 4880 mm wide x 2135 mm high
The most important measurements when specifying a garage door is not necessarily the actual opening width but rather the opening height and the head-room and side-room measurements. A number of these measurements can differ from manufacturer to manufacturer and can also depend on whether the door is manually operated or automated. The headroom measurement is critical where a sectional door is being specified. The minimum dimensions below are provided as a guide for planning purposes. (All dimensions need to be checked once a type of door has been chosen).
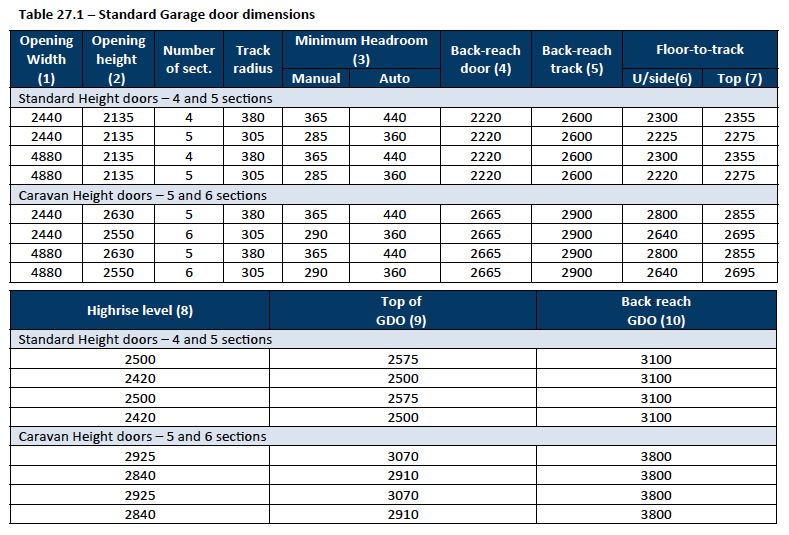
References
Alexander G D & Alexander G C. 2010. Buildaid Building and Pricing Guide 2010/11. Johannesburg: Buildaid Publishing.
Alexander G D & Van As F. 2008: Civil Technology. Johannesburg: EWA Publishing.
Alexander G D & Van As F. 2008: Civil Technology. Johannesburg: EWA Publishing.