Chapter 9
TOOLS
Introduction
Standards
Hand Tools
Measuring Equipment
Introduction
The design and manufacture of hand and power tools, is based on fundamental techniques and procedures spanning centuries and decades and where the development of modern tools is influenced by other variables like efficiency, quality, service life, and economics.
Standards
In South Africa the SABS stamp of approval of locally manufactured tools is always an indicator or guideline of the tools quality, although many tools are manufactured outside South Africa using the country of origins standards or multinational standards like EC guidelines. Therefore besides looking for internationally accepted standards when choosing tools, other factors to consider include – economics, quality, service life and fitness for purpose.
Economics
The overall economic calculation when purchasing tools and more especially power tools is very important; as it often happens that “cheap” tools turn out to be uneconomically expensive on account of their generally bad performance or short service life and where the tool, which appeared “more expensive” on the surface turns out after only a short period of use better value-for-money in terms of performance and overall service life and therefore the more economical decision.
Quality
Two essential criteria for tool quality need consideration – the working quality of the tool and the work progress the tool will offer the user. This is however subjective and really depends on the user and the working task being performed; for example, a user using a tool which is perfectly designed for him or her and the working task, will be more content than with a no frills “cheaper” product, that isn’t as perfectly designed.
Service life
It is important to consider what the intended service life of the tool will be and its intended purpose when purchasing tools. For example, if a tool is only going to be used once a year, the quality or range of the tool should then be chosen based on this criterion. Remembering most tool manufactures have various ranges to suit this classification, for example a DIY range compared to an industrial or heavy industrial range of tools.
Fitness for purpose
Tools are designed for a particular application or job and should be used for that purpose only. Using a tool for some other work instead of its intended purpose can lead to discomfort to the user and a reduced service life of the tool and can even lead to pain or injury.
Note: To avoid injuries one must use tools in a safe manner and always read operating instructions when provided.
Hand tools
A hand tool is a device or an instrument used to perform a particular task that does not require a motor, but intended for hand held operation by one individual; almost every type of tool can be considered a hand tool – for example, a knife and fork are used as a tool to eat. Hand tools include anything from hammers to wrenches, to axes, pliers, screwdrivers, punches, trowels, to chisels, etc. In this book we only deal with two categories of hand tools being construction and garden hand tools.
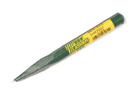
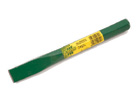
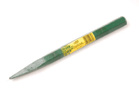
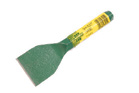
Chisel
A tool with a flat steel blade sharpened across its tip to astraight cutting edge attached to or forms part of a handlein steel or plastic. Chisels are made for chiselling concrete,bricks and wood.
Float
A plastering tool with a flat face and a handle used for floating the surface of plasters or a screed; common types include wood, rubber, and plastic.
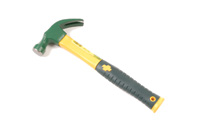
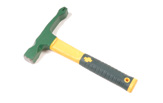
Hammer
A tool used for striking, with a flat striking surface for driving in nails as well as for dressing, picking, spalling, etc. Hammer heads are generally of steel, and handles are wood, plastic or steel. The part of a hammerhead opposite the flat face may have various shapes like a peen, claw or pick – common hammer types include bricklayers, carpenters, club and sledge.
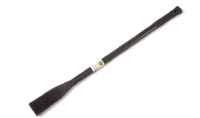
Pick
Used for loosening soil when digging a trench generally manufactured in two forms – C&D (cut and dig) and D&D (did and dig).
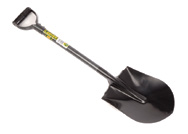
Round nose Shovel
Generally used for mixing concrete and mortar; also used for loading aggregates.
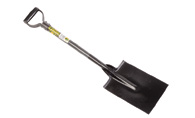
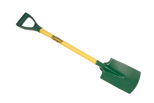
Spade
A spade is mainly used to assist with digging and for shoring (cutting) the edges or walls of a foundation trench.
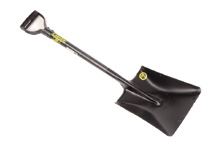
Square mouth shovel
Generally used for picking up discarded soil, and for loading.
Square
Used to assist in squaring of corners at 90° and specifically for setting out and setting corners of brickwork. Also used for plastering (reveals, cornices, etc.) and for other tasks where a 90° angle is required.
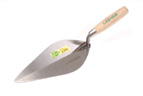
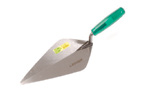
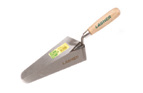
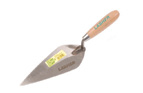
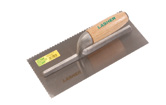
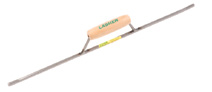
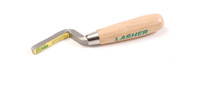
Trowel
A steel bladed hand tool for gauging, mixing, laying on, or finishing plaster or concrete also used for spreading adhesives (plain or notched) – common types include brick, pointing, plastering and gauge trowels.
Construction tools
Chisels

Cross Cut
Diamond point
Flat chisel (cold)
12 x 150mm
20 x 200mm
20 x 250mm
25 x 250mm
25 x 300mm
Concrete
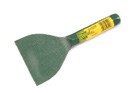
Brick Bolster
Bolster (electrician)
Trowels
Brick Trowel (wooden handle)
250mm
280mm
300mm
Brick Trowel (rosa)
280mm
300mm
Gauging Trowel
150mm
175mm
200mm
Pointing Trowel
150mm
175mm
200mm
Plaster
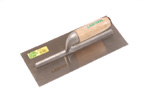
Plaster Trowel
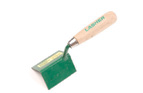
Corner trowel (outside corner) cove

Corner trowel (inside corner) cove
Trowel (inside corner) sharp

Trowel (outside corner) sharp
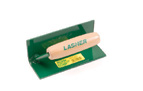
Plaster (other)

Plaster hawk (all steel/aluminium)
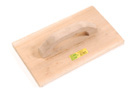
Wooden float
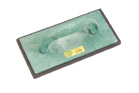
Plastic (rubber) float
Floor edge trowel
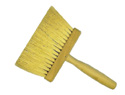
Block (plaster) brush
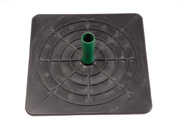
Plaster hawk (all plastic)
Tiler
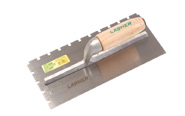
Notched tiler’s trowel
Hammers
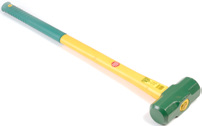
Sledge hammer
Also available with soft grip handle
3.6Kg
4.5Kg
6.3Kg
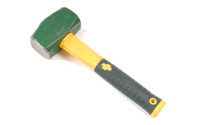
Club hammer – soft grip
Also available with wooden handles
1.1Kg
1.8Kg
Claw hammer – soft grip
Also available with wooden handle
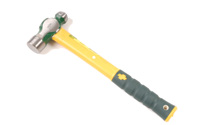
Ball peen hammer
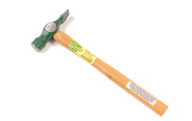
Joiner hammer
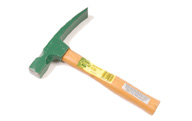
Brick hammer
Scutch hammer
Also available with wooden handle
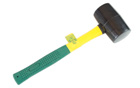
Rubber mallet
Digging Tools
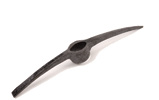
Pick head
C & D
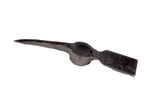
Mattock
Square mouth shovel
Round nose shovel
Spade
Pick handle
Jointing Tools
Long brick jointer
Available in different profiles
Cross brick jointer
Available in different profiles
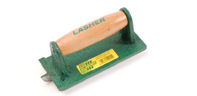
Jointer single groove for Grano
Also available in six Groove
Wheelbarrows
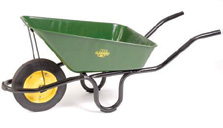
Wheelbarrow
Trestle
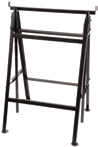
Trestle
- Heavy duty
- Light duty
Garden Tools
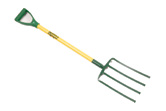
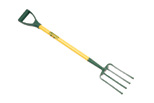
Fork
Available in different types – 4 & 5 prong and for Ladies.
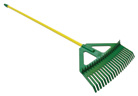
Garden Rake
Rubber Rake
Combination Rake
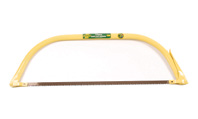
Bow Saw
Available in various sizes
530mm
600mm
750mm
900mm
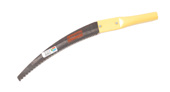
Pruning Saw
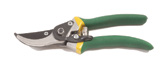
Medium duty Secateurs
Hoe
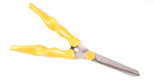
Hedge shears
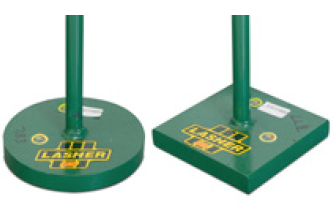
Stampers
- Round
- Square
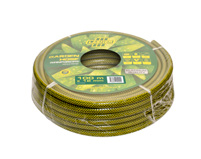
Hosepipe
20m Hose – 12mm diameter
30m Hose – 12mm diameter
30m Hose – 20mm diameter
100m Hose – 12mm diameter
100m Hose – 20mm diameter
Small Hand Tools
Ladies spade
Ladies fork
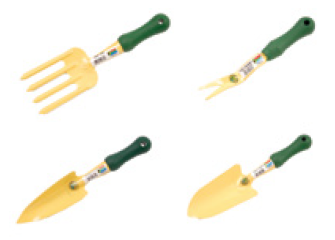
Garden hand tools
- Hand fork
- Daisy Grubber
- Transplanter
- Hand trowel
Hand Tool Application Guide
Table 9.1 – Construction Hand Tool Application Guide
| Tool Type | Trade | Application/Uses |
| Brick bolster | Bricklaying | Bricklayers chisel for cutting bricks |
| Brick hammer | Bricklaying | A hammer with one flat end and one with a sharp chisel-like end used for breaking and dressing bricks. |
| Brick trowel | Bricklaying | A trowel for spreading mortar on bricks or blocks |
| Brick Jointer | Bricklaying | A tool used to shape the mortar in a brick mortar joint |
| 2 lever lockset and handles | I each | A tool used to shape the mortar in a brick mortar joint |
| Pointing trowel | Bricklaying | Used for filling in small cavities like mortar joints |
| Club hammer | General | A heavy headed hammer used to deliver a forceful blow |
| Cross cut chisel | General | A chisel for cutting grooves and slots |
| Diamond point chisel | General | A chisel used for cleaning out mortar from corners |
| Flat chisel | General | A chisel used for breaking out brickwork or stone or to cut |
| Gauging trowel | General | A round nosed trowel used for mixing mortar or plaster and applying small amounts and used for patching |
| Hand saw | General | A saw generally used in building to cut wood by hand |
| Rake | General | A hand tool used to levelling ground |
| Sledgehammer | General | A heavy long-handled hammer used to drive stakes or wedges or for breaking (demolishing) |
| Wheelbarrow | General | Perhaps the most versatile small hand tool used for transporting materials around site with a capacity of ±65 ℓ |
| Wrecking bar | General | A heavy duty metal bar with a rough chisel shape on one end for lifting and a claw on the other end for pulling |
| Back or Tenon saw | Joinery | A fine toothed handsaw with a stiffened blade used to cut wood accurately and for precision joinery |
| Claw hammer | Joinery | A hammer with a cleft at one end for pulling nails |
| Coping saw | Joinery | A hand saw used for cutting round sharp curves |
| Cross cut saw | Joinery | A coarse toothed saw to cut across the grain of wood |
| Fret saw | Joinery | A coping saw with a deep U-shape frame |
| Joiner’s hammer | Joinery | A light weight hammer used for nailing small nails like panel pins |
| Panel Saw | Joinery | A fined tooth saw with approx. 10 TPI (1) and set for a cross- cut |
| Ripping saw | Joinery | A finer toothed saw to cut parallel to the grain of wood |
| Rubber mallet | Joinery | A tool used by carpenters using chisels providing a softened strike with a positive drive; also used to shift other building materials into position like paving bricks. |
| Ball peen hammer | Metal work | A hammer with one round and one flat end; used in working metal |
| Hacksaw | Metal work | A handsaw for cutting metal |
| Corner trowel | Plastering | An angle trowel for shaping plaster around internal or external corners |
| Plastering Hawk | Plastering | A tool used to temporarily hold mortar or plaster so that in can then be applied to the surface using a trowel |
| Plastering trowel | Plastering | A steel trowel used for spreading plaster and for levelling and polishing of plaster, screeds and concrete |
| Skirting trowel | Plastering | A tool used for shaping a plaster skirting in cement floors |
Accessories
Bow saw blades
The bow saw blade is usually very thin and thus makes a limited amount of contact with the wood, reducing the friction allowing for quicker cutting, especially when cutting ‘green’ (wet) wood. The bow saw is used for tree felling, tree trimming. Bow saws can also be used for notching, making diagonal cuts and for securing wood pieces together. Bow saws cut in both directions because each tooth is sharpened on both sides. The teeth are set coarsely and this blade will cut firewood and logs quite easily. Blades come in various lengths from 500mm to 900mm – most of them are approximately 38mm wide and sharpened to a 4 TPI.
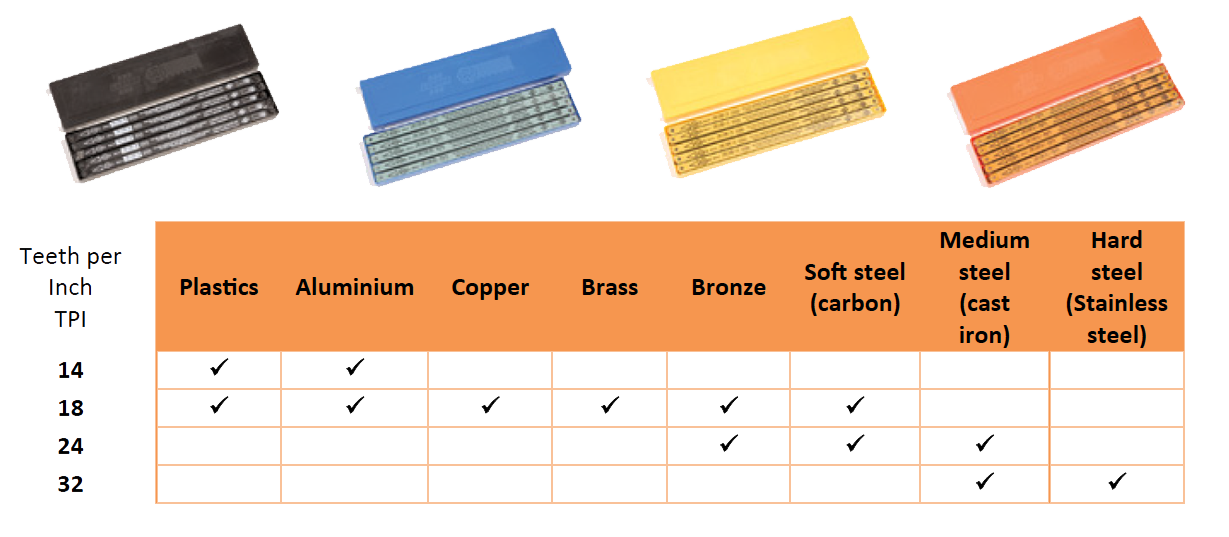
Hacksaw blades
Hacksaw blades are typically available in 300 mm lengths (there are no standardized lengths) and are normally quite brittle and manufactured from HSS steel. More durable Bi-metal blades are also available today providing better durability and are more flexible and more expensive. The standard pitch of the teeth of hacksaw blades can be from 14 to 32 teeth per inch (TPI) – the teeth are very small and are set in a gradual ‘wave’ (in a smooth curve) which determines how well the blade cuts. The blade is normally chosen based on the thickness of the material being cut, with a minimum of three teeth in the material.
32 TPI blades – provide a finer cut and are good for cutting thin gauge steel or thin walled tubing and hard steel.
24 TPI blades – are used for medium hard steel and regular walled tubing including cutting angle iron, reinforcing bar, heavy pipe, brass and copper.
18TPI blades – are used for harder materials like galvanised iron water pipes and large pieces of steel.
14 TPI blades – although these blades are not often found they work well when cutting soft metals like aluminium and tin – also ideal for cutting plastics.
Table 9.2. Hacksaw blade selection chart
Measuring Equipment
Outline
Metrology is undergoing a shift away from the conventional mechanical/manual methods to “intelligent” measurement techniques which implies the use of electronic or electronically supported measuring instruments and tools. Intelligent metrology allows you to measure faster and with greater precision and to work more efficiently and economically in both the construction and DIY sector.
Levelling and the transmission of height values is a procedure used frequently in the construction industry. Manual levelling instruments are difficult to operate usually imprecise and, as a rule, two operators are required. For this reason they are increasingly replaced by electronic levelling instruments where laser technology is the transmission medium.
As a rule, class II and III lasers are used in so-called “construction lasers”.
It is a general rule that higher operating comfort, higher precision and more automated functions can only be achieved through higher constructive effort and therefore are more expensive. In order to ensure efficient and economical application under the most diverse operating conditions, three device categories have become accepted in the marketplace:
- laser with manual levelling
- laser with manual levelling and rotation
- laser with automatic levelling and rotation
Optical accessories like deviating and beam splitter prisms, reflection panels, remote controls and receivers allow the extension or simplification of laser operations.
Terminology
Angle measuring
Angles are measured mechanically with the help of a calibrated scale on two flexibly connected wings. Electronic methods of measurement detect the angle through a sensor and convert it in a measuring element.
Calibrate
Precise adjustment of, for example, a measuring tool.
Coordinates
Numerical values capable of defining the position of a point in a plane and/or in space.
Inclinometer
Tool designed for the precise angular detection of horizontal and vertical variations.
Increment
Single, usually small steps of a measured quantity. Example: a staircase (quantity) consists of many individual steps (increments)
Laser
Abbreviation of ‘Light Amplification by Stimulated Emission of Radiation’. Depending on the model lasers generate single-frequency light beams in the visible and/or invisible range of the spectrum which can be focussed into beams of very small diameters
Laser goggles
Glasses to improve the visibility of emitted laser beams.
Note: These are not safety goggles to protect the user against laser beams.
Laser rangefinder
High-precision rangefinder. The reflection time of the emitted laser beam is measured and used to calculate the distance.
Levelling instrument
Tool designed for the transfer of measuring points of equal height in a room.
Measuring
Process during which the value of a physical quantity is determined.
Measuring range
The range between the intended maximum and minimum value which a measuring instrument can display.
Prism
Optical component designed for beam deflection.
Remote control
Device designed for the initiation of switching process on an appliance out of the direct reach of the operator.
Scale
Display division, usually numerical, in case of measuring instruments.
Spirit level
Measuring tool for the estimation of variations from the vertical or horizontal. The variation is displayed by the position of an air bubble in a “bubble level”. For precise measurement of angles or %-variations the spirit level is displaced more and more by digital angle measurers and digital clinometers
Equipment Types
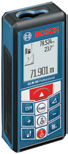
Laser Rangefinder
The easy solution for precise range finding
- High measuring accuracy and ease of measuring
- Used to measure straight lines, square and cubic meters
- Robust design for tough jobsite conditions
- Optimum work results due to high measuring accuracy
- All-round softgrip protection for a long lifetime
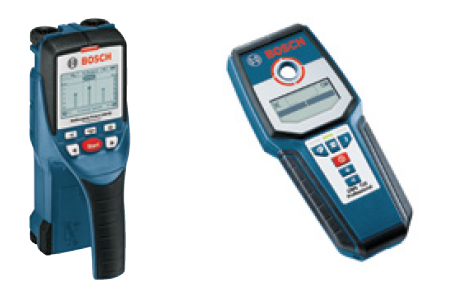
Wall scanner Detectors
The specialist for finding objects in difficult conditions
- Unique: reliable detection of objects even in damp concrete
- Millimetre-accurate detection of ferrous/non-ferrous metals, live cables, wood and plastic pipes
- Digital display of material properties and the actual object depth is displayed, making it easy to determine the depth of the object
- The Signal View/SV displays objects that are very close together even more precisely
- The specialist for finding rebar, brickforce and even hollow gaps
- Ruler View: measuring distances between objects, millimetre-accurate marking on the wall
- Self-calibrating
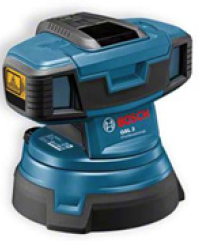
Floor surface laser
The world’s first floor surface laser
- Used to accurately measure horizontal floor surface levels and can be used to make sure class-1 surface levels are achieved when specified.
- Displays surface irregularities precisely using a simple principle: one line = level; split line = not level. Remote control for easy and comfortable operation
- Ideal for site managers, surveyors and all flooring trades
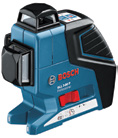
Line laser
Precise lines, high visibility
- Self-levelling horizontal and vertical pendulum line laser for quick alignment of lines
- High visibility of the laser lines with a working range of up to 80 m (with a LR2 receiver)
- Extremely precise and accurate
- Vertical, horizontal, cross line and plumb modes for precise alignment
- Easy handling due to single-handed operation
- Robust design with softgrip covering protects against knocks
- Pendulum lock ensures safe transport
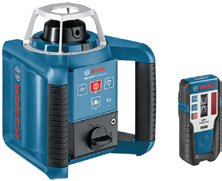
Rotation laser
Easy handling with horizontal, vertical self-levelling and plumbing
- Easy to operate thanks to one button function and self-explanatory display
- Easy to set up in both the horizontal and vertical modes due to automatic self-levelling
- The shock warning function, which can be switched on and off, prevents levelling errors in the event of shocks and vibrations
- Three functions; Point, line or rotation modes for optimum visibility
- High accuracy of 0.1 mm/m
- Dust and splash protection

Point laser
Highly compact 5-point laser – for easy transfer of reference points
- Self-levelling 5-point horizontal and plumb laser for indoor work
- For precise transfer of right angles and reference points from the ground to the ceiling or left to right/wall to wall
- Easy handling due to its very compact size
- Wide variety of fixing possibilities using a universal mount – tripod mount, wall mount, pipe mount, etc.
- Working range of up to 30 m
- High levelling accuracy of ± 0.3 mm/m
- Dust and splash protection
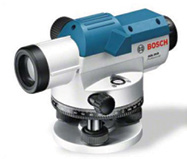
Optical Levels (dumpy level)
Robust and reliable – ideal for outdoor use up to 100m
- Ideal for outdoor use due to a robust housing with dust and splash protection
- Fast aperture for excellent staff reading
- Compensator lock for safe transport
- Target collimator for rough alignment
- Penta prism makes it easy to read the circular vial
- Erect image
- Large focusing knob for easy alignment
- Fast aperture for a sharp image of the target (measuring rod)
- Endless degree/angle setting using knobs with friction-braked rotation
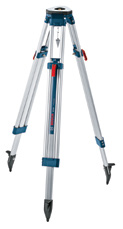
Tripods
Versatile aluminium tripod
- Easy height adjustments range from 1.5m to 3.5m
- High stability on any surface
- Robust aluminium design
- Suitable for line, point and rotation laser levels
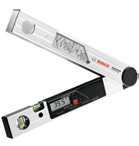
Angle Measures
Extremely accurate angle measurement
- Fast and precise calculation of angles for measuring roof angles, cornices and moulding joints
- Angles can be transferred precisely onto workpieces
- The digital display offers the highest angular accuracy
- Self-calibrating
- Also calculates mitre/bevel angles for mitre saws
Inclinometers
Precise digital inclinometer
- Measures precise inclines in degrees, percent or mm/m
- Direction arrows and acoustic signals at 0° and 90° for easy alignment
- Hold/Copy function to hold and transfer the measuring result
- Automatic rotation of the measured values on the display when working overhead
- Easy calibration function for continued accuracy
- Robust aluminium housing
- Digital and spirit level indicators
Power tools
Outline
Power tools are usually designed for a special job which means that there are many different types of power tools on the market with a great variety of versions and models. The construction must be sturdy, easy to maintain and capable of continuous performance. The weight plays only a minor role, for instance, in cases where freehand or overhead work has to be done frequently. Noise, dust emissions and vibrations must be taken into consideration by the manufacturer.
Operative capability and high performance reserves are decisive characteristics. It is of extreme importance that when choosing a power tool for a specific task or application that it is the right tool. Furthermore there are various model types to suit the usage like DIY, and industrial and it is therefore important that the user chooses the right power tool and model for the application.
Terminology
AC/DC motor
Electric motor which can be operated with both alternating and direct voltage.
Ampere
Unit of measurement for the electric current, current intensity.
Attachments
Accessories built onto machines to extend their range of applications.
Back flange
Disc-shaped clamping device used to attach usually disc-shaped application tools on the tool spindle. Typically found
on angle grinders and rotational saws.
Battery for cordless tool
Rechargeable battery cell.
Battery voltage
Nominal voltage of a rechargeable battery, depending on the battery type and the number of battery cells.
Belt guide
Device to adjust the belt travel; the sanding belt is inserted and centered exactly with an adjusting knob while the tool is running in order to prevent the belt from running off during operation. Centering also stops the belt from slipping off and getting caught inside the machine housing.
Blade guard
Device to prevent unintentional contact with a tool cutting edge.
Brushes (electrical)
Carbon brushes are simply known as brushes and are used as power supply to the rotating armature of a universal or DC motor.
Clutch
Technical term for the separating point in the line of force (torque) of machines where the driving mechanism can be disconnected from the output shaft. Power tools usually have a pre-set maximum torque to suit the tool and application before the clutch would engage.
Constant-Electronic
Electronic regulating device which holds an adjustable rotational speed or a fixed predetermined rotational speed constant under changing loads. This method is used, for example, for angle grinders, impact drills, planers and circular saws.
Contact pressure
This is the manual pressure exerted by the tool user to achieve optimum penetration of the substrate being drilled at the correct cutting speed of the drill bit. In the case of impact drills the drilling performance depends largely on the applied contact pressure.
Cutting speed
The cutting speed is specified for work on different types of materials; it ensures the best possible work results.
Dead man’s switch
Switch that cannot be locked, i.e. if you let go, the switch returns immediately into the off position.
Depth stop
Accessory part of drills and rotary hammers designed for the limitation of the drilling depth.
Direction of rotation
The direction of rotation of a power tool is defined by looking at the direction of the line of force. Clockwise direction of rotation is known as right-handed rotation.
Disengaging clutch
Clutch which interrupts the line of force for a short time or permanently when a specified torque is reached.
DIY tools
Machine tools constructively adapted to suit the needs of DIYers.
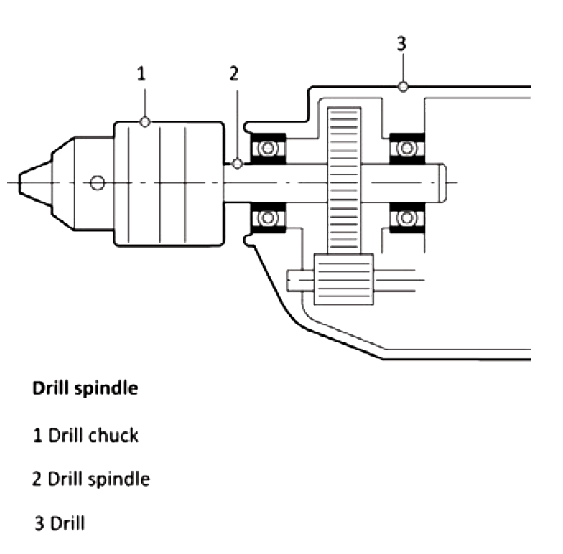
Drill chuck
A drill chuck is a clamping device attached to the end of the drill spindle which holds the application tool (drill bit). The purpose of the drill chuck is to ensure a non-positive, friction-locked connection between the application tool and the drill. Chucks are available in two distinct types:
- Keyed chuck – a chuck with a toothed wheel rim. It is opened and closed using a chuck key.
- Keyless chuck – a chuck which can be tightened without using a chuck key; usually by hand.
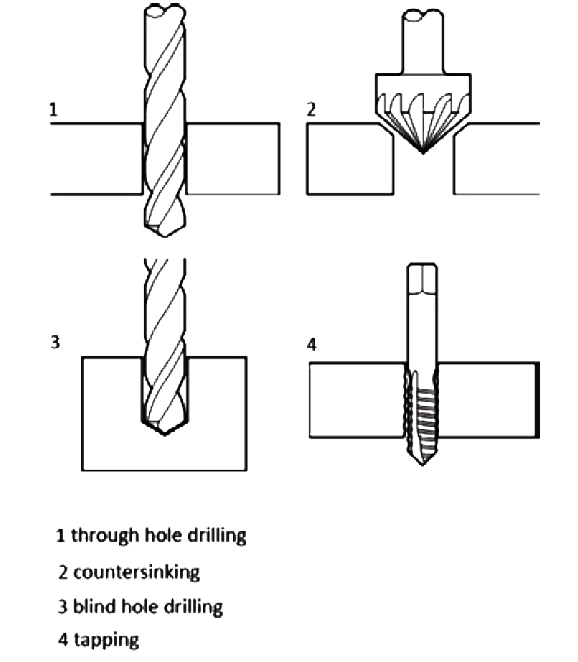
Drilling
Drilling is a term describing the process by which through holes or blind holes are produced and their follow-up treatment like countersinking or tapping.
Drilling progress
The drilling progress depends on a number of factors, among them motor power, operator pressure, material type, type and shape of the accessories and drilling speed.
Drill spindle
Output shaft of a drill. The drill chuck is mounted on it.
Dust extraction
Device for the collection and removal of dust and shavings produced during tool operation.
Ergonomics
Science of the user-related design of working tools and equipment. The goal of ergonomic design is to adapt a tool to human requirements, and not vice-versa. An uncomfortable power tool in use would be inefficient and even harmful to the user.
Fastening (fixing) technology
Fastening technology is the generic term for all manners of drilling and fastening operations in the civil and engineering and construction industries. Different types of drills or hammers with or without dust extraction are used for the installation of dowels, self-drilling anchors, steel-expansion anchors, heavy-duty anchors and adhesive anchors.
Impact rate
Number of impacts per unit of time in case of impact drills and hammers.
Industrial power tools
Power tools designed for application by professional tradesmen.
Lithium-ion battery
Rechargeable battery with electrodes on the basis of lithium compounds. Known for its high cell voltage and low self-discharge.
Nibbler
Handheld punching tool designed for the cutting and processing of thin metal plate.
On-off switch
Most important switch in an electric appliance. Connects and disconnects the appliance to/from the power supply.
Operating instructions
Description belonging to all technical appliances in which the user is informed about the safe handling of the appliance by suitable instructions in written and pictorial form.
Overload clutch
Clutch disconnecting or reducing the line of force in case of an overload condition. (See clutch)
Rotary hammer
Tool with combined rotary/percussive motion of the application tool designed for the production of fixing holes in stone-based materials.
Safety release clutch
In case of jamming a safety clutch disconnects the driving mechanism from the output shaft of a machine tool.
SDS
Acronym describing a tool-free clamping system from BOSCH. Abbreviation of the term “Special Direct System”.
Speed control
Controls the rotational speed of a motor by single or continuous modification. In contrast to speed regulation, speed control does not react automatically to changing loads or for drilling or cutting into different materials.
Torque
The torque or rotary force of a power tool is the maximum attainable torque for electric screwdrivers and impact wrenches and cordless screwdrivers.
Power Tool Safety
Safety is generally defined as the protection of individuals against dangers to their health, life and property. Since the use of all power tools generally bears some kind of risk, it is first of all the manufacturer who has to make sure that the appliance produced by him conforms to the valid safety requirements at the time of manufacturer and furthermore provides the utmost user safety which can be realised by current technical means. The user, on the other hand, is responsible for his operation of the appliance in work areas and with the working methods recommended by the manufacturer and for his adherence to valid safety regulations and provisions for the prevention of accidents. The safety of a power tool can be categorised into:
- Product safety – The term product safety relates to the functional safety in a technical sense and means that the product does not endanger users, other persons or property if used as directed.
- Active safety measures – Active safety measures are all those actions which the user performs actively by appropriate handling of the tool in order to carry out the working task at hand.
- Passive safety measures – Passive safety measures protect the user against hazards inevitably associated with the working task and which cannot be avoided. As a rule these include dust and splinters, and also noise.
Operating safety
The styling of an appliance is the most important factor when we are talking about ‘operating safety’ or ‘safe handling’. The styling of a machine can therefore be seen as the point of contact between the objective machine functions and the subjective person of the machine operator.
Power tools have areas for gripping where the user holds the machine, guides it and applies the feeding power. Many operating tasks are attributed to the hands. These tasks include holding, guiding, pushing, and gear shifting. All this must be done without interrupting work, without changing the grip and without premature fatigue. The ergonomic and therefore safety-relevant focus of a machine must therefore be placed on the areas of gripping. The human hand not only has to hold the power tool, it also must be able to guide it. This is especially apparent in difficult working positions. Safe working requires that the machine can be easily switched on and off in any working position. The finger or fingers should find the switch ‘blindly’ without having to search for it. Therefore switches have to be located in prominent positions where they can be quickly found and operated even with gloves.
Operating instructions
Operating instructions are the best known way to convey operating information from the manufacturer to the user. These instructions should therefore never be ignored. The contents of operating instructions have been carefully structured and formulated by power tool manufactures for the benefit of users and available in various languages.
Safety instructions
Special safety instructions are included with the operating instructions whenever this is required and they deserve special attention and continual awareness.
Workplace safety
A safe workplace or workstation is the best pre- condition for accident-free working. The following criteria are important for workplace safety:
Orderliness
Orderly workstations are clearly arranged and therefore safer. Tools and materials are easy to find. The presumed time loss through cleaning up is easily compensated by faster and safer working.
Electric connections
The use of power tools requires the installation of a sufficient number of electric connections (power points) to avoid having to use extension cords which can become dangerous trip wires. One or several emergency stop switches are very important for power tools used in stationary operation.
Lighting
Precise and safe working is only possible if there is light available in sufficient strength. The choice and arrangement of the lighting fixtures has to take possible shadows or blinding effects into account which can be caused by the work-piece or the machines used for processing. If two or more lighting fixtures with fluorescent lamps are used, they should be connected to different phases of the AC mains. This helps to avoid stroboscopic effects through flickering light which make the application tool appear to stand still at certain speeds.
Precise and safe working is only possible if there is light available in sufficient strength. The choice and arrangement of the lighting fixtures has to take possible shadows or blinding effects into account which can be caused by the work-piece or the machines used for processing. If two or more lighting fixtures with fluorescent lamps are used, they should be connected to different phases of the AC mains. This helps to avoid stroboscopic effects through flickering light which make the application tool appear to stand still at certain speeds.
Fire protection
Fires can be started in many ways through flying sparks (e.g. during the grinding of metal) and can remain unnoticed at first. The best fire prevention is still a clean workshop, an orderly hobby room and thorough preparation of the job at hand, like the erection of protective screens.
Tool related safety measures
Tool-related safety measures include all those precautions typical for a specific tool type (e. g. chainsaws, routers, etc.) which are required in addition to general safety measures. Additional information about tool-related safety measures can be found below under power tools and accessories.
Dust extraction
The removal rate of modern power tools is rather high and large quantities of dust and chips are produced per unit of time. Depending on the processed material, these dusts can be toxic and/or carcinogenic. In general, one can assume that any kind of dust can be potentially toxic if there is a sufficient quantity of it. The finer the dust, the more aggressive are its effects. The protection through dust extraction is particularly strong if the dust is removed by suction straight from its point of origin. Orderliness and cleanliness at the workplace are a positive side effect of dust extraction. Tools are protected against dirt, the visibility is maintained and the risk of accidents less. A further advantage of proper dust extraction is that the usual tiresome (and costly) clean up after work is reduced to a bare minimum.
Power tool protective wear and guards
Eye protection
The eye protection is necessary to protect the eyes of the wearer from the effects of his work. These effects include dust, chips or splinters during chip-producing operations, brightness or infrared radiation during welding and brazing operations or during application of laser tools of laser class III or higher. Suitable as eye protection are:
- safety goggles and visors against dust and particles
- safety goggles and shields with safelight lenses against welding flames and electric arcs
- special glasses against laser beams

Breathing protection
Breathing protection protects the respiratory organs of the worker against, dust, chips and splinters caused during chip-producing operations as well as chemical vapours and decomposition products e.g. in case of welding and brazing processes or the processing of products containing solvents. The protective products in question range from simple halfmasks to fully closed systems. Breathing protection devices are categorised in accordance with their degree of protection and are subject to standardisation. Their specific application is obligatory.

Hearing protection
The effects of loud noise on human ears are not spontaneous, but rather long-term. Their health risks are therefore not perceived directly. This makes the after-effects of noise particularly heinous and dangerous. This is made worse by the fact that damage to the sensitive hearing organs tends to accumulate and is irreversible. This means that the hearing damage through excessive noise adds up through the years and cannot be repaired. While the machine noise can be kept to a minimum by constructive measures, the actual working noise cannot and therefore wearing some kind of hearing protection to suit the application is always recommended.

Hand protection
Hands are the most complex, sensible and versatile “working tools” of human beings. However, at the same time they are the most vulnerable parts of the body. Hands must therefore be protected against:
- mechanical hazards
- thermal influences
- chemical influences
Hands are best protected by gloves whose material, design and quality should ideally provide optimum safety without obstructing the function of the hands. Their types and materials are selected to suit the required protection purpose. However, it has to be noted that safety gloves cannot be worn during work involving circulating tools since the glove material could catch on and be pulled into the rotating machine parts.

Protective clothing
Protective clothing is a collective term describing suitable clothing adapted to the job at hand. Its purpose is to protect individuals as comfortably as possible against the effects of his or her work (and weather influences). Protective clothing includes, for example:
- aprons
- jackets
- trousers
- overalls
- shoes
- helmets
The potential for variation and combination is exceptionally high. For each job and every trade one can obtain suitable protective clothing today.
Functions and applications of power tools
The function of power tools is based on mechanical functions which can also be performed by hand:
- rotation
- oscillation
- stroke motion
In addition, the application of heat is also possible. The combination of these basic functions makes power tools capable of performing nearly all working tasks.
Rotation
Rotation is the most frequently used function. Typical applications for rotation are:
- drilling
- screwdriving
- sanding and grinding
- cutting
- sawing
- routing
- planning
Oscillation
Oscillatory motion is mainly used for surface treatment (sanding) or for compacting and multi-cutters.
Stroke motion
Like rotation, stroke motion is applied in many different ways. Typical applications include:
- sawing
- shearing
- nibbling
- scraping
Hammer motion is a special form of stroke motion. Impact executed by gears and with great force in one direction.
Hammer motion is used in:
Hammer motion is used in:
- rotary hammers
- needle de-scalers
- tackers
- nail guns
Heating
The heat quantities developed by power tools are enough to shape thermoplastic materials and to melt low-melting metals. The heat can be transferred by hot air or contact.
Typical devices include:
- heat guns
- soldering irons
- soldering guns
- glue guns
Note: Power tools are used by different groups of users.
Users can be grouped into three categories:
- Do-it-yourselfers
- tradesmen
- industry
Since each one of these groups of user’s places different demands on power tools, their design has been adapted to suit these three kinds. In this publication we only discuss industrial power tools.
Power Tool Categories
Drilling
Drilling is a chip-forming process used to make bores (drilled holes) in workpieces. Drilled holes are cylindrical. Holes drilled through the workpiece are called open bores or through-holes. Bores which do not reach the other end of the workpiece are called blind holes. Bores with a depth of more than 5 times the drill bit diameter are called deep holes.
A distinction is made between:
- drilling in solid material
- boring (broaching a predrilled hole) and variants related to drilling
- countersinking
The most important criteria for drilling holes are the selection of:
- suitable drill bits
- the appropriate cutting speed (rotational speed)
- the required feeding power (applied pressure)
Power tools used for drilling
The rotational speed and torque which the application tool, i.e. the drill bit requires, has to be delivered by the power tool. The suitable tool has to be selected from the great variety of types and models. The following drill types are available for drilling:
- Rotary drills
- Impact drills
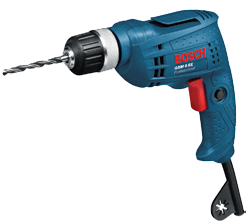
Rotary drills
Rotary drills are basically drills that just turn or rotate for straight-forward drilling. These types of drills are used for high-precision or accurate drilling; for example, in metal work for rivets or in joinery and cabinetry when fitting hinges. These drills ensure excellent concentricity where the power output and rotational speed of the drill should correspond to the typical working task.
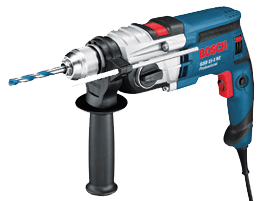
Impact drills
Impact drills have both the functions of rotation-only and the rotation with impact function. These functions are switchable. Their speed range is generally higher than that of rotary drills because it is adapted to drilling in wood, mortar and stone. The impact force is relatively small and primarily dependent on manual pressure whereby the user is exposed to rather strong vibrations. Therefore one should only use impact drills if the varied practical application requires a universal, all-purpose type of tool.
Drilling work safety
Users of drills are put at risk when restoring torques occur. These restoring torques occur during high torque delivery of the drill and through increasing drill bit friction in the drilled hole in case of:
- deep holes
- large-diameter holes
- blocking of the drill bit in the drilled hole or when the drill bit comes out of the workpiece.
The sudden blocking or jamming of the drill bit and with it the power tool can generate very high and dangerous restoring torques. Dangerous restoring torques can be avoided by:
- Always use perfectly ground and sharp drill bits.
- Support chip clearance during the drilling of deep holes by regularly withdrawing the bit from the hole. This reduces drill bit friction and the risk of jamming.
- Select the correct speed for the drilling of large-diameter holes and clamp the workpiece tightly.
- Damaged or worn out drill bits produce considerably more friction and have an increased tendency for jamming or blocking.
- Always pilot drill in metal for holes in excess of 6 mm. This reduces the required forward operator pressure. This is especially recommended for drilling in thin sheets of metal since the forward pressure can be controlled more easily when the drill bit emerges on the other side of the workpiece which helps to avoid the hooking and jamming of the cutting edge. As rule of thumb you should choose a drill bit for pilot drilling whose diameter corresponds to the width of the chisel edge on the large drill bit.
Most restoring torques can also be compensated by secure machine guidance. This means holding and guiding the drill with both hands. Drills designed for use with an auxiliary handle should be used with the auxiliary handle.
Chiselling
Depending on the material to be processed, chiselling is understood to be the cutting, chipping or demolishing of materials by percussive action. The percussive forces required for chiselling cannot be generated by the simple serrated striking mechanisms used in hammer drills. Consequently, hammer striking mechanisms have to be used in this case.
Power tools used for chiselling
Typical power tools for chiselling include:
- Rotary hammers
- Demolition hammers
Rotary hammers
Rotary hammers, have a rotation stop feature which allows you to switch off the rotation of the application tool. In this mode they can perform the same tasks as chipping or demolition hammers and are used for light chipping and breaking applications. Modern rotary hammers are equipped with electronically adjustable speed and hammer force. They come with a tool holder which can be locked in varying positions with the tool-free clamping systems SDS-plus, SDS-top or SDS-max.
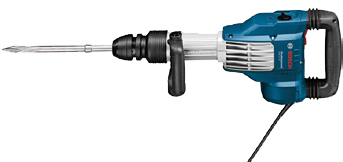
Demolition hammers
Demolition hammers in the weight classes from 12…30 kg are also known as chipping hammers or paving breakers. Their form is quite different from smaller weight classes and they are usually applied at an angle or vertically. Their removal rates are much greater and are therefore used for specialist chipping and breaking applications.
Chiselling work safety
Work safety during chiselling consists mainly of passive measures to protect the tool operator and bystanders. The removal of stock from stone materials involves sharp and unpredictable splinters.
Eyes and head must therefore be protected by safety goggles and a helmet. The operational noise is considerable and cannot be reduced due to the nature of the work which means that hearing protection is also a must. Eyes and hands need to be protected.
Cordless
Within the last decade cordless power tools have reached a market share of over 25 percent of all power tools sold world-wide. The reasons for this are their easy handling, convenience and their performance capacity which has increased substantially in recent years with the continuous improvement in battery technology.
Battery technology
The energy content of batteries is the product of voltage (V) and capacity (Ah): volt x ampere-hours = watt-hours. The usual voltages and capacities for cordless power tools yield indicative energy contents as shown in the table.
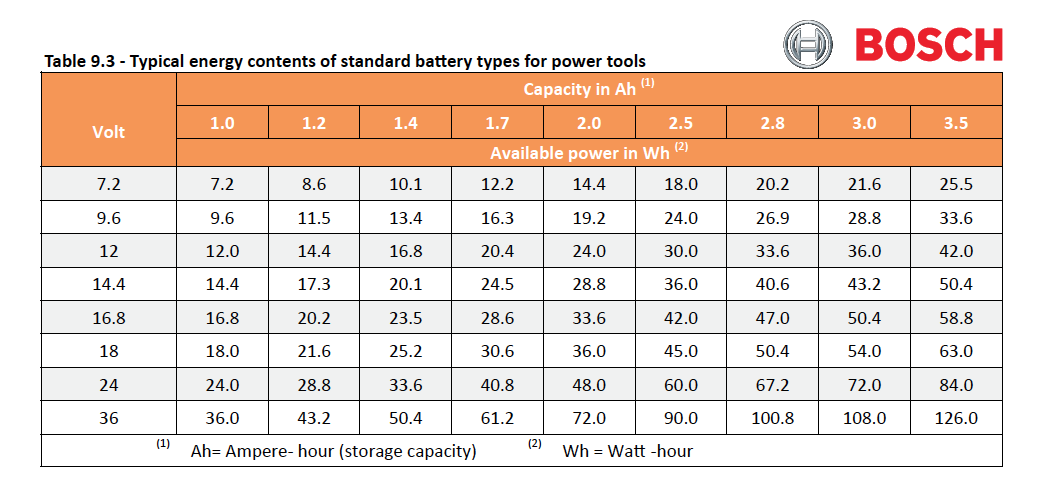
Today´s lithium-ion batteries represent the state of the art in the development of rechargeable batteries. With 90 to 110 Wh/kg, they have the highest energy density in relation to weight and volume in comparison to conventional rechargeable batteries such as NiCd (Nickelcadmium batteries) or NiMH (Nickel-metalhydride batteries). They are not affected by the memory effect and can therefore be charged up at any time without reducing their capacity. However, the charging process must be performed with utmost precision and is therefore controlled by special electronic components. They prevent an excessive current flow, control the charging and discharging characteristics and protect against overheating. Lithium-ion batteries are available in different sizes from small 3.6 volt to big 36 volt series; with the 10.8 and 18 volt series being the most popular being light and having unbeatable battery runtime.
Types of cordless power tools
The great variety of cordless power tools is still growing due to the development of yet more powerful rechargeable batteries. The most frequently used cordless power tools can be arranged according to the following main groups:
- for drilling and screwdriving
- for sawing
- for cutting
- for planing
- special tools
Cordless power tools for drilling and screwdriving Drilling and screwdriving are processes which require rather short time intervals of only a few seconds and a relatively low application of power. Technically speaking we are dealing with so-called intermittent periodic duty, i. e. work phases and breaks follow each-other, whereby the breaks correspond to the work phases or are even longer. The limited energy content of the battery allows you to accomplish a certain number of work cycles each one of which is by itself a complete work unit. This type of operation suits cordless power tools and is the reason why by far the largest number of cordless power tools is available for drilling and screwdriving.
Cordless power tools for sawing
Sawing is an operational process which can last from a few seconds to several minutes of continuous operating time with a high demand for power depending on the individual working situation; thus the type of operation has to be taken into account accordingly. Often the required working tasks cannot be fulfilled under extreme conditions since the battery is empty before the job is finished. Cordless saws should only be applied in situations where the use of a mains-operated tool is not possible or where the performance capacity of the cordless saw is sufficient for the working task.
Cordless power tools for metal cutting
The power demand of power tools for metal cutting is considerably smaller than that of sawing machines. In addition, cutting usually requires less time. Most battery-powered sheet metal shears and nibblers have enough power to generate a cutting performance comparable to that of mains-powered machines. However, if the thickness of the metal sheet exceeds 1.5 mm, the power demand increases dramatically and the suitability of using cordless would then need to be accessed to the situation.
Cordless power tools for planing
The chip-producing process in planning is a working task which usually requires as much power as sawing. The duty intervals during which the planing tool is in action also largely correspond to sawing. The actual power demand for planing depends on the following:
- chip thickness (cutting depth)
- feed rate
Although the work progress increases if the cutting depth and/or the feed rate are increased, the power consumption will also become higher. In order to make optimum use of the available battery power, whilst planing one has to make compromises with regard to work progress. The chip thickness and the feed rate have to be considerably reduced in comparison to mains-powered planers.
Cordless special tools
As is the case with all power tools, there are also special tools available in the cordless machine segment available for special uses and applications, like:
- cordless lamps
- multi tool
- inspection tools
- impact wrenches
Screwdriving
Professional screwdrivers are always single-purpose machines used to reach the best possible work results in the shortest possible time. Drills are only suitable for occasional screwdriving in the do-it-yourself sector. Cordless drill-drivers are an exception to this. Screwdriving can be categorised as follows:
- General Screwdriving – wood working etc.
- Roofing – self drilling and tek screws
- Dry walling
Once the screwdriving category is recognized, the fundamental difference lies in the speed and where the screwdriving conditions must be determined. There are basically two screwdriving conditions:
- soft screwdriving conditions
- hard screwdriving conditions
This rough distinction enables a preliminary decision on the screwdriving technique to be applied. Soft screwdriving conditions exist if a joining part is located directly under the screw head (or nut) and yields when the screw is turned in further after the screw head contacts the surface, and thereby the screw is pulled into the part to be joined. A typical example of soft screwdriving conditions is given when a screw is driven into wood: if more torque is applied after the screw head has come to rest on the surface, the screw will be pulled further into the wood. This means that the penetration depth has to be limited in soft screwdriving conditions.
Hard screwdriving conditions exist if a joining part is located directly under the screw head (or nut) and does not yield even if more torque is applied after the screw head contacts the surface. A typical example of hard screwdriving conditions is given when a screw is driven into a metal thread: if more torque is applied after the screw head has come to rest on the surface, the screw will not be pulled further into the metal. If the torque is high enough, the screw will be destroyed. That means that the tightening torque has to be limited in case of hard screwdriving conditions.
Power tools used for screw-driving
One can now proceed to choose the suitable screw-driving tool, where two basic methods are available:
- screw-driving with depth limitation
- screw-driving with torque limitation
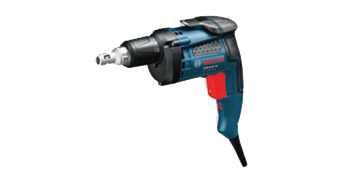
Screw-driving with depth limitation
So-called depth-stop screwdrivers are used for depth-limited screw-driving. A typical feature of this type of screwdriver is that the screwdriver shaft stops rotating in no-load operation and starts to turn only when contact pressure is applied. During depth-limited screw-driving the screw is screwed in at full torque until the head of the screw comes to rest on the material or alternatively, if countersunk head screws are used, it penetrates into the material until the screw head is flush to the surface. The screw-driving process is stopped when this point is reached.
Screw-driving with torque limitation
So-called dynamometric or torque screwdrivers are used for screw-driving with torque limitation. A typical feature of this type of screwdriver is that the maximum torque for any screw-driving case can be pre-set on the machine. When the screw or nut is driven in, the torque demand is initially very small and increases suddenly when the screw head (or nut face) reaches the workpiece. When the pre-set torque value is reached, the clutch disconnects the screwdriver shaft from the motor which keeps running at idling speed.
Screw-driving work safety
Some screwdriver applications involve extremely high torques. Dangerous restoring torques can occur if the wrong screw-driving tool is used for the job at hand. These restoring torques can occur very suddenly depending on the screw-driving conditions.
With worn out or unsuitable application tools (screwdriver bits, socket spanners) there is the risk of slipping off from the driven screw. The screw-driving process must therefore always be preceded by an analysis of the working task, the so-called screw-driving conditions, and the type of screw used for this purpose.
- Correct selection of the screwdriving tool.
- Correct adjustment of the screwdriving tool, e. g. setting the torque or the depth stop in accordance with the manufacturer’s recommendations.
- In case of cross-slotted screws a distinction has to be made between Phillips and Pozidriv. Their profiles are very similar and can be easily confused. Pozidriv bits will always slip out of Phillips screws and vice versa.
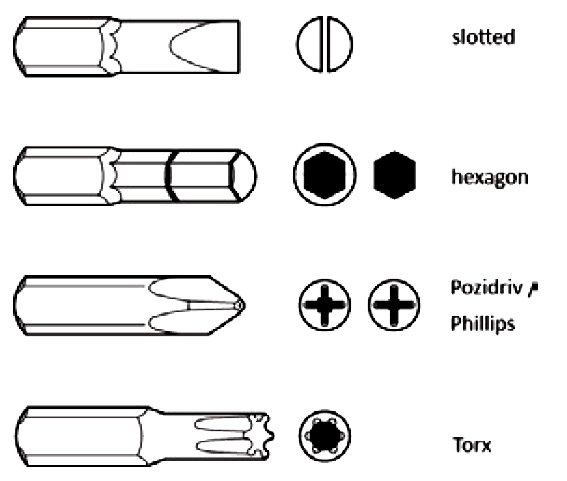
Figure 12.1 – Screwdriver bits
Most bits wear out eventually and no longer provide sufficient hold in the screw head. Injuries to the hand are possible if the bits slip of the screw. In case of socket spanners for impact wrenches only special high-quality socket spanners approved for this purpose may be used. 12-face sockets or cheap no-name products disintegrate after only a few applications and can be quite dangerous.
Sawing and cutting
Sawing, like drilling, is a very old working technique. Sawing is used to cut workpieces in two, to trim boards to length and to cut materials and components to size. Sawing is a chip-forming process. A material loss occurs during sawing in the form of chips. The gap cutting track which is produced during sawing is as wide as the cutting width of the saw blade. Depending on the working principle and type of saw, one can execute curved and straight cuts, or only straight cuts. The quality of the saw cut is dependent on the chosen saw blade, the sawing principle and the sawing experience of the user. Work progress is largely determined by the sawing principle and based on one of these three basic principles.
- stroke
- rotation
- circulation
While the term cutting is used to describe in depth grinding. The working principle is rotation. The grinding process is carried out by the edge, the circumference of the abrasive (cutting disc). The power tools used for this purpose are either angle grinders or abrasive cut-off machines. The working process resembles sawing with a circular or radial arm saw.
Wood
All kinds of wood can be sawn without problems; saw blades are available for all wood types. All types of saws are recommended. Sawing wood requires high cutting speeds. Soft wood can be cut at higher cutting speeds than hard wood.
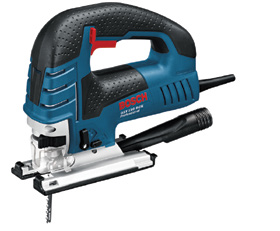
Jigsaw
Jigsaws are the most popular sawing tools. Mitre cuts are possible since the base plate can be tilted. Jigsaws are mainly used for smaller/shorter work and curve cuts in all materials. Of all the saws, they have the largest selection of universal and special saw blades.
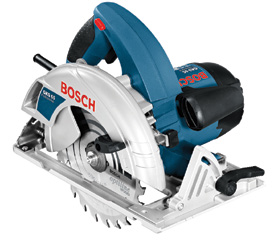
Circular saw
Hand-held circular saws are the most important power tools for woodworking. The majority of hand-held circular saws have cutting depths of 40 to 85 mm. Their power consumption rating lies between 350 and 1600 watt. Cutting depths of up to 100 mm are used for carpenter’s work although the handling of such large hand-held circular saws can be critical since their saw blades can produce very high restoring torques when they get stuck in the material.
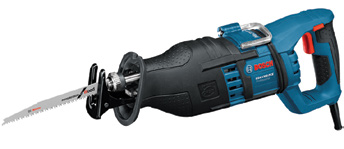
Sabre saw
Sabre saws are held by a D-handle on the back and by its spindle neck or an auxiliary handle. High-quality reciprocating saws come with internal counterbalance and active vibration damping for low-fatigue working and the pendulum stroke allows for fast sawing progress. The machines have power consumption ratings of 1100 to 1500 watt, their cutting depth depends on the length of the applied saw blade. Orbital action can be added to improve the saw penetration. Cutting depths of up to 250 mm are possible in structural tubing. Typical applications of reciprocating saws include sanitary installations and structural steel engineering.
Multi-cutters
Slim grip circumference for more comfortable working in] precision applications, with SDS system for fast, tool-free changing of a multitude of accessories from grout and mortar remover to cutting saw blades to sanding plates.
Metal
Hand-held electric saws can be used to cut ferrous and nonferrous metals. Here he saw type determines its suitability. Stroke-type saws are highly suitable, with the exception of reciprocating tandem saws. The use of stationary equipment (e.g. angle grinder in cut-off stand) leads to good and dimensionally accurate results. The service life of the disc limits the cutting depth since the disc diameter diminishes with increasing wear. The peripheral velocity (cutting speed) is also inevitably reduced and with it the abrasive efficiency and the work progress.
Angle-Grinder
In case of angle grinders the motor and the abrasive tool are arranged at an angle of 90° (at right angles) to each-other. This arrangement allows the safe handling of the reaction forces occurring during rotary brushing even when industrial tools are used. The angular gearing reduces the motor speed to suit the applied sanding tool diameter. Common are speeds between 6500 to 11500 rpm. Special grinders have lower speeds. Angle grinders are recommended for metalwork and they are one of the tools most frequently used for this type of work.
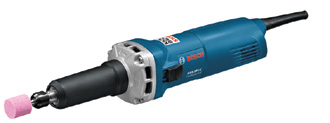
Straight Grinder
Straight grinders are used with a variety of accessories which are also known as rotating files. They are guided manually. Their application requires very high rotational speeds. Collet chucks which require extraordinary concentricity are used as tool fittings. Straight grinders with direct drive are used for general applications. In this case the collet chuck is mounted directly on the extended motor shaft. Straight grinders with separate spindle bearings are used for accurate work. Their concentricity is even higher. The calibrated spindle collar allows the stationary use of these straight grinders (e.g. in a lathe). Metal Jigsaw (Same machine for wood using a different blade)
Shearing and nibbling
Shearing and nibbling are methods to cut and separate sheet metal. These operations are based on the principles of shearing or nibbling; the two working principles differ with respect to their cutting efficiency, the required power and the range of possible applications. The shearing principle – Shearing means that a movable upper blade is guided past a stationary lower blade in a stroke motion. The material is pinched between the blades with so much shearing stress that the material yields (pinch roll crack). In this fashion the material is sheared off.
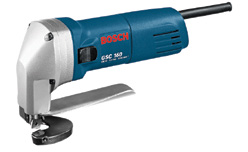
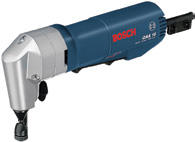
Electric shears are mainly sheet metal shears exclusively designed for metalwork. The nibbling principle – Nibbling means that a movable punch is pushed through a stationary die in a stroke motion. High shearing stress is exerted on the material in between punch and die in such a fashion that the section of material below the punch is sheared off and pushed through the die. The entire force of the punch must be compensated by the die holder. Nibbling is therefore a series of punching operations.
Masonry and concrete
Masonry or stone materials can only be “sawn” or “cut” in the true sense of the word if the material is considerably “softer” than the cutter material of the application tool. In all other cases the material has to be severed by plunge-cut grinding. The “stone saws” available for this purpose are special cut-off grinders with diamond-tipped cutting discs – (not discussed in this book).
Angle grinder
In the case of angle grinders for cutting masonry or concrete the abrasive being used for the cutting process is very important and only masonry blades or cutting discs should be used as they are manufactured specifically for this purpose where suitable carrier and bonding materials are used. One can work with very high rotational speeds and the resulting high cutting speeds ensure rapid work progress and good dust transport.

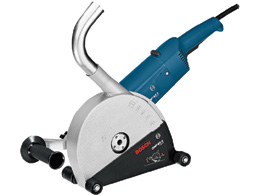
Wall chasers
Wall chasers are cut-off grinders designed for cutting deep grooves in masonry, concrete and stone. They are specially constructed for this purpose and cannot be used for general grinding work. Wall chasers are equipped with a footplate integrated into the machine construction, a dust extraction adapter and depth stops. Diamond-tipped cut-off wheels with diameters up to 300 mm are used as application tools. The power consumption of these usually electronically regulated machines goes up to approx. 2500 watt. Dust extraction is mandatory due to the extreme dust volume produced during cutting.
Sawing work safety
In the case of power tools used for sawing there is mainly a risk of injury through contact with the saw blade, both during work and while the tool is at rest. Saws and especially circular saws are reckoned among the most powerful machine tools. As a result there is a risk of back kicking and operating errors. As a matter of principle, only sharp saw blades in faultless condition may be used. The saw blades must be suitable for the saw they are used in and approved for the intended purpose. Blunt or damaged saw blades tend to jam and block the machine. Injuries through contact with the saw blade can be avoided by the following measures:
- never remove, force to remain open or otherwise manipulate protective guards or safety features.
- always operate the machine with both hands while holding it by the intended gripping areas.
The saw must be guided safely and firmly during operation. The feeding power has to be chosen in such a fashion that the saw blade is neither jammed nor blocked. Dangerous kick-back torques could be the result. Power tools for sawing can be subdivided into the following categories:
- stroke-type saws (reciprocating sabre saws, power hand saws, jigsaws)
- rotary saws (circular saws)
The physical characteristics of these different saw types must be taken into account during their application and the operating instructions carefully read and practiced.
Grinders work safety
The high peripheral speeds (rotational speed) of the applied abrasive when using straight grinders or angle grinders are their common feature. If the abrasive disintegrates or breaks apart, the fragments are flung away with high energy and can cause severe accidents. Also, there is a great risk of injury if the rotating abrasive is contacted. Angle grinders remove material quickly and generate a lot of dust while doing so and have powerful motors that produce high restoring torques during start-up./p>The most commonly tool used in construction is the angle grinder; angle grinders use disc shaped abrasive tools (grinding discs) with a maximum peripheral velocity of 80 m/s. This means that various maximum admissible speeds apply to different disc diameters. The correlation is as follows:
- 100…125 mm = 11.000 RPM
- 150 mm = 9.300 RPM
- 80 mm = 8.500 RPM
- 230 mm = 6.500 RPM
- 300 mm = 5.000 RPM
The most important attachment to any angle grinder is the safety guard and they should NEVER be used without a safety guard properly fitted. The size of the safety guard is adapted to the respective disc diameter and speed of the angle grinder. THE HOW TO OF BUILDING 140 The condition of the grinding discs themselves always has to be checked. Discs with larger notches or cracks must no longer be used. Likewise discs that were exposed to moisture or have become oily or grease-covered may no longer be used.
Important Note: Angle grinders are reckoned among the most powerful electric power tools. They should always be held and guided with both hands. This also applies expressly to small angle grinders which in the past have often been referred to as “one-handed angle grinders”. Today these little machines are so powerful that they can no longer be safely controlled by only one hand. It is recommended to work with gloves and hearing protection and the wearing of safety goggles is mandatory.
Routers
The process of routing is a chip-forming type of surface treatment. Typical applications are the machining of edges and the cutting of grooves. Routing produces a material loss in the shape of chips. Hand-held routing machines are available for different application purposes and with different power consumption ratings. Common versions are:
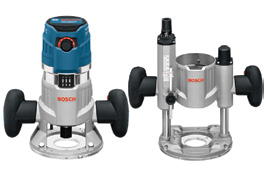
- Fixed base machines
- Palm or laminate trimmers
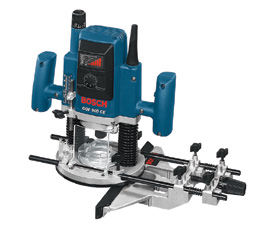
- Plunge base routers
Multi-functional/fixed base routers
Multi-functional machines consist of a bar-shaped motor which can also be used by itself as a straight grinder. Mounted on a fixed base and commonly used for template and pattern routing.
Palm router
Palm routers are smaller versions of fixed based based routers.

Plunge base routers
The actual routing machines are single-purpose machines which were designed and constructed for general use. They have a performance range of approx.900 to 2000 watt. Their usual speed range is from approx. 12000 to 24000 rpm.
Router work safety
Routers, on account of their working principle, operate on very high rotational speeds. Their application tools (router bits) have very sharp cutting edges. There is a risk of injury both while the tool is running and during standstill. Only sharp router bits in faultless condition may be used for working with a routing machine. The router bits must be suitable for the routing machine they are used in and approved for the intended purpose. Blunt or damaged router bits can produce powerful vibrations, machine kick-back and even bit breakage. Injuries through contact with the router bit can be avoided by the following measures:
- Always operate the machine with both hands while holding it by the intended gripping areas
- Remove the router bit from the routing machine after the work is finished.
The feed direction during the trimming of edges must always be the opposite of the rotational direction of the router bit (upcut or counter-rotational milling). It is very difficult to guide the machine safely while working in line with the direction of rotation (downcut milling) especially in case a larger chip depth is chosen.
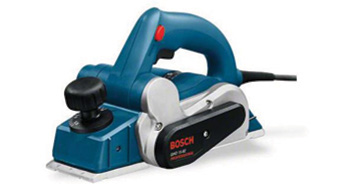
Planers
Planing is a chip-forming type of surface treatment where rotation is the working principle which produces a material loss in the shape of chips. Typical applications are for smoothing or surface planing, but also for the structuring of surfaces. In principle, hand-held electric planers consist of a horizontal drive motor positioned at 90° angle to the operating direction. The motor uses a belt drive to turn the cutter shaft (ram head) where one or several blades (planing knives) are attached at the periphery. Electric planers are classified by their planing width and the maximum shaving size. The most common planer width is 82 mm. Planers with a width of 100 mm or more are called extra-wide planers. The maximum shaving size depends on the motor power of the planer. Motor capacities of 550 to 850 watt and maximum shaving sizes of 1.5 to 4.0 mm are usual. Planers with constant electronic maintain the motor speed under load which is a great advantage. In addition to speeding up work progress this also improves the surface quality.
Planer work safety
The blade drum (cutter shaft) of the electric planer rotates at very high speed. The centrifugal mass makes the blade drum run on for some time after switch-off. Until it has come to a complete stand-still it must not be contacted by the operator or come into contact with other objects like, for example, the workbench. Therefore the planer should not be laid to rest before the cutter shaft has stopped moving. It is best to use a planer equipped with a parking device (“parking shoe”). This device prevents the cutter shaft from coming into contact with the workbench. Nevertheless, one has to make sure that the resting area is free of obstacles.
Sanding
Sanding is a type of surface treatment especially used to improve the surface quality. The actual application tools used during sanding are abrasive grains which use their edges to grind the material to dust. Depending on the principle and type of the applied sanding tool one can process even, concave or both surface types. In general, the term sanding is used to describe surface work (surface sanding). If the sanding or grinding operation penetrates into the surface, one speaks of abrasive cutting or cut-off grinding. The abrasive which carries out the actual sanding process (the abrasive grain) must execute a motion relative to the workpiece surface. This motion can be based on one of the following three basic principles:
Oscillation
Finishing sanders usually apply the abrasive in a circular back-and-forth motion [see figure below]. Because of the low relative speed of the abrasive grain, the stock removal is limited and the dust transportation is bad which is why in comparison to other sanding methods only relatively low removal rates are possible. The sanding plate is rigid. This is good for very smooth surfaces of high quality; however, in case of concave surfaces or on edges there is a risk of oversanding.

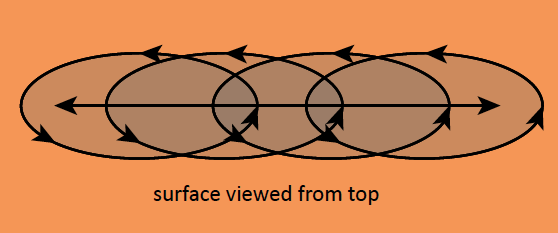
Oscillation and rotation
Eccentric or random orbit sanders usually apply the abrasive in an orbital back-and-forth motion. Both motions are superimposed and result in a complex sanding pattern capable of producing an excellent surface quality [see figure below]. Rotation makes the abrasive grain move at very high relative speed to the workpiece surface which ensures good dust transportation and a high removal rate. In contrast to finishing sanders, random orbit sanders are equipped with flexible bearings which allow the sanding of concave surfaces.
Circulation
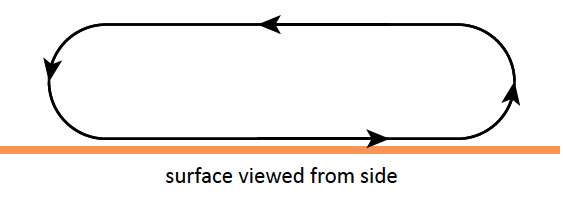
This type of sander has the abrasive attached to the surface of an endless belt (belt sander). This type of tool is recommended for smooth surfaces, however in case of concave surfaces or along edges there is a risk of oversanding. Circulating belt sanders operate with high belt speeds and ensure rapid work progress. The sanding direction is a steady longitudinal motion [see figure below] which can have a positive effect, depending on the sanding task and its processed material at hand. These principles are represented in a number of different sanding power tools.
Orbital sander
The working principle of an orbital sander is based on a sanding pad which oscillates back and forth. It is flexibly attached to the machine housing and driven through an eccentric. Orbital sanders come with a rectangular sanding pad whose elasticity must be low to make sure that the vibrations required for the sanding process can be transferred nearly loss-free onto the abrasive sheet. Used for finishing, light stock removal and light sanding.

Random – (Eccentric)
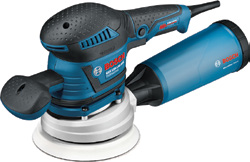
Random-orbit sanders/polishers produce the quality finish of orbital sanders, however, with a considerably higher removal rate. Their round sanding pad with varying hardness is suitable for working on concave or convex surfaces. They can be used for fine a rough work, offering high stock removal and can be used on big flat surfaces and irregular surfaces.
Belt
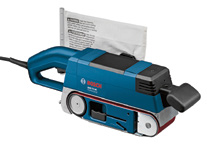
The motion of the sanding belt runs in linear direction over the sanding plate of the belt sander. It is therefore the only sanding instrument which allows linear sanding. This is an advantage when working on materials with a preferred fibre direction since it allows sanding with the grain of the wood. Excellent stock removal rates are possible because of the high belt speed. Belt sanders are therefore suitable for working on large surfaces, although they offer only a rough finish.
Sanding work safety
Sanders are based on various working principles. Accordingly, the safety measures required for different sanding tools are varied and have to be regarded separately as discussed below:
Random-orbit sanders
Random-orbit sanders work with an eccentric orbital motion with rotary motion superposed on it. Their capacity is rather low and so is their abrasive mass. Except for the generated sanding dust there is hardly any hazard and a safety guard is not required.
Finishing sanders
Finishing and delta sanders work with an eccentric orbital motion of low amplitude and except for the sanding dust there is hardly any hazard from these tools.
Belt sanders
Belt sanders have a relatively large sanding area over which the sanding belt travels at high speed. Their high motor power coupled with the strong speed reduction produce a high pulling torque on the rotating sanding area which makes the belt sander want to shoot forward at high speed if too much operator pressure is applied. A belt sander must therefore always be operated with both hands. The proper handling of a belt sander requires some practice. In order to reduce or avoid the danger caused by spontaneous forward acceleration, the belt sander must be placed carefully on-to the workpiece surface, held safely in place, ensuring not to press down too hard on the workpiece surface before starting the motor. Sanding dust must be vacuumed off at all times. This can be done by internal or external dust extraction devices. Hearing protection should be worn to muffle the high-frequency noise produced by the sanding belt.
Polishing
Polishers are special versions of angle grinders for the super finishing of surfaces. Since the surfaces to be polished can be metal, but also heat-sensitive paintwork, polishers are equipped with adjustable speeds of between approx. 700 to 3000 rpm. Their application tools include felt, linen and lamb’s wool discs; the abrasive agent is applied as polishing paste or wax.
Heat gun and Glue guns
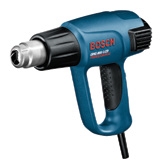
Heat guns are a tool designed for the generation of a stream of hot air with temperatures of between 50 to 550°C and used for a number of different applications; for example, paint stripping or heating up of plastic pipes to bend or join. While glue guns are tools designed for the processing of hotmelt adhesive sticks for bonding or gluing applications; for example attaching a timber component to a wall.
Dust Extraction
The removal rate of modern power tools is rather high and large quantities of dust and chips are produced per unit of time. If debris and dust are removed by suction directly at their place of origin, the efficiency of the power tool is restored and maintained since clogging-up and build-up of dirt are prevented right from the start. Furthermore, the health hazards to the respiratory system caused by dusts of certain work materials have been known for a long time and where the proper use of dust extraction can minimize the hazard. Finally orderliness and cleanliness at the work-place are also a positive consequence of dust extraction.
The devices used for dust extraction can be divided into three categories
- vacuum cleaner
- integrated dust extraction
- dust extraction accessories
The first two categories can be regarded as active dust extraction devices. Active dust extraction through the power tool it-self is usually accomplished by a combination of dust extraction accessories and a vacuum cleaner or by integrated (built-in) dust extraction.
Stationary/bench-top power tools
The term “stationary power tools” (also known as: Benchtop tools) covers all power tools which are:
- designed for stationary operation
- transportable
Due to their stationary operating mode they are capable of more accurate working results in comparison to hand-held tools. Their compact dimensions also allow a higher degree of mobility.
Definition
Stationary power tools are machine tools, which are not held by the operator’s hand during application; instead they are mounted on a solid base like a sub- frame or a work bench. In addition, they can also be used for mobile application. They are designed as single-purpose tools. Their performance capacity, precision and technical features are optimised to fulfil their intended purpose during application. The recommendations and regulations for stationary machines (machine tools) also apply to some extent to the operation of stationary power tools.
Fields of application
Stationary power tools are used in workshops and on building sites. In the workshop they supplement permanently installed machines in small-scale production and single-part production jobs. In small-scale machine shop practice they are a reasonably priced alternative to permanently installed stationary machines. On building sites stationary power tools have the advantage of delivering higher precision and faster work progress in comparison to manually operated tools. Especially for repeatedly required operations they are the more economical solution.
Tool types
Sawing and cutting operations are probably the most frequent applications in the professional trade sector. Within these working tasks there are special applications, for which the following stationary power tools are optimised:
- cross-cut and mitre saws
- panel saws
- cut-off grinders
- circular bench saw

Accessories
Outline
Power tools require accessories for the fulfilment of their specific working tasks and the accessories discussed here are the usual application tools such as drill bits, abrasives and screwdriver bits which can be used for many purposes and different applications.
Terminology
Abrasive
Generic term for application tools and materials available in various forms such as sandpaper, grinding wheels, or discs used for sanding/grinding.
Backing pad
Flexible, round grinding pad used to support fibre sanding sheets on angle grinders.
Bit
Short term describing small application tools such as screwdriver bits.
Brad point
Drill bits equipped with an advance feed thread. The brad point pulls the bit into the material almost by itself and the operator has to supply little feeding power.
Core cutter
Pipe-shaped drilling tool with toothed cutting edge at the front side. Instead of the entire hole diameter only a ringshaped gap is drilled to save energy.
Countersinking bit
Drilling tool with short, tapered tool point. Countersinking bits are used to shape drilled holes to accept countersunk screws or to deburr drilled holes.
Cutting disc
Grinding disc of reduced width for separating or depth cutting.
Die
An internally threaded nut (tool) for cutting male threads on bars or pipes.
Diamond blade or saw
A circular saw or blade with abrasive industrial diamonds set round its rim (periphery).
Drill bit
Application tool designed for the production of drilled holes; usually a twist drill – drill bits comes in various forms and sizes.
Fine sanding
Sanding operation during the final stage of surface treatment. The grit of the abrasive is usually higher than 240.
Fixing, plug
Elements designed for the connection of building components to stone-based materials.
Flat chisel
Chisel with flat cutting edge
Forstner bit
A special drill for drilling larger diameter holes in wood.
Glue sticks
Hot-melt adhesive pressed into sticks for use in glue guns.
Hard metals
Metal alloys partly made of high-melting (refractory) metals such as tungsten, cobalt, tantalum and different carbides.
Holesaw
Cup-shaped drilling tool with saw teeth at the front edge. Instead of the entire hole diameter only a ring-shaped gap is sawed to save energy.
Round-shank drill bit
Drill bit with round, straight shank.
Screwdriver bit
Application tool for screwdrivers, for example slotted or Pozidriv.
SDS
Abbreviation of the term “Special Direct System“- a tool-free clamping system.
Self-drilling screw
Screw with drill bit-like sharpened and hardened tip. Drills its own through-hole in plate and sheet materials
Tap
An accurately threaded plug of hard steel which cuts threads inside a bored hole. It has a square end that is turned with a tap wrench.
Tapper
Machine tool designed for thread cutting.
Thread cutter
Application tool for the chip-producing machining of internal threads
Drilling
The following questions have to be answered in order to select the optimum drill bit, rotational speed and applied pressure:
- Which material is the hole being drilled into?
- What diameter is the hole going to have?
- Is it a through-hole, a blind hole or a deep hole?
If these facts are known one can make the right selection.
Figure 12.2 – Types of drilling
The following requirements are important for drilling:
- the borehole must be true to measure
- work progress should be as fast as possible
- the drill bit should last as long as possible (maximum service life)
These three demands are affected by the drill bit material, the geometry of the cutting edge and the way the bit has been manufactured. Large-diameter bores in thin materials are not drilled with solid bits but are cut out with so-called core bits (which are rather milling cutters) or hole saws.
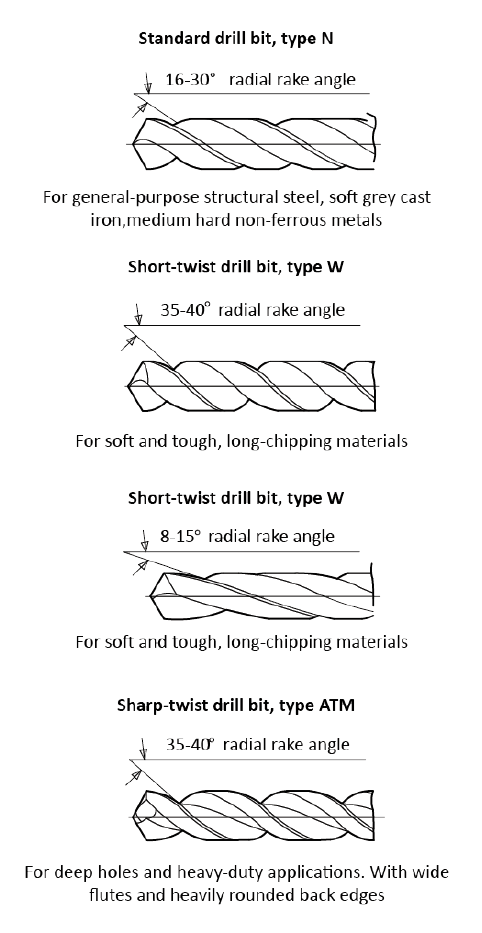
Figure 12.3 – Twist drill bit geometry
Drilling in metal
Twist drills are almost exclusively used for drilling in metal. These popular application tools are also known as “spiral bits”. Drill bit material It is not recommended to use drill bits made of standard tool steel for drilling in metal. These bits lose their dimensional accuracy after a short time, become blunt and are not suitable for efficient and precise drilling in metal.
They are not value for money. The same is true for the do-it-yourself sector. Nowadays only drill bits made of high-speed-steel (HSS) should be used for drilling in metal. These bits are considerably harder and therefore dimensionally accurate. Their higher strength at elevated temperature ensures faster work progress without reducing the service life.

Tool geometry
The tool geometry of the cutting edge is selected to suit the type of hole drilled and the material into which the hole is drilled. The cutting edge angle, the point angle and the spiral flute angle largely determine the properties of the drill bit.
Cutting speed
The selected rotational speed, and with it the cutting speed of the bit, depend on the hole diameter and the drilled material. A difference has to be made here; the cutting speed is material-specific and therefore constant for one and the same material. On the other hand, the cutting speed naturally depends on the drill bit diameter (cutting edge circumference). By selecting the right rotational (motor) speed one has to maintain the material-specific cutting speed. The selection is based on these rules:
- The possible cutting speed depends on the work material
- Small drill diameters require a higher speed than larger drill diameters to maintain the ideal cutting speed.
- Use the correct cutting speed to ensure ideal drill bit performance in the material being drilled.
Applied pressure (feed)
The applied pressure (feeding power) depends, on the way the drill point is ground. But there is an additional, material-specific factor. As a matter of principle, hard materials require more feed pressure than soft materials. If, for example, hard corrosion-resistant steels are drilled with too little applied pressure, the cutting edge will only lightly “scratch” the surface. It will not “cut” its way into the workpiece and heat up quickly since the frictional heat is not dissipated by cut-off material. As a consequence, the drill point will overheat and “burn out” which will ruin the drill bit.
At the same time corrosion-resistant steel’s experience strengthening by cold-working in the drilling spot which makes further drilling progress more difficult. For this reason one should start drilling at low speed, proceed swiftly and with high contact pressure. In addition to the intensity of the applied pressure, its direction is also very important. In order to achieve fast penetration and high drilling quality it is important that the pressure is applied through the centre of the drill bit axis (the machine drive shaft). This central direction of the applied pressure is facilitated by ergonomically well-constructed drills (power tools). However, the best possible hand-position is not always maintained by the tool user since it is not considered as important. The usual consequences are imprecisely drilled holes, an increased expenditure of force and often broken drill bits! For practical purposes, the correct feed pressure for handheld power tools is determined by experience.

Drilling in Brick – Concrete – Stone
Drill bits for brick, concrete or stone differ fundamentally from drill bits for metal, wood and plastic. Concrete or brick is a material which does not produce chips. Therefore one cannot use chip-forming methods for processing concrete or brick. The working principle applied here is to crush the structure by scraping or impacting. In both cases the (brittle) structural cohesion is destroyed and the drilling dust created thus is removed from the drilled hole up the spiral “twist” grooves of the drill bit.
Brick or stone materials with light, porous cohesion like weak concrete, or porous brick can be drilled by using rotary tools, whereas concrete materials with strong cohesion and/or hard aggregates like structural or precast concrete can only be drilled by a combination of impact and rotary motion. The most important distinguishing features of drills for brick, concrete or stone are:
- cutter material
- tool geometry
- flute shape
- fitting
- dust extraction
A great number of different drill bits for “drilling” brick, concrete or stone are available on the market. Best results are obtained by using drill bits which have been adapted especially for the processed material – see Table 9.7 It is also important to remember that large-diameter bores are no longer drilled with solid bits but as ring gaps with so-called core cutters. The cutting edges “teeth” of core cutters consist either of inserted tungsten-carbide cutters or diamond-tipped segments. The latter must be used with rotation-only and without impact.

Figure 9.4 – Drill bit geometry for brick, concrete or stone.

Drilling in Wood
Drill bits for wood and wood materials are quite different from those used for drilling in metal. Although it is possible to use spiral bits for metal also in wood, the quality of the drilled hole will never be satisfactory. The main reason for this is that wood is a natural work material with variable texture and hardness which, in addition, is not homogenous and has a fibrous structure. This can divert the drill points of conventional spiral bits at the start or during the drilling of a hole. The point angle is responsible for the displacement of a portion of the (soft) work material which produces the well-known tearing at the point where the bit leaves the material. For the same reason bores near the edge can split the material.
Therefore drill bits for wood have a special geometry. The key criteria are:
- centring
- edge limitation
- feed
- chip clearance
- drill bit shank
Again one must remember that large-diameter bores are no longer drilled with solid bits but as ring gaps with so-called hole saws.
Hole saws
Hole saws are used to cut holes with very large diameters. However, because only a small annular gap with a relatively small cross-section is cut, the required forces and also the chip volume are much reduced. Hole saws consist of a cup-shaped sleeve with saw teeth on its open end. The closed end is connected to a driving shank which is either permanently attached or separable by threaded connection or system lock.

Figure 9.5 – Drill bits for wood
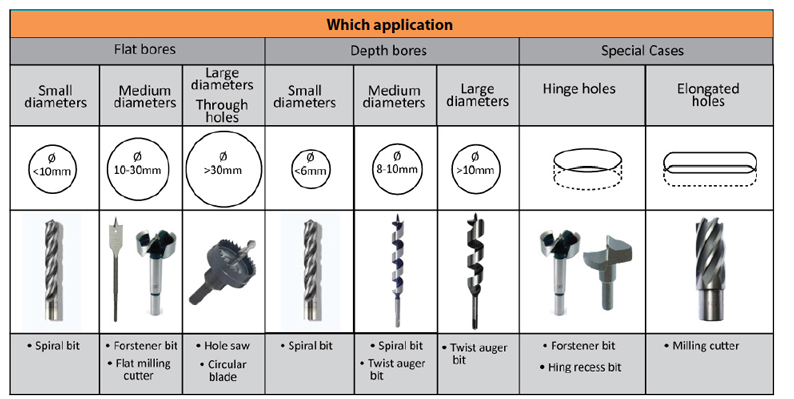
Figure 9.6 – Selection chart of the correct drill bit for wood and wood materials
Drilling other materials
As a rule, the same drill bits are used for drilling in plastic as for metal. In general, the same principles apply with respect to individual criteria as mentioned above on “drilling in metal”. However, there are some plastics which require special tool geometry and/or special cutter material. The following recommendations are general recommendations for drilling in different types of plastics.
- Thermoplastics
Thermoplastics are rather soft. Drill bits with sharp cutting edges are a must here. Bits which have already been used for drilling in metal should not be used to drill high-quality holes in thermoplastics.
- Thermosetting plastics
With respect to the sharpness of the cutting edge, thermosetting plastics are not as sensitive as thermoplastics. Nevertheless, it is recommended that separate drill bits be used.
- Fiberglass-reinforced plastics (GFRP)
Due to the embedded glass fibres, GFRP have a strongly abrasive effect on the cutting edges of drill bits. Blunt cutters tend to squeeze the material more than cut it. As a consequence, the glass fibres are quite exposed in “frayed” holes and increase the capillary action under the influence of moisture. Penetrating moisture can make the fibreglassplastic- compound brittle around the drilled hole and connecting elements might loose their hold in the material after a certain period. This problem can be solved by resharpening the drill bits frequently (which is slow and takes time) or by using special drill bits with razor-sharp tungstencarbide cutters.
- Cast minerals/composites
Cast minerals are plastics which contain mineral fillers to improve their compression resistance or to give them a decorative appearance like solid surface composite kitchen tops. The mineral components of these composites require the use of sharp carbide drill bits.
- High-performance plastics
High-performance or superplastics are synthetic materials with special properties. They can be rather soft plastics like PTFE (polytetrafluoroethylene) or very hard plastics like PC (polycarbonates). These materials often require the use of special tools; information on drilling these types of plastics can be obtained from the manufacturers of these materials.
Drill bit sets
Drill bit sets are available from manufacturers in many different forms from specific drill type sets, to package sizes, to combination sets that have a variety of drill and power bits to suit many different drilling and screw-driving applications. Drill bit sets are convenient if you are carrying out a range of different applications (jobs) and can also include power bits for use with cordless tools.
Drill Chucks
Drill chucks are used to clamp application tools like drill bits to drills. Their advantage is that you can tighten tool shanks of varying diameters with them. A distinction is made between keyed chucks and keyless chucks.
Key-type chucks
Key-type chucks are tightened and released with the help of a cog-shaped chuck key and an external crown gear. The jaws, usually three, have to be tightened individually by applying the chuck key in all three chuck holes to make sure that the application tool is concentric and safely gripped.
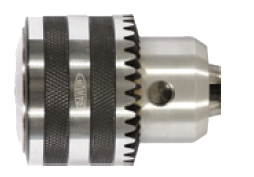
Keyless chucks
No separate chuck key is required for keyless chucks. They can be tightened and released by turning the external chuck sleeve by hand which is specially designed for manual operation. There are two basic types of keyless chucks:
- Two-sleeve keyless chucks – a double-sleeve keyless chuck has an external sleeve consisting of two parts. One sleeve is used for gripping, and the other for tightening and slackening. Both hands are therefore needed to operate this type of chuck.
- Single-sleeve keyless chucks – single-sleeve keyless chucks require only one hand for tightening and releasing which makes their operation very simple. The large gripping surface makes the maximum tightening force higher than for two-sleeve keyless chucks. The drive shaft has to be blocked before this chuck can be operated. This can be done manually or automatically.
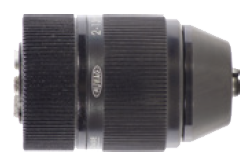
Professional power bits
Application tools for tightening screws are often referred to as power bits or more commonly known as screwdriver bits which match the screw or nut in form and size; available for slotted, cross-slotted, hexagon-socket and Torx screws, in varying hardness and shape and in different qualities.
It is important to remember that cheaper quality power bits usually offer the worst service life and are not recommended since they are likely to damage the workpiece and the screw head and don’t last very long.
Tool shanks of screwdriver bits
Tool shanks with 1/4″ hexagonal shank are the most commonly used. The shanks are retained either by spring-ring safety locks or ball safety locks. Bits for spring ring retention usually do not fit properly into tool holders with ball safety. Bits for ball safety can get stuck in tool holders equipped with spring ring safety and can often not be removed, making it important that the correct tool shank is used.
Key-type chucks
Key-type chucks are tightened and released with the help of a cog-shaped chuck key and an external crown gear. The jaws, usually three, have to be tightened individually by applying the chuck key in all three chuck holes to make sure that the application tool is concentric and safely gripped.

Figure 9.7 – Shanks of screwdriver bits and their tool holders
Different types of screwdriver bits
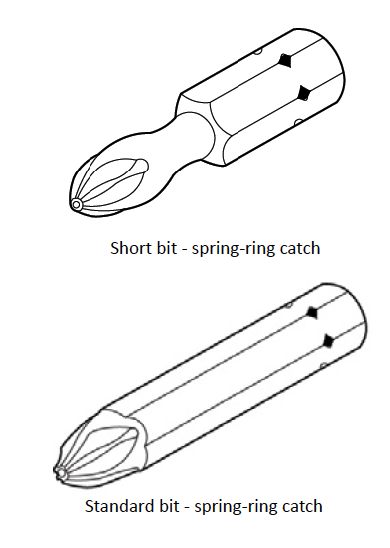
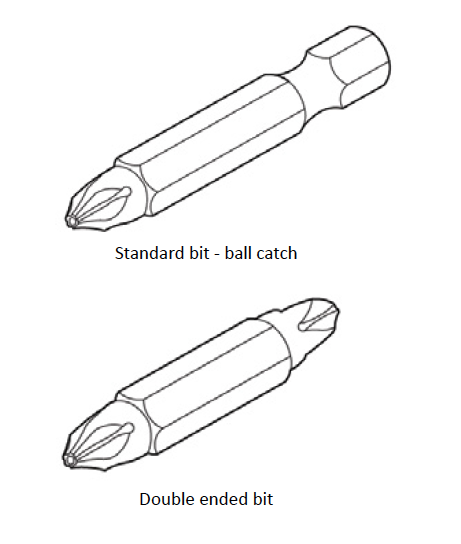
Hard bits
Hard bits wear out more slowly, but they are relatively brittle and can break under hard screw-driving conditions due to the sudden torque increase. The recommended application of hard bits is for soft screw-driving conditions, where the bit can reach a long service life.
Soft bits
Soft bits wear out more quickly, but they are tougher. They are mainly used in hard screw-driving conditions where the higher wear is accepted in favour of the improved resistance to breaking.
Screwdriver bit profiles

Phillips
The Phillips profile is very common, the profiled flanks are slightly conical, and as a consequence the screwdriver bit can be well centred. However, it can slip easily off the screw head if only little pressure is applied.
Note: Bits with Phillips profile are not compatible with Pozidriv screws.
Pozidriv
The Pozidriv profile is an advanced development of the Phillips profile. It consists of a primary and a secondary profile. The profile edges of the primary profile run parallel, and as a consequence the risk of slipping of this screwdriver bit is reduced. The secondary profile increases the contact surface and together the two profiles improve the torque transmission.
Note: Bits with a Pozidriv profile cannot be used to drive Phillips screws.
Slotted
The use of slotted screws is getting less and less. Nevertheless, there are applications, where slotted screws must be driven by machine. The problem is that the screwdriver bit can slip off the screw slot to one or the other side. For this reason slotted screwdriver bits should be used with finder sleeves whose internal diameter is chosen to fit the outside diameter of the screw head.
Torx
The Torx is an advanced development of the internal hex profile. The difference is that the torque is not transmitted through the profiled edges but by profiled surfaces. As a consequence, higher torque values can be transmitted in comparison to internal hexagon screws and by using smaller key widths.
Hex
Internal hex screws or known more as “Allen screws” have parallel profiled flanks. Together with the large contact surface high torque values can be transmitted by keys with relatively small widths.
Square
Internal square screws have square profiled sides. With the small contact surface especially in smaller widths only low torque values can be transmitted.
Power bits for hex nuts
The general term “hex screws” is applied to all screws or nuts with external hex profiles. The bits used in this context are known as socket wrenches or nutsetters.A number of other power bit accessories like socket adapters, magnetic bit holders, and power bit sets are available which have not been illustrated here.
Router Bits
The process of routing is a chip-forming type process used more often with timber products where the router bit machines edges and cuts grooves (shapes) into the material. The characteristics of all chip-producing application tools are largely determined by the geometry of the tool cutting edge and in routing the following individual criteria determine work progress, cutting quality, endurance, feeding power and suitability for specific materials:
- rake angle
- clearance or relief angle
- lip angle
- cutting angle
- relief
- depth of cut limitation
- number of cutters
- flute shape
- cutter material
- pilots
- ball bearing pilots
The operative performance of a router bit depends largely on the optimisation of the above individual criteria and on the material to be processed.
Because of the high number of variables applicable in choosing a router bit (tool) we have not illustrated any individual bits in this book and recommended that the reader get more information on router bits from their local Builders merchant or hardware store or power tool manufacturer.
Saw Blades
Saws blades are application tools on which the chip-producing cutting edges (teeth) are arranged in consecutive linear fashion and come into action one after the other. The motion of the saw blade is based on one of three basic principles:
- stroke
- rotation
- circulation
- Stroke-type sawing
In the case of stroke-type saws, the saw blade is moved back and forth or up and down. Depending on the tooth geometry, the saw blade cuts only in one direction (usually) or in both directions. Saw blades usually cut during the pulling motion. With narrow stroke-type saw blades it is possible to cut tight curves with high accuracy as found with Jigsaws.
- Rotational saws
Rotation saws have their saw teeth arranged along the circumference of a circular blade. This type of saw blade construction is
mechanically very stable and therefore highly durable. One can select very high rotational speeds and resulting high cutting speeds ensure rapid work progress. The cutting motion is mono-directional which has a positive effect on the service life of the saw teeth. The effective surface of the saw blade in the sawn gap ensures excellent saw blade guidance. For this reason they are perfectly suited for precise, straight cuts. However, on account of their working principle they cannot be used for curve cutting. - Circulating saws
In the case of circulating saws the saw teeth are arranged either along the edge of a continuous belt (band saw) or a chain (chainsaw). Circulating saws operate with high cutting speeds and ensure rapid work progress.
Saw blade geometry
Most saw blades available on the market today are optimised for applications with wood. The large selection of blades makes it easy to choose the right type for the saw blade for the job at hand and where the following criteria can assist in making the correct choice.
Tooth material
Either CV steel, HSS or hard metals (car bides) are used for tooth material. CV-teeth are used for larger rake and relief angles which yields sharp, aggressive but less durable saw blades and typically used in wood and plastic applications. The use of HSS allows a similar geometry where the teeth are more resilient, but tend to break more easily due to their hardness and are typically used in metal applications.
Tooth shape
The tooth shape determines the cutting quality and the bearing strength. A distinction is made between basic shapes and combinations. The most important basic shapes are:
- pointed teeth
- coarse teeth
- flat teeth
- alternating teeth
- trapezoidal teeth
- hollow teeth
This includes mixed shapes. Pointed teeth and coarse teeth are mainly used on CV, HSS and bi-metal saw blades, the other shapes are found on TC-tipped saw blades. The best cutting quality is often achieved with combinations of different tooth shapes – see circular saw blades that follow later in this section.
Tooth size
The tooth size determines the amount of material and chips removed during one single pass through the workpiece i.e. the material is cut by few large or many small teeth. Few large teeth result in bad cutting quality and provide a rough finish while many small teeth give a better quality finish.
Number of teeth/tooth spacing (TPI)
Given the saw blade size, the number of teeth is determined by the tooth size. During each stroke or revolution of the saw blade there are either more or less teeth in action, the quality of the cut increases with the number of teeth. On the same length of saw blade, few large teeth result in a large tooth spacing, and many small teeth result in a small tooth spacing. Blades with fewer teeth are cheaper than blades with more teeth.
Tooth arrangement
The teeth can be arranged evenly along he saw blade or its periphery or in a combination of different tooth sizes, i.e. with different tooth spacing. This can have a positive effect on the work progress, the variety of possible applications, the cutting quality or all three factors together. Typical arrangements include:
- Standard toothing
- Vario toothing
- Progressive toothing
- Dual toothing
Note: As a rule, saw blades are not named after their working principle, but after the power tool they are used with.
Jigsaw Blades
The jigsaw is regarded as the most universally used and versatile power tool when cutting a variety of different materials. The jigsaw blade market is separated into two distinct shank types:
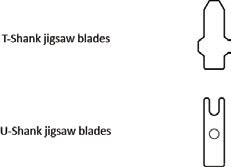
Both types have their pros and cons. The T-shank is a more versatile arrangement, since most jigsaws are able to accommodate both the T-shank and the U-shank blades. Be aware that some jigsaw brands will only accommodate T-shank blades like Bosch.
Jigsaw Blades for Wood
Woodworkers work with a vast variety of wood from hardwoods to softwoods, and from plywood to particle boards such as chipboard to MDF. Looking at this from a cutting point of view these materials have different cutting requirements, for example crosscut to ripping blades, scroll or curve cutting blades and reverse cut blades.
Offset teeth
Side set teeth “offset teeth” are used for high speed rough cuts. The offset of the teeth prevents the jigsaw blade from being squeezed out during the cut. Offset teeth blades, with a wide teeth pitch of 4mm cut especially well along the grain (ripping).
What is the main difference between a curve cut blade and a straight cut jigsaw blade?
The width of the jigsaw blade – a smaller blade cuts curves easily than a wider blade. The top of the jigsaw blade teeth are very close to the centre line of the blade; allowing you to turn the blade near the centre of the jigsaw centre line.
Reverse cut blades.
When using a jigsaw the orbital action of the saw drives the blade in the up and down direction (stroke) and driving any standard jigsaw blade will splinter some materials on the up stroke. Reverse cut blades prevent this from happening and will allow splinter free cutting along the top of the workpiece being cut – especially when cutting laminates.
Note: when using a reverse teeth jigsaw blade – the orbital action of your saw must be switched OFF and you will need to hold the jigsaw firmly to the counter surface and reverse the cutting action manually.
When sawing wood – two or three teeth should always be in operation at once and thinner workpieces require more (smaller) teeth per unit of length than thicker workpieces. Cuts across the grain produce short chips; therefore the suitable saw blade must have a higher number of teeth than a saw blade for straight cuts where individual chips are much longer.
Plunge cuts
A plunge cut with a jigsaw is often handy whether it’s for the cut outs for kitchen sinks or other table top insets. Some jigsaw blades have the capacity to directly ‘dive into’ the work top without any drilling – you don’t have to drill a hole for blade insertion.
Jigsaw Blades for Metal
Metal cutting jigsaw blades commonly have a wave type side-set of the teeth. They are available in different lengths for cutting different and longer lengths. On jigsaw blades for metal, the teeth are side-set in groups and in fluent shape. This prevents the blade from being squeezed too much in particularly when cutting soft metals like aluminium.
Jigsaw Blades for Ceramics
This kind of jigsaw blade cuts ceramic and cement board among other materials. This blade can be used to cut fibreglass and reinforced plastics. This blade has a tungsten carbide edge and no teeth. The tungsten carbide edge cuts more like a file and not a saw.You should turn down the speed of your jigsaw so that the blade wont overheat especially when cutting tiles.
Jigsaw Blades for Acrylics
Cutting acrylic material is perhaps one of the most difficult or trickiest. Most of the time, the material being cut tends to overheat and will ‘smear’ when cut. Special jigsaw blades for acrylic material will solve the problem. The blade looks very similar to a standard jigsaw blade for cutting wood, but the teeth are not side-set, they are taper ground.
Holesaws
As described earlier, large and very large holes in boards and panels are better cut with holesaws. A centring bit (usually sold separately) determines the position of the holesaw in relation to the workpiece or layout before the saw teeth penetrate into the material. It is important to make sure the measurements are accurate before proceeding as once the hole has been cut it is very difficult to patch and would typically result in replacing the component being drilled.
Holesaws are available in sizes from 14mm to 210mm with a maximum cutting depth of 32mm for all sizes; and can be used in wood, gypsum boards, plastics, non-ferrous metals, aluminium, steel and stainless steel. Applications in metal require cooling by using an appropriate cutting oil or the abrasion will cause enough heat to damage the cutting ability of the saw.
Some important Do’s and Don’ts
Do
- Operate the holesaw at the recommended speed – see RPM table below (Table 23 (x)). For cutting wood the drill can be run at almost top speed.
- Apply sufficient feed pressure when sawing – more for harder materials less for softer.
- Use a good grade cutting oil
- Chuck the holesaw properly – an improperly chucked holesaw will cause damaging vibrations
- Hold the saw perpendicular to the surface of the material being cut
- Wear safety glasses and keep hands away from the sawing operation and use a side handle.
Don’t
- Run a holesaw too fast
- Allow tooth points to rub over the workpiece without digging in to take a chip – rubbing the tooth points dulls them so
they can’t cut. - Don’t try and saw holes at an angle to the work surface – it will bind or twist out of round and break.

Circular Saw Blades
Circular saw blades are round-shaped cutting blades designed for use with mitre saws, table saws, radial arm saws, cut-off saws and standard circular saws. Many circular saw blades can be used interchangeably between machines….but using the right blade for the application is paramount….it improves performance, quality and efficiency.
Circular saw blades vary widely in quality and price. More expensive blades usually have features that extend the longevity of the blade while enhancing performance. Cheaper and poor quality blades may dull quicker or produce rougher cuts, so make sure you weigh up the benefits of the blade in addition to only the initial cost.
Construction, Dimensions and Teeth
Construction – Circular saw blades are usually constructed of steel or carbide-tipped steel. Steel blades are inexpensive but the teeth can dull quickly and are often only used for DIY applications. Carbide-tipped blades, on the other hand, are extremely durable, and offer better value for money and can last up to ten times longer than steel.
Dimensions
There are three dimensions to keep in mind when you’re shopping for circular saw blades – diameter, arbor size and kerf. The first two dimensions, diameter and arbor size, are determined by the saw. Blade diameters start at 160mm but the most common diameters are 185mm for circular saws, 230mm for table saws and 230mm and 250mm for mitre saws. Arbor sizes range from 16mm to 30mm – check your saw or owner’s manual too see what size blades you need.
Kerf is the thickness of the blade. Thick-kerf blades last longer and can usually be re-sharpened, so they tend to be more expensive.
- Thin-kerf blades are sharper and faster when new but dull quickly
- Thin-kerf blades remove less material from the workpiece during cuts
- Thick-kerf blades hold up to nails better and resist wobble
Teeth
As described previously , blades with more teeth yield a cleaner cut and blades with fewer teeth deliver faster cuts with rougher edges.
Note: For masonry and metal applications, you need to use an abrasive wheel (cutting disc) or diamond blade.
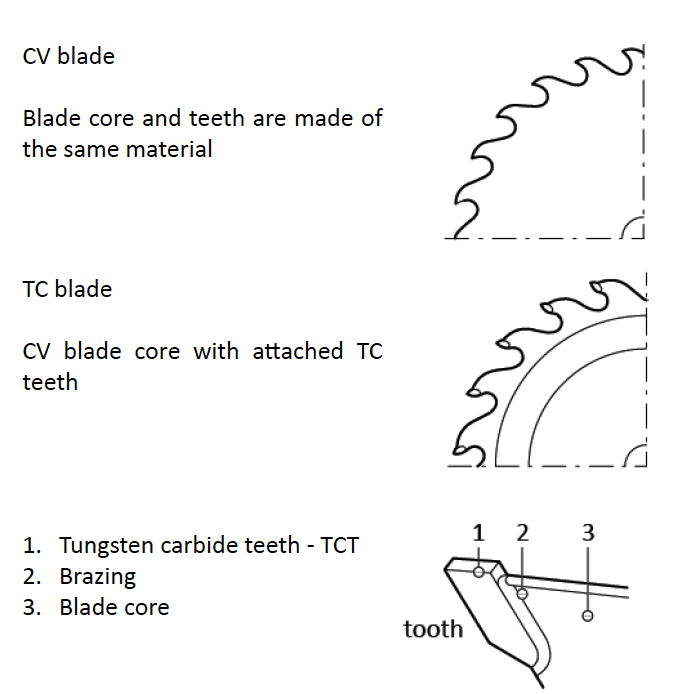
Figure 9.8 – Circular saw blade – Tooth material
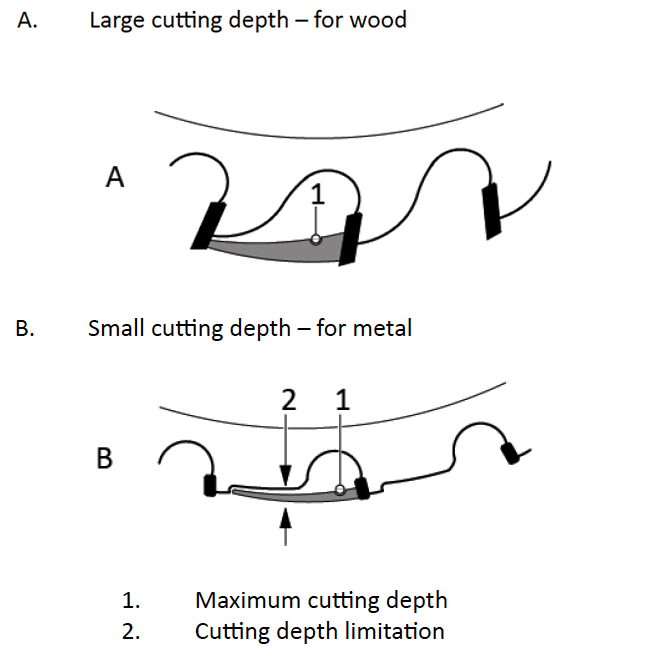
Applications
Manufactures of saw blades will tell you which saws, materials and/or cuts each of their blades is designed for; eliminating guesswork. The information provided below provides a general overview of choices, but remember many manufacturers offer blades designed for specific materials. The recommended application(s) are usually printed on the blade for easy identification even after the sales packaging has been removed. Combination blades are popular among users with diverse needs because they can be used in many different applications, for a number of different materials and cuts.
- Expansion slots: Slots in the blade prevent warping by allowing the metal to expand and cool when it gets hot.
- Coatings: some blades are coated to prevent corrosion, friction and/or gum up, extending blade life.
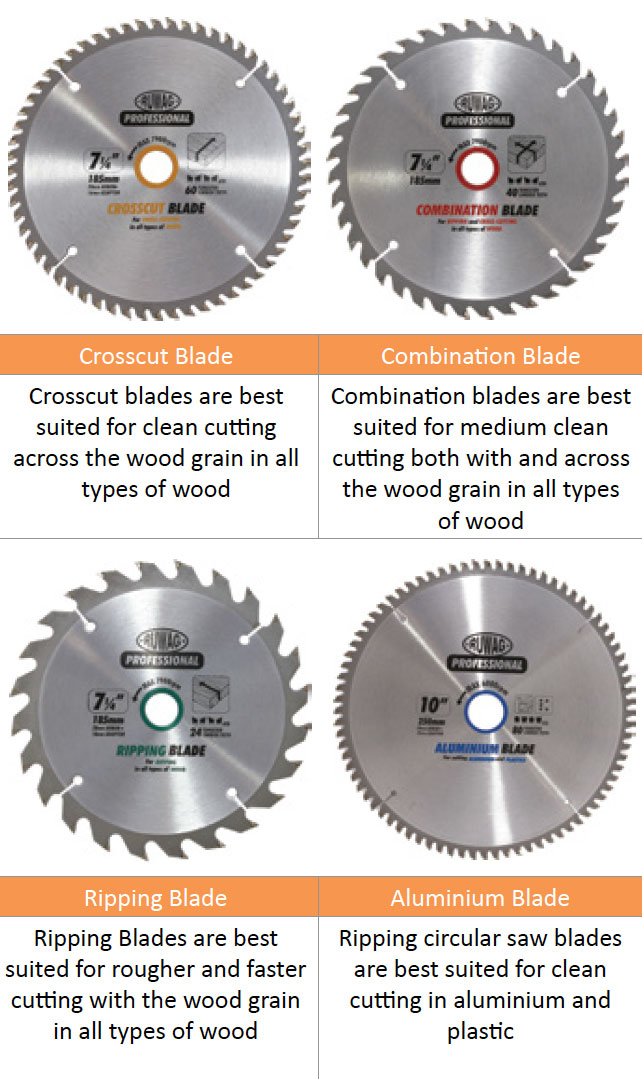
Diamond Blades
A diamond blade is a saw blade that has diamonds fixed on its base for cutting hard abrasive materials. A diamond blade grinds rather than cuts, through the material. Sintered metal bonded diamond blades are the most common – the blade consists of a steel core and diamond segments, which are made by combining synthetic diamond crystals with metal powder and then sintering them. The diamond segments are also known as the “cutting teeth” of the blade.
Most blades have spaces (gullets) between segments to provide cooling and slurry removal; although when cutting ceramic tiles a continuous rim tile blade is always recommended as a segmented blade will chip the tile, but remember that continuous rim blades don’t resist heat as well as segmented blades.
Cutting with or without water
Many blades are designed to operate either wet or dry. However, diamond tools and blades work better when wet and dry cutting should be limited to situations in which water cannot or should not be used.
Water prevents the blade from overheating, reduces the amount of harmful dust created by cutting, removes slurry from the cut and extends the longevity of the blade.When water cannot be used for example when using an electric grinder, measures should be taken to ensure proper dust extraction – refer power tool safety.
Dimensions
The most commonly available blade diameters for hand-held power tools like angle grinders, circular saws and wall chasers are 115mm and 230mm.
Applications
Matching the correct diamond blade to the intended application will maximise the longevity of the blade.
Note: Bigger blades are available for use with masonry cut off saws and high speed power saws which are not discussed in this book.

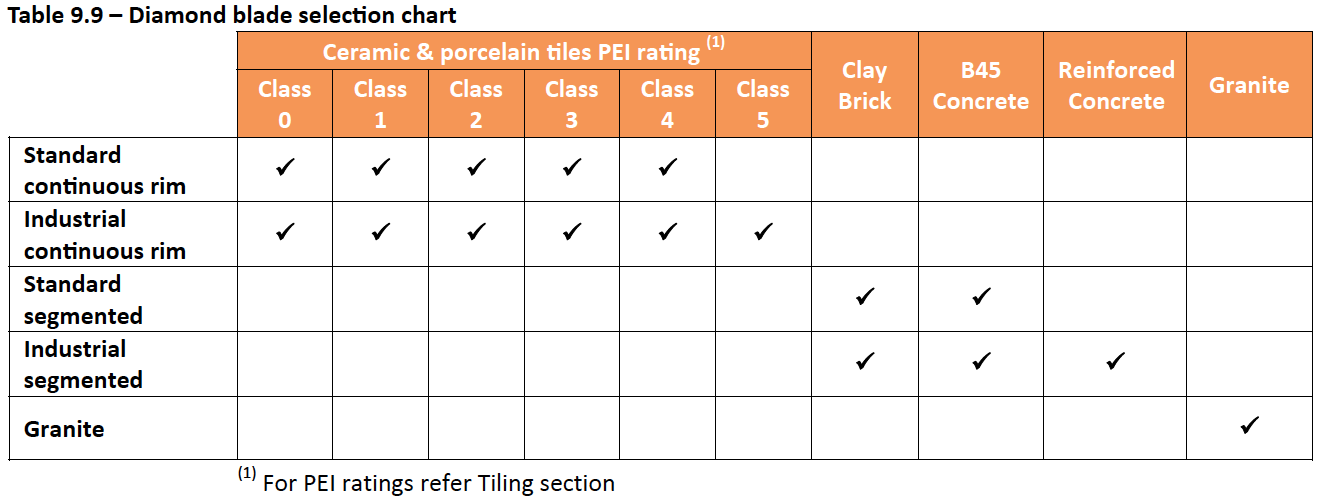
Cutting and grinding discs
Cutting and grinding discs are used for abrasive cutting and abrasive grinding and in this context one has to be aware that the diameter of discs is reduced through wear and that this will reduce one the maximum depth of cut and the overall abrasive efficiency.
Abrasive materials
The abrasives mainly used for these applications consist of the following materials:
- natural corundum
- silicon carbide
- aluminium oxide
- zirconic corundum
These abrasives are used for different purposes depending on their properties.
Natural corundum
Natural corundum is one of the oldest abrasive materials developed – with modern power tools it is not very durable and very
seldom used, although still used for low quality, hand-operated abrasives.
Silicon carbide (SiC)
SiC has a hard, sharp-edged structure which makes it especially suitable for processing hard and tough materials. And also
used for masonry, paintwork and synthetic material applications.
Aluminium oxide (Al2O3)
Aluminium oxide (also called special fused alumina) is very hard and tough. It is particularly suited for processing long-chipping
materials like wood or metal.
Zirconic corundum
The microcrystalline structure of zirconic corundum produces new and sharp edges when it becomes worn which has a self-sharpening
effect. For this reason it is especially recommended for tough-hard materials such as corrosion-proof steel.
Operating speeds
Prior to mounting or fitting the grinding or cutting disc on the machine, it must be ensured that the machine’s nominal speed (as specified on the nameplate) does not exceed the maximum operating speed indicated on the grinding wheel or disc. Most discs available in South Africa are made to run at a maximum operating speed of 80m.s – the table below shows the recommended operating speeds for various sized discs.
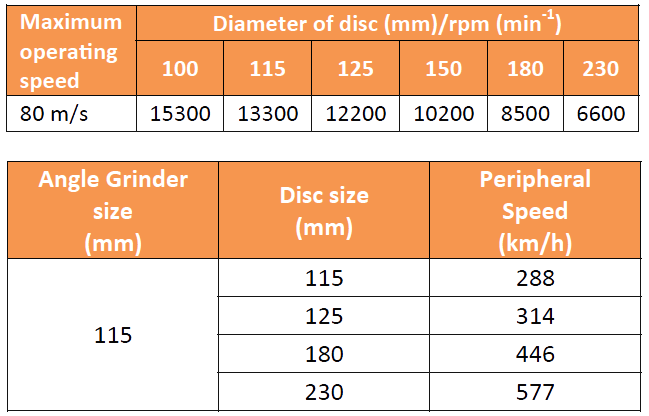

Cutting
The term cutting is used to describe in-depth grinding. The working principle is rotation. The grinding process is carried out by the edge, the circumference of the abrasive (cutting disc). The power tools used for this purpose are either angle grinders or abrasive cut-off machines. The working process resembles sawing with a circular or radial arm saw.
Cutting applications
Cutting metal
Cutting metal by using cut-off wheels (cutting discs) is quite common and typically carried out manually using stationary equipment like an angle grinder in a cut-off stand, which provides good and dimensionally accurate results. The service life of the cutting disc limits the cutting depth since the disc diameter diminishes with increasing wear. The peripheral velocity (cutting speed) is also inevitably reduced and with it the abrasive efficiency and the work progress. The power demand depends on the diameter of the cutting gap (and therefore the diameter of the disc). Modern cut-off wheels with disc widths of approx. 1mm allow fast cuts with little heat development.
Cutting plastics
Cutting synthetic materials with cut-off wheels (cutting discs) produces frictional heat in the actively involved section of the disc. This heat is not removed or dissipated by the synthetic material. Local overheating and melting of the plastic are the consequences. Certain plastics disintegrate under the influence of heat and change their colour and properties as a result. These melting and disintegration processes clog up the texture of the abrasive medium which becomes unusable. Therefore abrasive cutting is not recommended for plastics other than that of thin-walled profiles.
Cutting wood
Cutting wood with cut-off wheels (cutting discs) produces frictional heat in the actively involved section of the disc. This heat is not removed or dissipated by the wood. Local overheating and burn marks on the wood are the consequences. Therefore abrasive cutting is not recommended for wood or wood materials.
Cutting stone
Cutting stone or stone materials with conventional cutting discs is a common practice, but very inefficient. The service life of the disc limits the cutting depth since the disc diameter diminishes with increasing wear. The peripheral velocity (cutting speed) is also inevitably reduced and with it the abrasive efficiency and the work progress. The use of diamond tipped blades for cutting stone and stone materials is becoming more popular mainly because the service life (durability) of the blade is increased to as much as one hundred times longer (with nearly constant diameter and therefore constant peripheral velocity) than conventional cutting discs diminishes with increasing wear. The peripheral velocity (cutting speed) is also inevitably reduced and with it the abrasive efficiency and the work progress.
The use of diamond tipped blades for cutting stone and stone materials is becoming more popular mainly because the service life (durability) of the blade is increased to as much as one hundred times longer (with nearly constant diameter and therefore constant peripheral velocity) than conventional cutting discs.
Grinding and sanding
The process of grinding or sanding is done by using discs that are usually thicker – between 4 to 8mm thicker depending on the application – Discs can also have depressed centres. Another disc commonly used for sanding and grinding is known as a flap disc or fan wheel which is a plate-shaped grinding disc on which the abrasive in various grades is arranged in a fan-shaped layout with overlapping segments in the centre – see figure below.
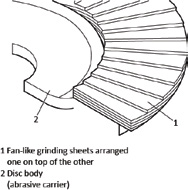
Cutting and grinding safety
- Don’t handle wheels roughly.
- Don’t use non-reinforced cut-off wheels on portable machines.
- Don’t store wheels in a damp atmosphere or in extreme temperatures.
- Don’t mount a damaged wheel.
- Don’t ever exceed the maximum operating speed marked on the wheel – see above.
- Don’t force a wheel onto a machine spindle.
- Don’t use mounting flanges which are incorrect, damaged, dirty or burred.
- Don’t tighten the mounting nut or locking flange excessively. To do so can distort the flanges and discs.
- Never use an angle grinder or cut off machine without the safety guard – see note below.
- Don’t grind with a depressed centre grinding wheel at an angle below 30 degrees to the work piece.
- Don’t use a machine in a position where you do not have full control of the machine and you are not well balanced.
- Don’t use machines without proper ventilation or dust protection equipment.
- Don’t allow the wheel to be trapped or pinched in the cut.
- Don’t apply side pressure to cut-off wheels. You should not bend the wheel.
- Don’t stop the wheel by applying pressure to the periphery or face. Always switch the machine off and allow the wheel to stop revolving.
Note: a safety guard serves three purposes:
1. Directs the flight of sparks
2. Prevents the use of oversized discs on the machine
3. Protects the use from debris in case of disc failure
Sanding
Sanding is a surface treatment principally used to improve the surface quality. The actual application tools used during sanding are abrasives which use their edges to grind the material to dust and depending on the principle and the type of sanding tool used one can process even, concave or both surface types.
Typical applications
Sanding and grinding metal
Sanding with rotation (circulation) is the optimum processing method since the high peripheral speeds ensure good work progress. The centrifugal force propels worn out abrasive grains and the removed material out of the sanding area. Sanding with oscillation or circulation is less favourable in terms of finish quality since the sanding dust and broken off abrasive grains cannot be removed quickly enough and tend to produce scratch marks in the surface.
Sanding plastics
Most plastics become deformed under the influence of heat. If they are heated too much they can melt or disintegrate. Therefore, heat development when sanding should be reduced to a minimum when working with plastics. In practice, one should sand plastic with reduced operator pressure and low peripheral speed. Abrasives with an open structure develop less heat during sanding and should therefore be preferred. In the case of large-scale sanding operations, it is better to remove the material roughly with coarse-grained abrasives, and to switch to finer abrasives for the finish. Large-grained abrasives clog up less quickly and the cooler sanding process of the larger grains prevents the plastic from melting.
Sanding wood
Wood and wood materials are comparatively soft and are quite easy to sand; however, the fibre structure of the wood has to be observed during sanding. Sanding across the fibres (unavoidable for rotational sanders) removes the material (stock) quickly and creates a rough surface. It would be better to use a finer grain abrasive when sanding softer type woods which will be more time-consuming but will prevent one from oversanding the workpiece. Resin pockets are also a disadvantage when sanding wood, since they clog up the abrasive and smear the surface. As a tip remove the resin deposits by milling or dissolving them with suitable thinners prior to sanding.
Sanding painted surfaces
Coats of solvent based paints like varnish behave to some extent like plastics: if they become too hot they can melt or disintegrate which has a negative effect on their surface quality. Consequently, heat development should be reduced to a minimum. In practice, one should therefore sand these surfaces with reduced operator pressure at low peripheral speeds. Abrasives with open structure develop less heat during sanding and should therefore be preferred.
Sanding stone
Stone and masonry are much harder substrates or materials to sand and thus slows down the work progress during surface treatment in comparison with other materials and surfaces.
Rough work can be carried out with special angle grinders (wet grinders, concrete grinders) fitted with cup wheels or diamond-tipped cup wheels. Cup wheels are mainly used fo wet grinding since they form a kind of grinding paste (sludge); the abraded stone dust is incorporated into the sanding or grinding process which improves the grinding quality.
Note: one should always prefer a stationary processing technique (not discussed in this book) and to restrict the use of portable power tools to fitting and repair work.

Sandpaper types
There are a number of sandpaper types found on the market today and available through hardware and the like.
Sand/Quartz/Glass
Hard enough for sanding timber, but doesn’t have very sharp edges.
Garnet
Garnet is a mineral with sharp points, ideal for sanding soft materials like wood. It breaks down quickly when used on hard materials; a good choice for final sanding.
Emery
Emery is a mix of corundum and magnetite and is good for rust removal, polishing, de-burring and corrosion and paint removal. The synthetic grits give a superior sanding performance.
Aluminium oxide
Aluminium oxide is tough and the wedge-shape grit makes it suitable for smoothing and polishing steel, bronze, fibreglass, plaster, hard timbers and even stone.
Silicon Carbide
Silicon carbide is the hardest and sharpest abrasive and can be used wet or dry. It is suitable for cutting harder materials like metal, paint, plastic, and fibreglass. It is used to sand primers, sealers, paints and non-ferrous metals, as well as for final finishing.
Choosing the right grade of sandpaper
Sandpaper is made up of grit (particles); its effectiveness depends on the size, hardness and sharpness of the grit. The easiest way to remember grit size is that the numbering runs backward. The higher the number, the smother the sandpaper and the lower the number, the coarser the sandpaper.
In order to use sandpaper effectively you need to choose and use the correct type for the application. If you want to end up with a smooth surface, you need to start with a coarse paper, then, as you sand the surface down, keep changing the grade of sandpaper until the surface reaches its desired finish.
Sanding sheets
Sanding sheets for power tools come in various different shapes to suit power tool types for example, a sanding belt for a belt sander. The sheets also come in different shapes and sizes to suit specific brands of power tools; although many manufactures do try and standardise on these variations.
Cabinet Paper sanding sheets
Lose sandpaper sheets (cabinet paper) are available in the various grades described above and usually come in sheet sizes of 280x230mm. Rolls are also available in the common categories; coarse, medium and fine.
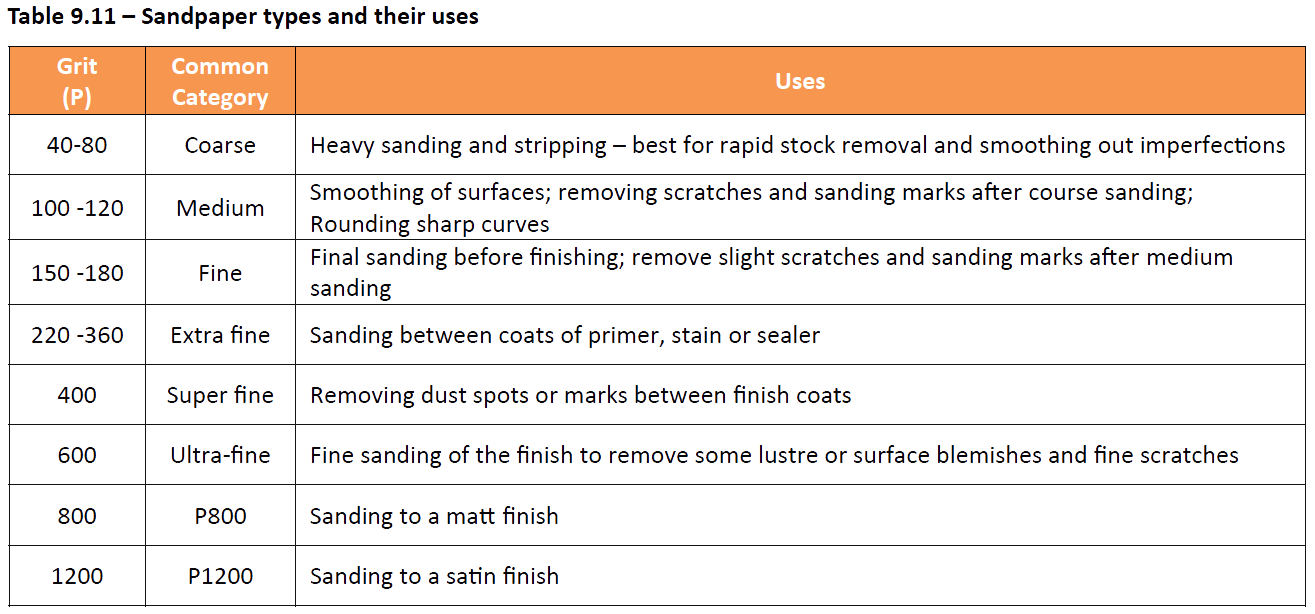
References
Holger H. Schweizer. 2006. Robert Bosch GmbH – Power Tool Division – Handbook for Trade and Industry (English issue). 6th
edition. Germany. Senner-Druck GmbH & Co.
Holger Schweizer & Erwin Ritz. 2002. Robert Bosch GmbH – Power Tool Division – Practical safety. 1st edition. Germany.
Bosch – Power tool portal – www.bosch-professional.com
Bosch South Africa – www.bosch.co.za
Lasher Tools South Africa – www.lasher.co.za
Ruwag South Africa – www.ruwag.co.za
http://www.woodworkingtalk.com