Building a classic and strong garden gate like this one is easier than you think – and we’re going to show you how.

Cutting List:
- 7 x 22 mm x 94 mm x 1700 mm PAR pine planks
(upright slats) - 3 x 22 mm x 94 mm x 840 mm PAR pine planks
(cross pieces) - 2 x 22 mm x 94 mm x 1200 mm
(diagonal braces – these will be trimmed in Step five) - 2 x 38 mm x 114 mm x 1800 mm CCA-treated pine
(wall braces)

Step 1.
First, measure the opening in which the garden gate will hang. The measurements we have given are for a doorway that is 1.8 m high by 940 mm wide. You may need to modify these dimensions to fit your doorway.
Step 2.
Cut your timber according to the cutting list.

Step 3.
The CCA timber will be mounted to the brick wall, to form a mounting frame for the gate. The opening is 940 mm wide, the CCA timber is 38 mm wide and we want a 12 mm gap between the mounting frame and the gate. Therefore the gate itself needs to be 840 mm wide (940 mm – 76 mm – 24 mm). Lay all seven of your pine slats next to each other, with a gap of 30 mm between each one. The easiest way to make this 30 mm spacing accurate, is to cut 30 mm spacers from scrap wood and use them between each slat.

Step 4.
Place the first cross piece on top of the slats, 250 mm from the top edge. Using wood glue and 4 mm x 30 mm screws, secure it in place. Repeat with a second cross piece 250 mm from the bottom edge. Now attach the third cross piece in the middle of the gate between the other two cross pieces. The middle of the gate will be 850 mm from the top edge. Make a mark here, mark the middle of the cross piece and line up the marks before attaching it.

Step 5.
Diagonal braces between the three cross pieces will give the gate far more rigidity and strength. The trick is to cut the ends at the correct angle to be flush with the cross pieces. Line up the diagonal brace between the top cross piece and the middle one. Draw a line at the angles needed to fit snugly against the cross pieces and cut. Secure it in place with glue and 4 mm x 30 mm screws. Repeat the process for the second diagonal brace on the bottom half of the gate.

Step 6.
Now that the gate is assembled, treat the timber for outdoor conditions. Cover the screw holes with wood filler and give them a light sanding once dry. Apply three coats of Fired Earth Velvet Wood Varnish in the colour ‘Burnt Brown’ to the gate and the side braces. This wood preservative will add UV protection and protection against other weather elements. Allow 24 hours between coats.

Step 7.
Once everything has dried, secure the wall braces to the wall using 8 mm x 100 mm Rawl bolts. Position the timber against one side wall and drill an 8 mm hole through the timber with a wood bit, gently marking the brickwork. Drill a 14 mm hole into the wall with an SDS drill and masonry bit, ensuring that your depth stop is set. Place the Rawl bolt through the timber and into the hole, then tighten with an impact driver. Repeat with bolts in the middle and at the bottom of the wall brace. Repeat on the other side of the doorway with the other wall brace.

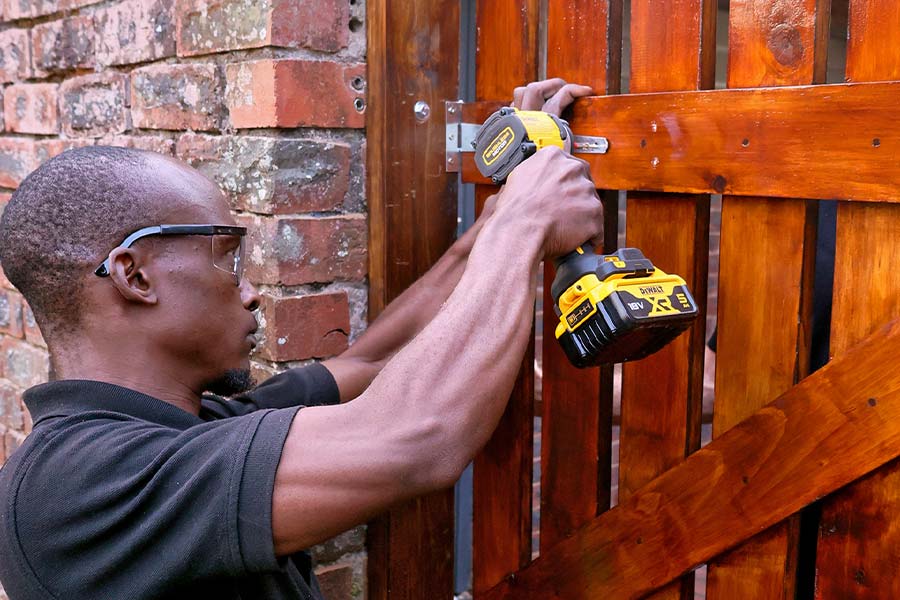
Step 8.
You will be hanging the gate with T-hinges. Remember that you don’t want your gate resting against the floor, so lift it up 50 mm before fitting it. Secure T-hinges to the wooden wall brace in line with the top and bottom cross pieces, using 4 mm x 30 mm wood screws and an impact drill. Now fasten the hinges to the two cross pieces of the gate – you’ll need a hand doing this. Add a barrel bolt to the middle cross piece and grill a corresponding hole in the wall for the bolt to go into.

Browse 1000’s of products available to you. Select your country to Shop Online.


