Don’t be put off trying something different and learning new skills. Fibreglass is so versatile and useful around the home, garden and workshop.


Step 1: Preparation
Before diving into the actual fibreglass repair, you need to prepare the damaged area. Start by sanding the surface to remove dirt and roughen up the surface. If necessary, remove any damaged bits to make sure that the repair will be as robust as possible. After sanding, clean the area thoroughly with acetone to remove any oils or other contaminants.

Step 2: Safety first
Working with fibreglass requires protective gear, due to the tiny glass fibres it contains. These fibres can cause irritation and discomfort if they come into contact with your skin, so remember to wear eye protection – a mask with a particulate filter and latex gloves. Also think about wearing a disposable coverall for added safety.

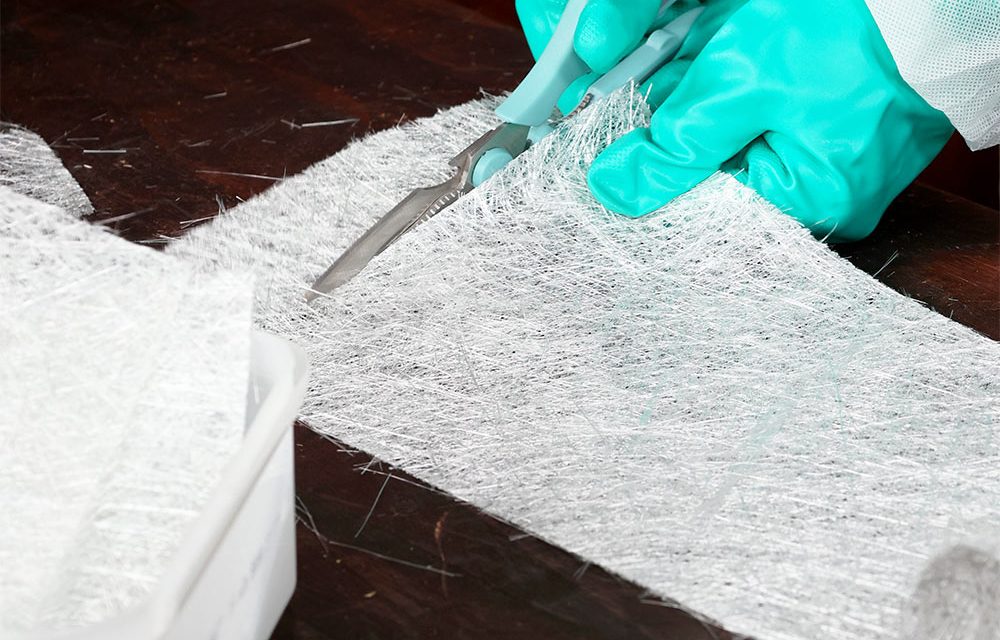
Step 3: Preparing fibreglass mat
Cutting fibreglass matting can be a bit messy as well as tough on scissors, so it’s a good idea to have a pair specifically for this job. Lay out the chopped strand mat (that’s what the sheets of fibreglass are called) and cut a few pieces slightly bigger than the area you’re repairing. Cut neatly to achieve a clean finish and keep the cut mat pieces organised in a container until you’re ready for them.

Step 4: Mixing resin
Fibreglass is a blend of fibre matting and resin. The resin arrives in two containers – the resin itself and a hardener. When doing a repair job, it’s crucial to follow the resin manufacturer’s recommended mixing ratios exactly. One tip is to use a kitchen scale to measure the resin by weight so that you’re accurate. It’s advisable to cover the scale with a piece of plastic before you do this, just in case you spill some resin – it’s not easy to clean up. Start by mixing a small batch, because resin heats up from the chemical reaction during mixing. The more resin, the bigger the reaction and the hotter it gets – it can even melt plastic containers! Mix thoroughly to ensure proper activation.

Step 5: Applying resin and mat
You’ll need to work quickly once the resin is mixed or it will begin to harden. Apply a layer of resin to the damaged area, then place a piece of fibreglass mat onto the wet resin and dab it with a paintbrush until it changes from white to nearly transparent. Repeat this process, layering the mat and resin until the damaged area is completely covered. A small fibreglass roller can help to remove air bubbles.

Step 6: Curing and final touches
Fibreglass resin starts to harden relatively quickly, usually within 15 – 20 minutes, but it will take a few hours before it is properly cured and hard to the touch. When it is hard, gently sand any rough edges or wayward fibreglass strands to ensure a smooth finish and prevent any potential skin irritation.
While fibreglass repair may seem daunting, especially for beginners, it’s a really useful skill to have and it only gets easier (and less messy!) with practice. Remember, everything you need to work with fibreglass is available at Builders, both in-store and online at builders.co.za. If you gave any questions, the friendly staff will be happy to help you.
Browse 1000’s of products available to you. Select your country to Shop Online.


