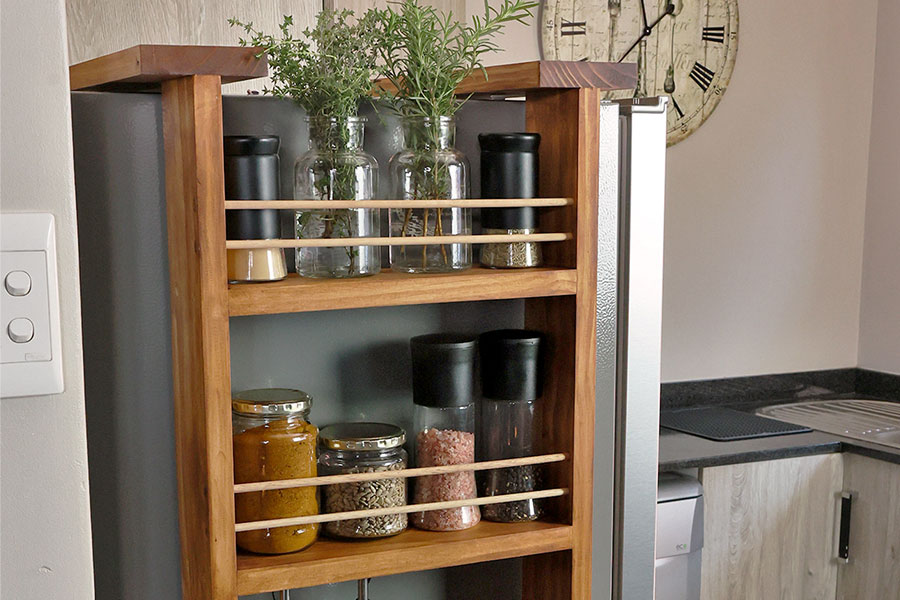
Make the most of the space around your fridge with this caddy DIY, using just two power tools!

Designed to make the most of the often-neglected space around your freestanding fridge, this project offers a practical storage solution for spices, everyday kitchen essentials and kitchen towels – right where you need them. Let’s dive in and see how you can achieve this using just two power tools!
The design is simple: a three-shelved fridge caddy made from a few metres of 22 mm x 94 mm PAR (planed all round) pine timber for the frame, 6 mm dowel rods for the shelf front supports and a short piece of 19 mm dowel rod for the bottom towel rail. You might need to adjust the dimensions based on your fridge size and storage needs.

Step 1.
Before we start, remember that this caddy hangs off the top of the fridge and leans against the side.
Start your project by measuring and cutting.
First, measure your fridge.
- Remember, this rests on top of your fridge, so you need to measure that first. Measure the width, considering any top-mounted door hinges or air vents that could get in the way. The fridge we used when doing this DIY has a max width of 420 mm. We made ours a bit smaller than that, 344 mm wide, to accommodate the top handles.
- Measure the height. We made our caddy 720 mm, so that the bottom of it is at 720 mm from the top of the fridge.

Step 2.
Once you have measured your fridge and decided on the dimensions of your caddy, cut the timber. Measure and cut each piece one at a time for accuracy. These are the dimensions for our example:
- Sides: 2 x 720 mm.
- Shelves: 3 x 300 mm (for a total caddy width of 344 mm, with the addition of the two 22 mm sides).
- Top supports: 2 x 360 mm (half the fridge width plus 94 mm, so that they extend out).
- Don’t worry if you don’t have a table saw or mitre saw. You can make these few cuts using a mitre box and hand saw. Secure the mitre box to a workbench for stability.

Step 3.
Lay out the pieces and decide how high you want the shelves and how far apart you want them. Think about what you’ll keep on the shelves before you make this decision. Measuring from the top end of the side pieces, we had our shelves 150 mm, 360 mm and 630 mm down. Use a square to draw lines for the shelf placements.

Step 4.
Mark the positions for the 6 mm dowel rods on the shelves, which are there to prevent bottles and things from falling off the shelves. We put ours 20 mm and 40mm above the shelves, with a third 90 mm above the bottom shelf. Measure and mark 10 mm in from the edge for drilling.

Step 5.
For the towel rail, mark a 19 mm hole 25 mm from the bottom end, which will leave enough space for your hand to get in and hang the towel.
Step 6.
Before you drill any holes, clamp the side pieces together. This will ensure that the holes will line up. Using the Einhell drill driver, drill 6 mm holes for the shelf dowels and a 19 mm hole for the towel rail. Also drill 3 mm pilot holes for the shelf screws. Countersink the 3 mm holes for the screw heads to sit below the timber surface. Now unclamp these planks.

Step 7.
Measure and mark the centre of the top support timbers. Clamp them together and drill 3 mm pilot holes, also countersinking them.
Step 8.
Before assembling, give all these timbers a sanding – it’s easier to sand now than when assembled. Since the timbers will be stained later with a water-based stain and sealer, wipe them down with a damp cloth before sanding. This moisture causes the timber fibres to stand up, which makes it easier to sand. It also prevents the fibres from standing up after applying the water-based sealer.
To sand, use an Einhell Multitool with the sanding head attachment. Start with 80 grit sandpaper to remove any rough timber and imperfections aggressively, followed by 120 grit to achieve a super smooth finish.

Step 9.
Now start the assembly. Place the two side pieces front side down (the front is the side with the holes for the front shelf dowels). Apply wood glue to each of the shelf sides and place them between the two side pieces. Use two clamps to hold all the pieces together. Once everything is aligned and square, secure the shelves with 4 mm x 50 mm screws.

Step 10.
Next are the top supports. Apply wood glue between the mating surfaces and fasten with 4 mm x 50 mm screws.
Step 11.
At this point, choose whether or not to fill all the countersunk screws with wood filler. If you do, fill the holes, let the wood filler dry and then give these areas a light sanding for a uniform finish.

Step 12.
Before fitting the dowel rods for both the towel rail and front shelf dowels, stain the caddy shelves, sides and top supports with a stain and sealer in one, like Fired Earth Wood Works in Imbuia colour. Keep the dowel rods in their natural colour to create a bit of contrast.
When applying Wood Works, work fast as the stain soaks in almost immediately and any run marks need to be worked out quickly. Use a sponge and a latex gloves to avoid staining hands. Working uniformly ensures even coverage as staining continues.

Step 13.
While that dries, hand sand the 6 mm and 19 mm dowels using the old sanding disk from the sander attachment.
Step 14.
Once the caddy is dry, fit the dowel rods. Push a 6 mm dowel rod through a hole and place a drop of wood glue on the dowel rod before pushing it through the hole on the other side. Trim to length with the Multitool. Repeat for all the remaining dowels, including the 19 mm dowel for the towel rail. If necessary, give the ends a light sanding and touch up with the Woodworks stain.

Step 15.
To seal and preserve the decorative wood finish, apply a clear matte coat of Rust-Oleum Ultra Cover 2X Spray Paint. Look at how the two-tone effect of the dowels versus the stain just pops!
Step 16.
The final step before hanging the caddy is to attach some silicone rubber pads to the back of the caddy and under the top supports. These pads will prevent direct contact and possible scratching on the fridge. The non-slip surface of these pads will also help reduce any movement of the caddy.
And that’s it! With two power tools and some hand tools, we’ve made this very useful caddy that will give extra usable space in the kitchen and looks great too. Remember, everything you need for your next DIY project, including a full range of Einhell power tools, is available from Builders, either in-store or online at Builders.co.za.
Browse 1000’s of products available to you. Select your country to Shop Online.


