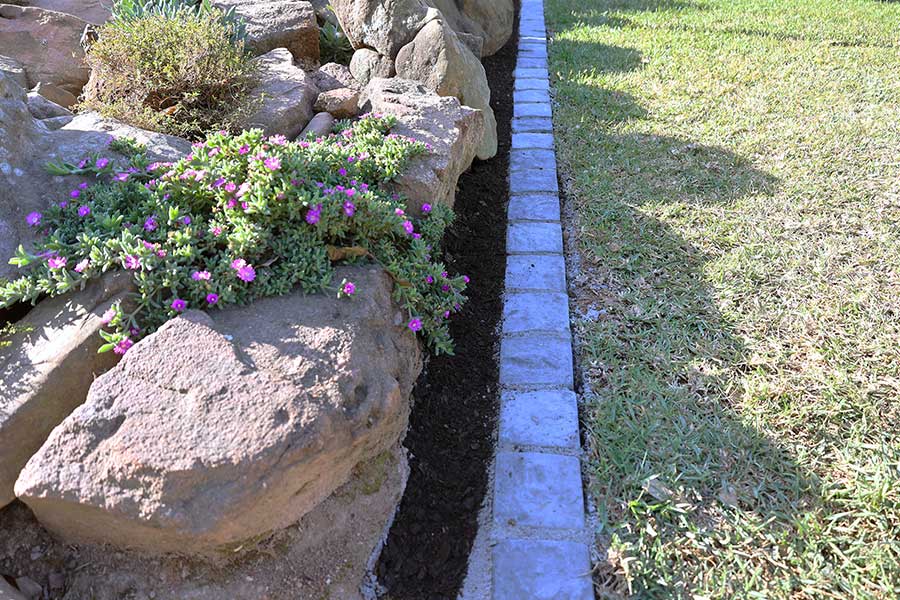
This old-school paving technique will add a really classy finish to your garden.
Hard landscaping doesn’t have to be hard work, but it can certainly make an area of the garden stand out. Cobblestone edging is a great way to turn a boring transition, like where a lawn meets a rockery, into a feature. Here’s how to do it.
- Stakes and fishing line/builder’s line
- Spade and pick
- Rubber mallet
- Trowel and float
- Cement (preferably black, for the higher curing strength)
- River sand
- Cobblestones
- Spirit level
- Garden Master potting soil

Step One
Start the preparation by hammering in stakes and running a fishing line where you want the cobblestones to sit. Straight lines look great with cobbles and this is obviously easier to do than curves.

Step Two
Cut and remove the lawn with a spade, digging the area lower and wider than an actual cobblestone. Cobble should be laid in concrete, so you need a good 30–40 mm depth below the stone to form a decent foundation. (You could lay the cobblestones straight onto the existing soil, but they would sit proud of the lawn. It’s better to have them flush with the grass level.) Using a pick to gently break the surface is the easiest way to gain some depth for the foundation. Don’t loosen or remove a lot of soil at once, though; take off a bit at a time so that you keep a solid surface of hard soil to pave on.

Step Three
Once you’ve reached the required depth, remove any loose soil and neaten up the surface and edges.
Step Four
Stamp the surface to make it firm and flat. If the ground is really hard, give it a watering to soften the upper layers before stamping. You don’t want any stones sticking up that would get in your way and cause unlevel cobbles.

Step Five
Next, mix up the concrete. Use black cement, which has a higher curing strength compared to blue cement. Mixing the dry ingredients first is the easiest way to ensure an evenly blended mixture – we recommend a ratio of 1 part cement to 2 parts sand. Don’t add too much water; you want a fairly thick consistency. Lay the freshly mixed concrete into your dug area, shape and level it out with a trowel and press it firmly into place with a float, ensuring a uniform surface where the cobbles will be laid.

Step Six
Place the first cobblestone into the concrete and give it a firm knock with a rubber mallet (not a 4-pound hammer!) to ensure it is properly bedded into the concrete. Flip the float onto its side and use its thickness to create a small gap between the next stone, then simply repeat this as you go along. This gap, when filled with concrete, will bind the cobbles on the sides and not just the base, giving a stronger hold with less chance of movement. Use your fishing line as your guide, take your time and ensure each block is correctly placed before moving along.

Step Seven
Cobblestones are often not smooth on top, so it’s virtually impossible to use a spirit level on an individual stone. Once roughly a metre of stone is laid into the concrete, place a spirit level across the top and tap the level with the mallet. This ensures that the tops of the stones are at the same height. Follow the contour if your area has a slight rise and fall. The fishing line also serves as a guide for the outer edge of the stones, keeping everything neat.

Step Eight
Continue with the process of concrete, laying the next cobble, tapping it into place and repeating. The gaps between the cobbles should fill up with concrete as you tap them into place. If there’s still a gap, fill it with a little more concrete to hold everything together and to look well finished.

Step Nine
Once done, brush the cobbles clean of any concrete spillages (which will happen!). Shape the concrete away from the top of the cobbles, so that the base is wider than the cobble. This will guide water away from the cobbles, reducing potential washaways and the chance of collapse.

Final Touches
The last step is to take some Garden Master potting soil and backfill behind the blocks, raising the level of the flower bed to just below the tops of the pavers. Brush off any excess spillage for a tidy finish.
Simplicity really is key and sometimes simple DIY projects like this can have a big impact on the visual outcome of an area. Just because this falls into the hard landscaping category, doesn’t mean it’s particularly hard work either – we finished this in a morning. Builders stocks a variety of paving options, so visit your local branch and have a look.
Browse 1000’s of products available to you. Select your country to Shop Online.


