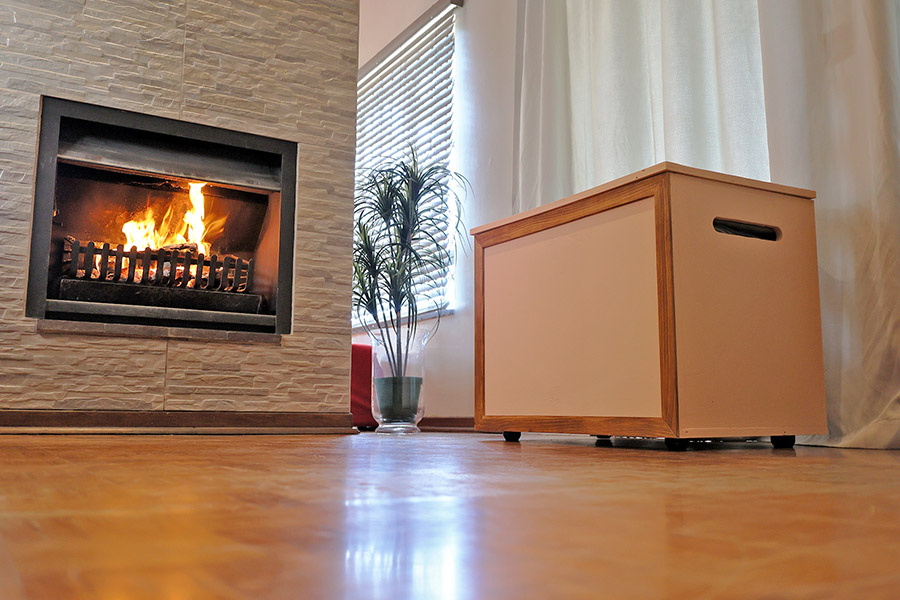
It’s so comforting to snuggle into a warm blanket in winter, but you really don’t need blankets all year round. Here’s where to store them…

Cutting List:
Sheet of 18 mm plywood cut to:
- 2 x 800 mm x 560 mm (front and back panel)
- 2 x 560 mm x 460 mm (side panels)
- 1 x 800 mm x 500 mm (base)
- 1 x 820 mm x 510 mm (lid)
8 mm x 44 mm pine cover strips cut at 45° angles to:
- 2 x 580 mm
- 2 x 800 mm

Step 1.
Cut the sheet of plywood according to the cutting list. Using a cordless DeWalt circular saw makes easy work of ripping the sheet into the required sizes. Battery-powered tools are excellent for portability and the same battery can be used across multiple power tools.

Step 2.
Cut out the recesses for the handles. Mark the centre of the handle and drill 2 x 35 mm holes with a spade bit, one on either side of the centre. Using a ruler and pencil, draw a line connecting the upper and lower edges of the holes, creating a round-edged rectangle, large enough for your hand. With the DeWalt multitool and the plunge-cut attachment, cut along these pencil lines. This tool is versatile and changing attachments is quick.

Step 3.
Fit the sanding attachment to the DeWalt multitool and give all the plywood a quick sanding to remove any rough edges, especially along the cut lines. Brush off the sawdust once you are done sanding and then give the timber a wipe with a damp cloth.

Step 4.
It’s time to assemble the chest. Before you get started, label the pieces with masking tape to avoid confusion during assembly. Start by assembling the four sides. This is easier if you have someone to hold the pieces together, but if you’re alone you can use a clamp to hold the panels in place. Drill a pilot hole with a speed pilot bit to recess the screw heads, then screw the panels together using 4 mm x 50 mm screws. Repeat this process for all four corners and add one screw midway up the edge.

Step 5.
To attach the base, flip your masterpiece over and secure it with a screw in each corner as well as one in the middle of each edge. Fill the screw holes with wood filler and give them a light sanding once the filler has dried. Set the lid aside for now – you will attach it after painting.

Step 6.
For a decorative touch, add cladding to the front outer edges of the chest using the 8 x 44 mm cover strips as per the cutting list. Remember – these were cut at 45° for a classy mitre join. Give these a quick sanding for a neat finish.

Step 7.
The chest is now partially assembled with recessed handles and decorative cladding. We can now paint and finish it. Apply an even coat of universal undercoat to the entire chest, including the lid. Without an undercoat, the topcoat may appear patchy as the wood can soak in the paint at different rates.

Step 8.
Once the undercoat is dry, give the chest two coats of topcoat. Fired Earth has a great colour called ‘Tranquility’ in their Colour Burst paint-tint range; this was inspired by Pantone’s Colour of the Year 2024, Peach Fuzz. It’s the perfect colour to give wood a trendy and warm finish. Simply add a sachet of the tint to 5-litres of Fire Earth white paint, mix the paint well to ensure an even colour and apply with a brush or roller. Two coats are needed for uniform coverage.

Step 9.
While waiting for the paint to dry on the chest, stain your decorative cladding with Fired Earth Wood Works in the Imbuia colour. This is a water-based stain and sealer. Apply it with an old rag, working quickly to avoid run marks.

Step 10.
Once the topcoat is dry, secure the butt hinges to the inside of the lid and the rear panel of the chest, making sure that the rear of the lid panel sits flush. When working with small screws, set the clutch on your drill driver to the lowest number and only increase the torque if necessary to get the screws all the way in. The overhang on the front and sides doubles as a handy grip for lifting the lid. Attach the cladding with panel pins, creating a square border around the front. A small, lightweight hammer gives better control and makes this delicate job much easier.

Step 11.
You can leave your storage chest as is or add plastic feet to lift it off the ground and prevent it from scratching floors.
This DIY is done! All that’s left is to bring the chest into the house and load it up with winter blankets somewhere where you can grab them when a cold front sets in.
Everything you need for this DIY, including the timber, the Fired Earth products and the DeWalt tools, is available from Builders, both in-store and online at builders.co.za.
Browse 1000’s of products available to you. Select your country to Shop Online.


