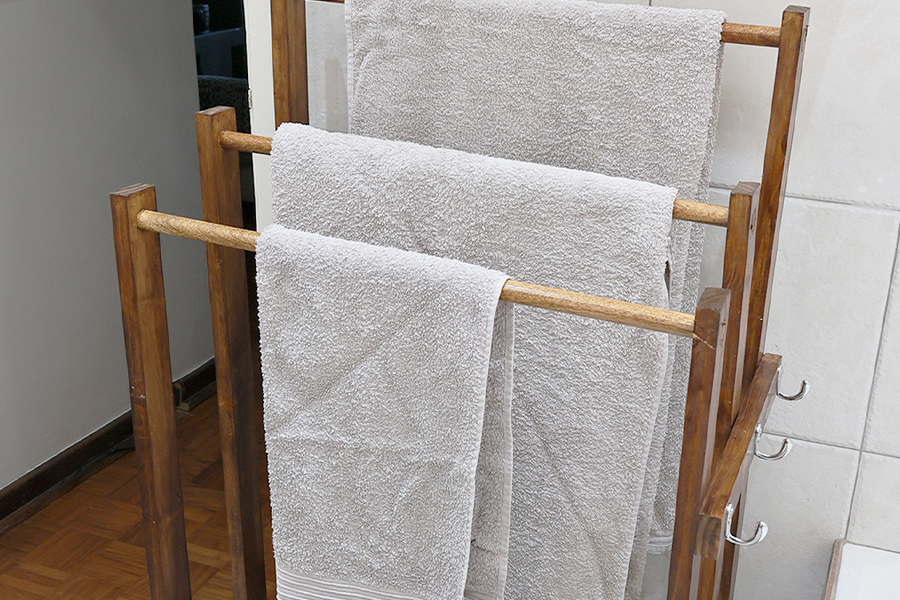
Say goodbye to piles of wet towels with this easy DIY towel rack. Perfect for both bathroom or poolside use, this trendy and practical DIY build will keep towels neatly organised and within reach. Because we like uncomplicated designs, this is an easy build too.

Materials Needed:
- 5 x 2.4 m lengths of 22 mm x 44 mm Planed All Round (PAR) Pine timber for the frame and shelf
- 3 x 19 mm dowel rods for the towel cross pieces
Cutting List:
- 2 x 22 mm x 42 mm x 1200 mm (rear uprights)
- 2 x 22 mm x 42 mm x 1000 mm (front uprights)
- 2 x 22 mm x 42 mm x 750 mm (middle uprights)
- 2 x 22 mm x 42 mm x 600 mm (front and rear of shelf)
- 8 x 22 mm x 42 mm x 340 mm (slats for shelf and cross brace)
- 3 x 19 mm x 600 mm dowel rods

Step 1:
Measure, mark and cut all pieces according to the cutting list. It’s important to use as much of the timber without too much wastage – on some lengths, the offcut can be used for one of the shorter lengths. Think smart and reduce wastage.
When using a circular saw to cut timber, adjust the blade to a depth slightly deeper than the timber thickness. This ensures a clean cut without tear-out and reduces strain on the saw, especially with hardwoods. The DeWalt Cordless Circular Saw has a maximum cutting depth of 55 mm, so this 22 mm timber is well within the cutting range. This saw also features quick blade stops for extra safety. While a jigsaw could work, a circular saw is quicker and gives a squarer cut.

Step 2:
Using a 19 mm spade drill bit, drill holes for the dowels on all the upright timber pieces now, so that when you apply sealant, it goes into these holes too. To make sure the holes line up on all of the uprights, clamp two upright pieces together. Measure 20 mm from one end and drill a hole through one piece, in the centre. The point of the spade bit will make a mark on the second piece. Remove the first piece and clamp a third piece below the second piece and repeat until all the uprights are drilled through. This method saves time and effort.

Step 3.
Sealing timber can be done before or after assembly but we prefer staining and sealing before assembly to make sure the sealant gets everywhere. PAR timber is already smooth from the sawmill, but needs light sanding before any timber treatment (painting, staining or sealing). Sand using the DeWalt Multitool with a sanding attachment and a 120-grit pad. For a smoother finish, follow up with 180-grit sandpaper.

Step 4.
For untreated PAR timber, seal inside the overlaps to prevent wood rot. If the timber was treated, varnishing after assembly would suffice. Use a brush seal timbers with Fired Earth Gloss Varnish in Imbuia colour (which is a stain and varnish in one). The first coat dries quickly and the second coat should be left to dry overnight. The dowel rods will be sealed with clear varnish to retain their natural colour.

Step 5.
Time to assemble our project. We’re going to start by building the slatted shelf. Place the shelf front on the bench and position an offcut flat against the side. Place the first short length or side piece on the inside of this, drill your pilot hole and secure with the 4 mm x 40 mm decking screws. Then attach the second long side and do the same. These decking screws are a bronze colour but what is really nice, is that they have a small head. These screws blend in very well – you don’t need to countersink and then fill with wood filler. It is much quicker this way. For soft wood like pine, be careful that you don’t screw the screw right through the wood. A tip is to set the clutch on your drill to a low setting to make sure this doesn’t happen.

Step 6.
Now you have a rectangle. Leave a 68 mm gap from the front slat and secure the second slat, repeating this all the way until you have the shelf completed.
Step 7.
To attach the legs, measure and mark 300 mm from the base of each leg. Remember, the hole for the dowels is at the top. Secure the four legs to the shelf with screws.
Step 8.
Attach the middle uprights flush with the shelf – they don’t touch the ground.

Step 9.
Look at that! It’s starting to take shape. Next, attach the dowel rods. To do this, put some wood glue on the inside of the dowel rod holes on the uprights and insert a dowel rod, twisting to spread the glue. You can trim the excess with a hacksaw, but this is where the multi-tool excels. Simply swap out the head attachment and trim the edges neatly. If you scratch the sealant, it’s easy enough to touch up, but try to be careful.

Step 10.
Attach the cross brace on the side to support the uprights.
Step 11.
Screw hooks onto the cross brace so there’s space to hang items such as swimming goggles or a shower cap, depending on where you use your now-complete towel stand.
You’ll notice that we used DeWalt WR tools in this DIY. One battery fits any power tool in the range, so it was easy to switch from circular saw to drill to multitool.
Browse 1000’s of products available to you. Select your country to Shop Online.


