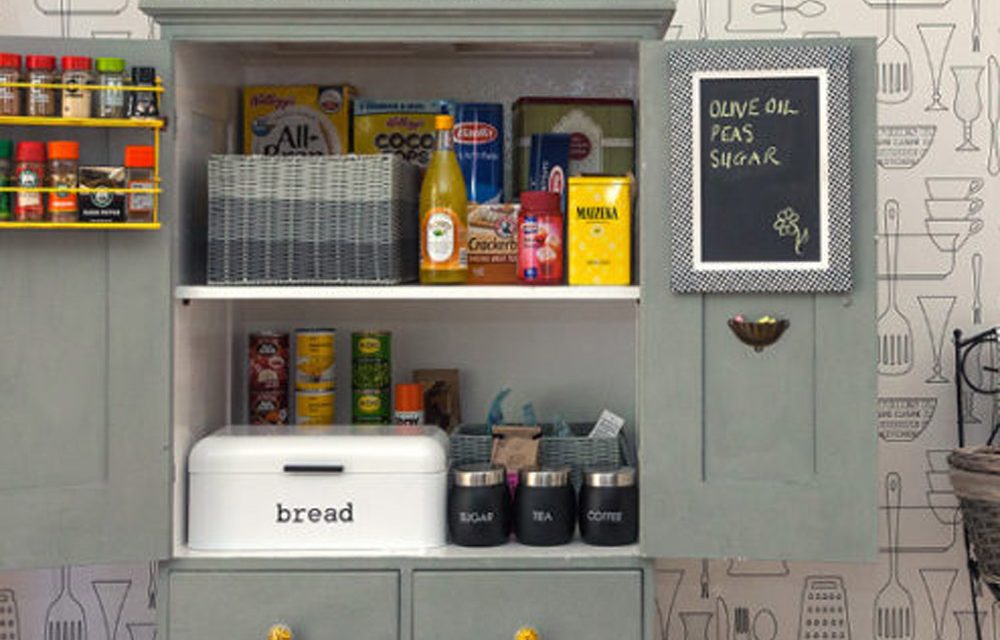
Before you throw your old TV cabinet out, there are a few things they’re good for. Here’s one idea: turn it into a pantry.
For the cupboards:
Materials you will need:
- Fired Earth chalk paint – Gauloise Grey
- Fired Earth clear wax
- Multi sander
- Modo universal undercoat
- Modo non-drip gloss enamel – white
- Academy Decorator mock mohair roller and tray
- Cutting-in brush
- Bloc-It painter’s tape
- Door knobs
- Drill
- Screwdriver
Step 1
Remove the fittings and put them in a safe place for use later.
Step 2
Prepare your clean surface by sanding the cabinet with a fine-grit sandpaper (around 120-grit will do), then wipe off dust with a damp cloth.
Top Tip: This job goes much quicker if you use a multi sander rather than tackling it by hand.
Step 3
Apply a single coat of Modo universal undercoat. Allow this to dry overnight.
Step 4
Paint the inside of the cabinet with Modo non-drip gloss enamel. Give it at least two coats, allowing each coat to dry thoroughly.
Step 5
Paint the outside of the cabinet and drawers with two coats of Fired Earth chalk Paint. We used Gauloise Grey, which is a soft grey with a slight green undertone. Start by cutting in the fiddly areas.
Top Tip: Chalk paint dries quickly so work in small sections, cutting in first and then painting using your roller. The mock mohair gives a finely stippled texture which is very pretty.
Step 6
Use a roller for the big flat areas. Make sure each coat is completely dry before moving on to the next step.
Step 7
Now it’s time to seal your surface with wax. Use a soft cloth and rub in a thin layer of the wax. Be careful not to leave lumps of wax. Allow this to dry for eight to 12 hours before applying a second coat.
Step 8
Once the second coat of wax is dry, buff it to a sheen.
Step 9
Screw in your new doorknobs.
Step 10
Reassemble the hinges and hang the doors.
If you want a distressed look, lightly sand the edges of the cabinet after the first coat of wax. Then seal with a second coat of wax. You can give the chalk paint a darker, richer look by using dark wax as your second wax coat. Try this out on a small piece first to make sure you like the effect.
For the shelf
Materials you will need:
- 19mm laminated pine shelving
- Dulux wood primer
- Modo non-drip gloss enamel
- Multi sander
- 50mm paintbrush (or roller)
- Hammer
- Shelf nails
Pre-measure the inside width and depth of your TV cabinet to get the shelf measurements, then pop into a Builders store. Laminated pine shelving comes in three-metre lengths and you can just ask the assistants in the wood department to cut it to size for you. When measuring the depth of the cabinet, remember that you need to leave space for the doors to close.
Step 11
Sand the shelf on all sides, to get a smooth finish, then dust it off thoroughly and wipe with a damp cloth.
Step 12
Raw wood needs to be primed. Use Dulux pink wood primer and give all sides of the shelf a single coat. Leave to dry, ideally overnight. Once the primer is dry, give the shelf a light sand to just smooth over the ‘hairy’ bits.
Step 13
Paint with two coats of enamel, allowing each coat to dry overnight.
Step 14
Measure the height at which you’d like to place the shelf and mark, then level it with a spirit level.
Step 15
Hammer in your shelf nails and fit the shelf.
To add a spice caddy
Materials you will need:
- Spice caddy
- Rust-Oleum Painter’s Touch 2x – yellow
- Rust-Oleum Painter’s Touch 2x – clear
Step 16
Give the spice caddy two coats of spray paint. Rust-Oleum Painter’s Touch 2x is super for the job as it’s a painter and primer in one and is suitable for metal, wood and plastic. It’s a good idea to finish with a glaze just to give that added protection. Use Rust-Oleum Painter’s Touch 2x clear.
Step 17
Measure and mark where you want to hang the spice caddy on the inside of a door of the pantry. Level with a spirit level.
Step 18
Drill the holes on your markers and hang the spice caddy.
To add a chalkboard
Materials you will need:
- An old picture frame with inner board
- Modo chalkboard paint – Panther Black
- Gecko duct tape – Houndstooth
- Brass cup handle
- No More Nails
Step 19
Remove the backing board from the frame and paint it with Modo chalkboard paint in Panther Black. Once the first coat is dry, apply the second coat. Make your brushstrokes rough so the chalk has something to grip on.
Step 20
Carefully cover your frame with Gecko duct tape. The frame we used had two tiers and, since it was white, we decided to leave the inner layer plain. But you can cover your frame completely as well and it will still look striking.
Step 21
Place the painted chalkboard into the frame and secure it snugly behind.
Step 22
Using No More Nails, adhere your newly framed chalkboard to the inside of the pantry door.
Step 23
Add a little brass cup handle if you like. No More Nails adhesive will hold it firmly enough.
Browse 1000’s of products available to you. Select your country to Shop Online.


